
What is 3D Needle Felting and How Does It Work
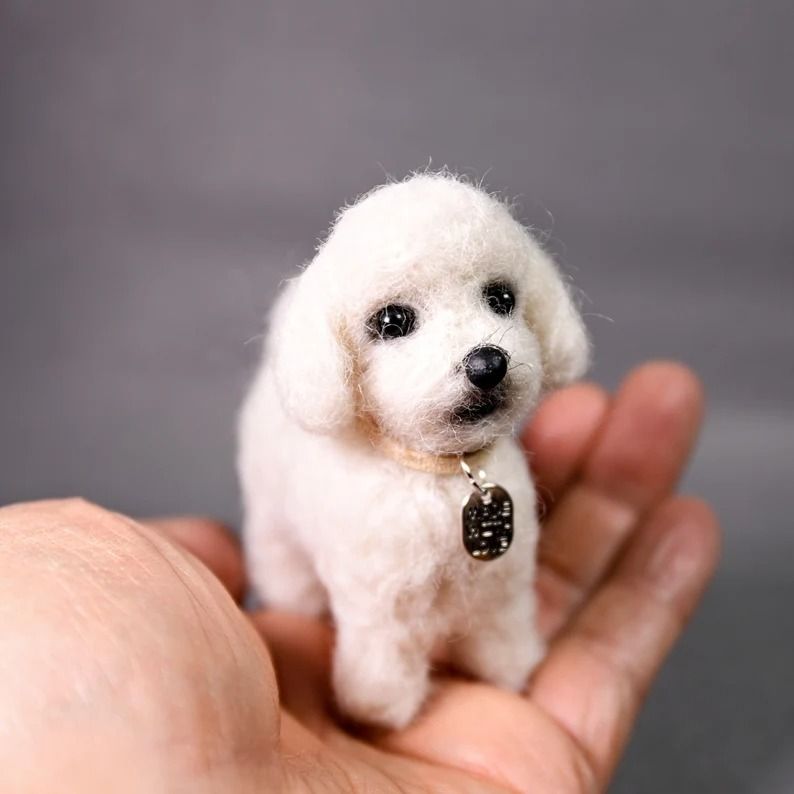
Needle felting 3D lets you transform soft wool into animals you can hold. Using a special barbed needle, you poke the wool repeatedly, causing the fibers to twist and stick together, allowing you to shape small legs or round faces. Many people enjoy needle felting 3D because it enables the creation of lifelike animals, including custom pet portraits. Beginners find needle felting 3D both fun and calming. If you want to try making animals, you’re in the right place. One brand, Pawimprint, specializes in needle felting 3D animal sculptures that look just like real pets.
Key Takeaways
3D needle felting uses a special barbed needle. It shapes wool into firm, detailed sculptures. You can make animals or toys. You do not need water or soap.
Different wool types and needle sizes help you build shapes. They also help you add small details. This makes your projects look real and special.
Start with simple shapes and layer wool carefully. This helps you make strong, smooth forms. Be patient and poke gently for better results.
Use a foam pad and finger guards to stay safe. Keep your workspace neat. This makes crafting easier and more fun.
3D needle felting gives you many creative choices. You can make pet portraits or ornaments. It helps you create special gifts and memories.
3D Needle Felting Basics
What is 3D Needle Felting
You may ask why 3D needle felting is unique. This craft lets you make sculptures from wool. You use a sharp needle with barbs to poke the wool many times. Each poke helps the wool fibers stick together. The barbs grab and twist the fibers, so you can shape the wool. You can make animals, toys, or tiny people. You do not need water or soap for this craft. You only need your hands, some wool, and a needle.
Here’s how 3D needle felting works:
Different needle sizes help you make shapes or add details.
Wool fibers come in many types. Some are strong and smooth. Others are soft and fluffy.
You build shapes by layering wool and poking it again and again.
The more you poke, the firmer and denser your project gets.
3D needle felting is special because you can make almost anything. You can create animals, toys, or even pet portraits. Many people like to make projects that look like their pets.
How Needle Felting 3D Works
Let’s see how 3D needle felting is different from other felting. Look at this table:
Aspect |
3D Needle Felting |
Wet Felting |
Nuno Felting |
|---|---|---|---|
Materials Used |
Wool roving or batting; foam pad; special notched needles |
Protein fibers (wool) with hot water and soap |
Protein fibers plus fabric (silk, linen, open-weave fabrics) |
Process |
Repeated stabbing with a notched needle to entangle fibers without water or soap |
Agitation with hot water and soap to open fiber scales and interlock fibers |
Wet felting with fabric incorporated, pressing fibers through fabric before agitation |
Fiber Types Allowed |
Wool and a wider variety including plant and man-made fibers (as long as stab-able) |
Primarily protein fibers with scales (wool) |
Protein fibers with fabric base |
Results |
Textured, sculptural 3D objects; poke holes visible; detailed and portable work |
Smooth, flat textiles like scarves, hats; energy-intensive; large flat pieces |
Felted fabric combined with fabric, creating textured textile surfaces |
Suitability |
Ideal for 3D sculptures, wool paintings, embellishments; portable and detailed |
Efficient for large flat textile pieces; smooth finish |
More involved process; fabric choice affects difficulty |
Physical Effort |
Low to moderate; repetitive stabbing; can be done anywhere |
High; requires physical agitation and energy |
Similar to wet felting but with added fabric handling |
With 3D needle felting, you work dry and can shape your project anywhere. You can make detailed animals or small decorations. You can use many kinds of wool and mix fibers for cool effects. Each project starts with simple shapes, like balls or tubes. You add more details as you go.
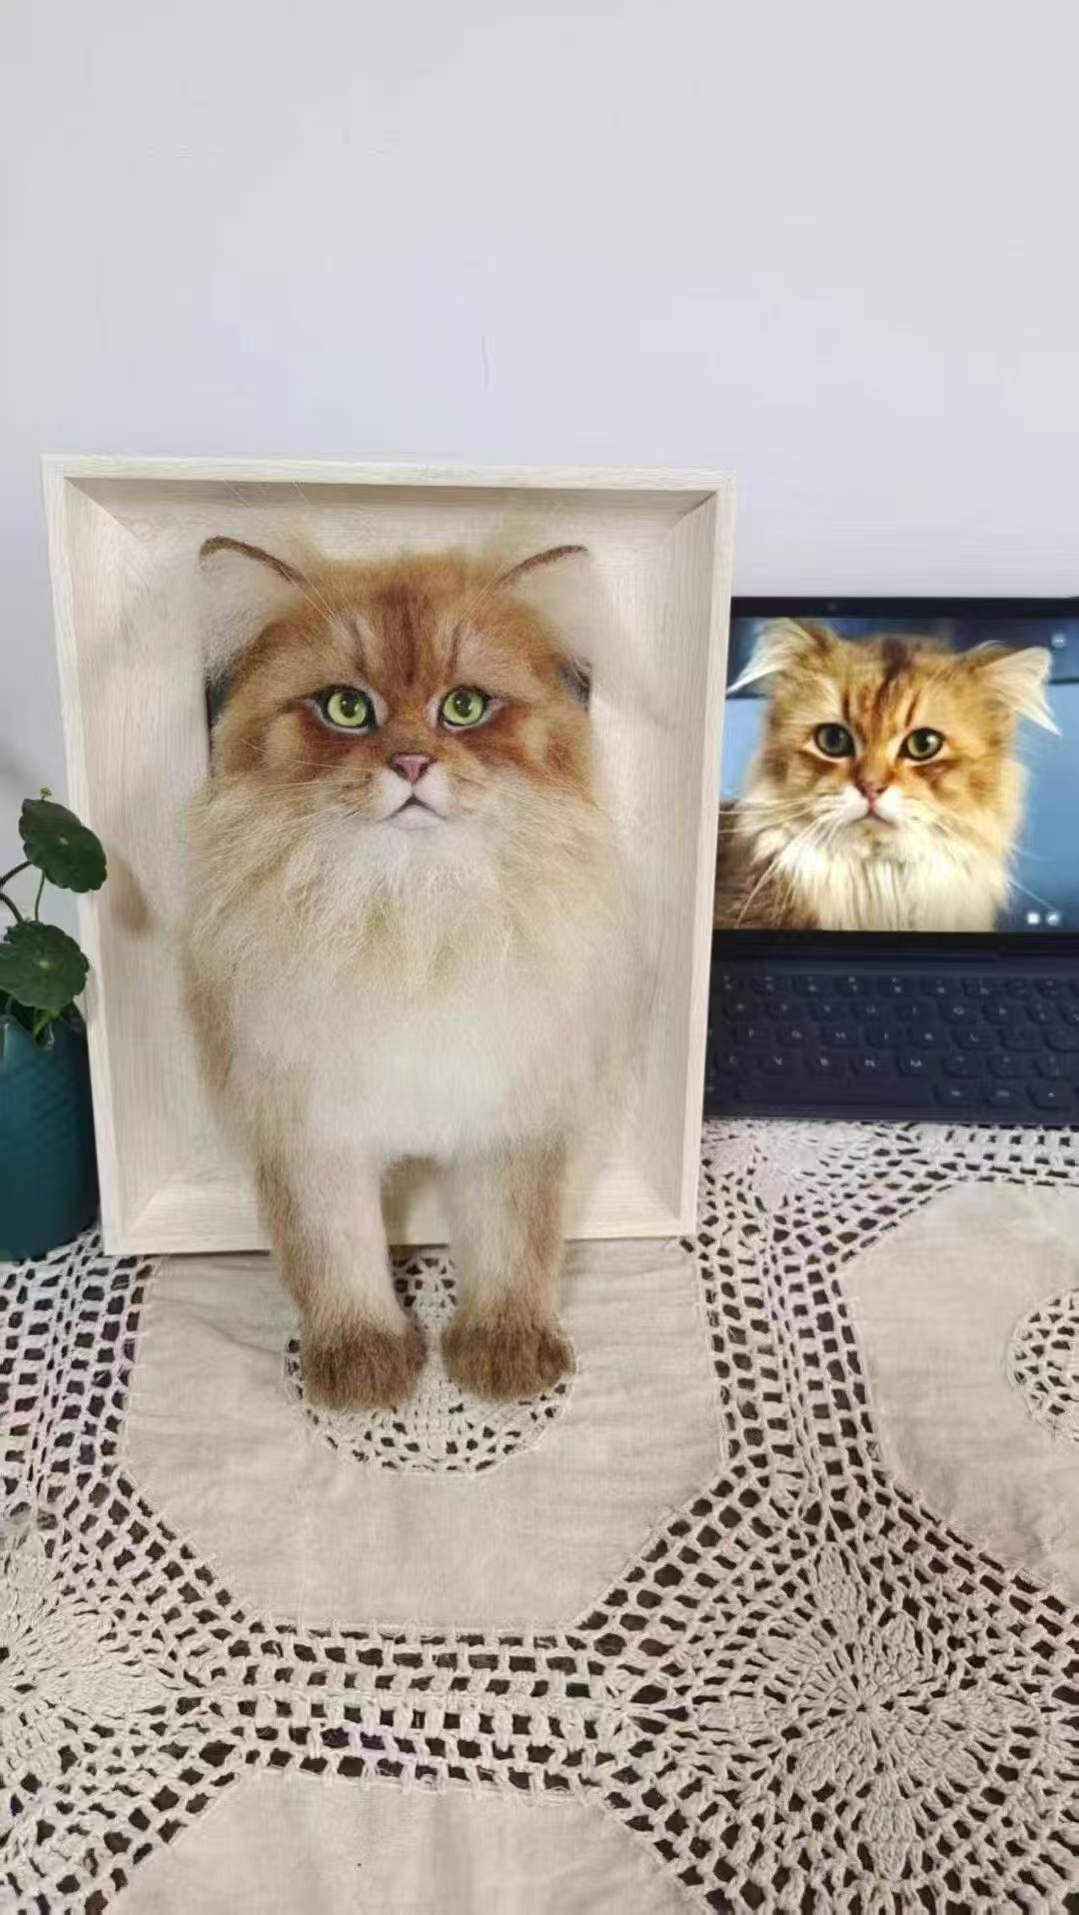
If you want to see what you can make, check out Pawimprint. They use 3D needle felting to make pet portraits. Their artists turn animal photos into wool sculptures. Each project shows your pet’s look and personality. You can pick full-body animals, photo frames, or keychains. Pawimprint shows how 3D needle felting can make special gifts and memories.
Tools & Materials
Wool Types for Needle Felting 3D
When you start needle felting, you’ll notice there are many types of wool. Each type works best for a different part of your project. For the core, carded wool like Corriedale or Jacob is perfect. This wool has short fibers that tangle quickly, so you can build shapes fast. If you want to add color or fine details, try using wool tops or roving. Merino wool is very soft and comes in many colors, making it great for realistic fur or finishing touches.
Here’s a quick look at some popular wool types:
Wool Type |
Softness |
Felting Speed |
Best Use |
|---|---|---|---|
Merino |
Very soft |
Slow |
Details, color, finishing |
Corriedale |
Less fine |
Quick |
Core shapes, base structure |
Jacob |
Medium fineness |
Easy |
Core, natural color variation |
Blue Faced Leicester |
Soft with shine |
Moderate |
Surface details, color effects |
Alpaca |
Very soft |
Slow |
Soft outer layer, special touch |
Natural wool is also better for the environment than synthetic fibers. It’s biodegradable and compostable, so your needle felting projects stay eco-friendly.
Felting Needles & Accessories
You can’t do needle felting without special needles. These needles have tiny barbs that grab and tangle the wool fibers. Needles come in different shapes and sizes. Thicker needles (like 36 gauge) help you shape the wool quickly. Finer needles (like 40 or 42 gauge) are best for adding small details and smoothing the surface.
Common needle types include:
Triangle needles for general use
Star needles for faster felting and joining pieces
Spiral needles for smooth finishes
You’ll also need a foam pad or wool mat. This protects your fingers and gives you a firm base for needle felting. Needle holders let you use more than one needle at a time, which speeds up big projects. Finger guards or leather gloves help keep your hands safe.
Tip: Always poke the needle straight in and out. Bending the needle can cause it to break.
Needle felting kits often include a variety of needles, wool, and a mat. These kits make it easy for beginners to get started. Here’s a chart showing the price range for some popular needle felting kits:

Workspace Setup
A good workspace makes needle felting safer and more fun. Choose a flat, stable table with plenty of light. Keep your tools and wool organized in clear bins or boxes. Always use a felting mat to protect your table and your hands. Store your needles in a case when you’re not using them. This keeps them sharp and out of reach of kids and pets.
Take breaks to rest your hands and eyes. Keep your area tidy to avoid accidents. If you use a wool mat instead of foam, you help the environment by reducing plastic waste.
Safety first! Wear finger guards, work slowly, and always know where your fingers are before you poke.
With the right tools and setup, you’ll find needle felting easy and enjoyable. You can create amazing animals, gifts, or even custom pet portraits with just a few simple supplies.
Needle Felting 3D Process
How to Start the Needle Felted Form
Ready to dive into your first needle felting 3D project? Let’s walk through how to start the needle felted form. You’ll need your wool, felting needles, and a foam pad. Here’s a simple step-by-step guide to get you started:
Pick the colors of wool roving you want for your project. For the core, undyed core wool works best because it felts quickly and shapes easily.
Pull apart small sections of wool. This makes it easier to roll and shape.
Place your foam pad on a flat surface. This keeps your table and fingers safe.
Roll the wool tightly into a ball or oval. For a mouse, start with a small oval for the body and a rounder ball for the head.
Use your felting needle to poke the wool evenly. Short, quick stabs work best. The more you poke, the firmer the wool gets.
Fold the edges over as you work to keep the shapes smooth. Peel the wool up from the pad now and then so it doesn’t stick.
Start with less wool. You can always add more, but you can’t take it away once it’s felted.
Tip: If you feel nervous about handling the needle, try a needle holder for a better grip.
You can use both roving and batting for the core. Batting often gives smoother edges. For tiny shapes like a mouse’s nose or tail, a bamboo skewer helps you roll the wool tightly. Remember, patience is key. Take your time and enjoy the process.
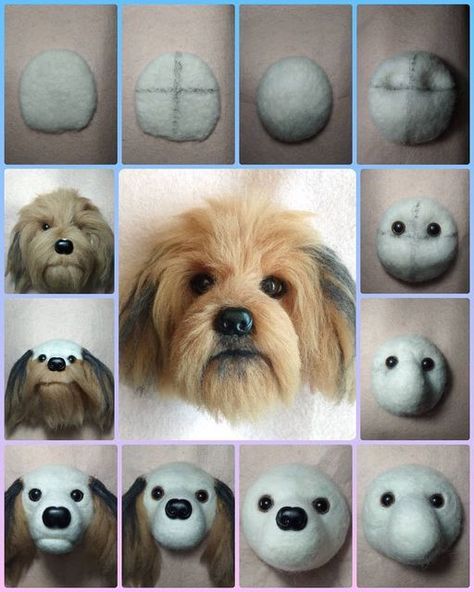
Shaping the Needle Felted Sculpture
Now you have the basic shapes for your mouse. Let’s move on to shaping the needle felted sculpture. This is where your mouse starts to look real!
Use your fingers and the needle to sculpt the wool. Push and pull the wool to get the right shape.
For the body, keep poking until it feels firm. Don’t overfelt at this stage. You want to keep it workable for adding details.
Attach the head to the body by placing the nose forward and wrapping a thin strip of wool between them. Needle felt the neck area until it feels secure.
Add more wool in thin layers to build up the body, head, and limbs. This layering technique helps you control the size and shape.
For making animal limbs, roll small pieces of wool into tubes. Attach them by leaving a bit of loose wool at the end and felting it onto the body.
Use different needle sizes for different jobs. Start with a coarse needle (like 36 gauge) for shaping, then switch to finer needles (like 40 gauge) for details.
If you want your mouse to stand or pose, you can add a wire armature inside the limbs. This helps keep the shape strong.
Note: Always stab the needle straight in and out. Bending the needle can cause it to break.
Artists often use reference photos or sketches to get the anatomy right. You can also use glass eyes or tiny beads to make the eyes look lifelike. For fur texture, try a reverse needle or a dog brush. Layering techniques with different colors of wool help you create realistic shading and markings.
How to Finish Off the 3D Needle-Felted Mouse
You’re almost done! Here’s how to finish off the 3d needle-felted mouse and give it that polished, adorable look:
Shape the head and body into egg forms by wrapping more wool and sculpting with your needle.
Keep adding wool and felting until the mouse matches the size and shape you want.
Attach the head to the body by wrapping wool between them and felting it to form a neck.
Make the ears by rolling small flat pieces of wool, then felting them into thin, round shapes. This is how to make the felted ears stand out.
Attach the ears, limbs, and tail by felting the loose ends onto the body. Use a fine needle for these details.
Add craft eyes or tiny beads for a lifelike look. You can also use chenille stems for the tail or whiskers.
Trim any stray fibers with scissors or a fabric shaver for a neat finish.
For extra cuteness, add accessories like a tiny hat or a felted mouse house.
Tip: Use a fine needle for the final touches. This helps smooth the surface and compact the wool.
Here’s a quick table to show how long these projects usually take:
Project Size |
Description |
Average Time Required |
|---|---|---|
Small Projects |
Simple shapes (like a mouse) |
|
Medium Projects |
More detailed creations |
4 to 8 hours |
Large Projects |
Intricate sculptures |
Several days |
Practical Tips and Common Mistakes for Beginners
Needle felting 3D is fun, but beginners sometimes run into trouble. Here are some practical tips to help you succeed:
Always use a felting cushion to protect your hands and your project.
Use short, quick stabs with the needle. Deep stabbing can break the needle or damage your shapes.
Start with less wool. Adding is easier than removing.
Choose the right needle for each step. Coarse needles shape, fine needles detail.
Pick the right wool. Avoid Superwash wool because it won’t felt.
Store your supplies in a safe place to keep them clean and sharp.
Be patient. Projects often come together late in the process. Don’t rush.
Start with simple projects before moving to complex ones. This helps you master the basic techniques.
If you poke your finger, take a break and use finger guards next time.
Remember: Everyone makes mistakes. Each project teaches you something new!
Common mistakes include using too much wool at once, not felting evenly, or breaking needles by bending them. Beginners sometimes pick advanced kits too soon. Start with easy shapes and beginner kits to build your skills. Rushing can lead to lumpy shapes or uneven density. Take your time and enjoy creating your 3d piece.
Needle felting 3D lets you turn simple wool into amazing animals, gifts, and decorations. With practice, you’ll create needle felted sculptures that look lifelike and full of personality. Try different layering techniques and shapes to see what you can make. Every project helps you get better and brings your ideas to life!
Tips & Troubleshooting
Beginner Tips for Needle Felting 3D
If you are new to needle felting, you might feel a little nervous about starting your first project. Don’t worry! Many beginners feel the same way. Here are some tips to help you get great results and enjoy your needle felting journey:
Always use a felting mat or foam pad. This keeps your fingers and table safe.
Hold your needle upright and poke straight up and down. This helps prevent broken needles and keeps your shapes neat.
Start with simple shapes. Balls and tubes are perfect for beginner projects.
Add wool in thin layers. Thick clumps can make your shapes lumpy or uneven.
Try the squeeze test. Your project should feel firm and spring back when you press it.
Take your time. Needle felting works best when you go slow and check your work often.
Use finger guards or a leather glove if you worry about poking your fingers.
Keep your workspace bright and tidy. Good lighting helps you see small details and avoid mistakes.
Tip: If you want easy projects for beginners, try making a simple animal or a tiny fruit. These shapes help you practice basic needle felting skills.
Common Issues & Solutions
Needle felting can have a few tricky moments, but you can fix most problems with a little patience. Here’s a table to help you troubleshoot common issues:
Problem |
Solution |
|---|---|
Broken needle |
Remove broken pieces. Use gentle, straight pokes. Avoid stabbing at angles. |
Loose or soft shapes |
Roll wool tightly for the core. Add thin layers and felt them in place. |
Lumpy or uneven shapes |
Build up slowly. Use a stick or skewer as a guide. Squeeze test often. |
Needle keeps breaking |
Use the right size needle. Work upright. Avoid hitting hard surfaces. |
Weak spots |
Add thin wool layers and felt again. For big issues, gently remove wool and redo. |
You might poke your finger sometimes. If this happens, take a break and use finger guards next time. Always focus on your work. Needle felting needles are very sharp, so keep your hands safe. Practice patience and use short, quick stabs. Rushing can lead to mistakes or injuries.
Needle felting lets you turn wool into amazing shapes and fun projects. With these tips, you can avoid common problems and enjoy every step of your creative journey!
Needle Felted Sculpture Ideas
3d needle felting lets you be very creative. You can make almost anything you think of. Many people begin by making needle felted animals. But you can also make ornaments, jewelry, and even art you can wear. If you love animals, this craft gives you lots of ideas. Let’s look at some popular and special projects you can try.
Custom Pet Portraits by Pawimprint
If you want a project that feels extra special, try custom pet portraits by Pawimprint. Their artists use 3d needle felting to turn your pet’s photo into a soft, lifelike sculpture. Here is how they make each one:
The artist starts with the eyes and nose. They add tiny bits of wool for shadows and highlights.
They mix colors to match your pet’s fur. This helps them get the patterns just right.
Small details like ears and jawline are shaped for a real 3D look.
Whiskers are made from stretched wool. This makes each portrait look real.
You can see digital drafts and give your thoughts before the artist finishes.
Pawimprint’s process feels caring and personal. Customers often say the portraits look beautiful and real. Many share stories about how these needle felted animals bring comfort and happiness, especially after losing a pet. People like to give these portraits as gifts for birthdays or holidays. The careful details and friendly service make Pawimprint a top choice for custom needle felted animals.
“The portrait captured my dog’s spirit. It made me cry happy tears!” – A happy customer
Other Creative 3D Needle Felting Projects
You can try many fun projects with 3d needle felting. Here are some ideas to help you get started:
Make needle felted animals like kittens, puppies, bunnies, foxes, deer, and hedgehogs.
Create holiday ornaments such as snowflakes, reindeer, or Santa figures.
Try lapel pins that use both flat and 3D felting for cool badges.
Add felted hearts or stars to homemade cards.
Make jewelry from marbled felt beads for necklaces or earrings.
Design sculptures that seem to float, like hummingbirds or dancers.
Explore fantasy creatures, such as dragons or fairies, with wings.
You can also join online groups to share your projects and get new ideas. Websites like The Felting and Fiber Studio have tutorials, galleries, and forums. You can meet other crafters and learn from them. Sharing your needle felted animals and other creations helps you grow as an artist.
Tip: Try new projects, even if they seem hard. Every needle felted sculpture you make teaches you something new!
You have learned the basics of 3D needle felting. You know how to pick wool and needles. You also know how to shape your first sculpture. Making a felted animal can make you feel happy and calm. It can help you be creative too. Custom pet portraits, like Pawimprint makes, help you remember special pets. They can make your home feel cozy. As you get better, try harder ways to add real-looking details. You can make special gifts for others. Needle felting is a journey, so enjoy each part of it!
FAQ
How long does it take to finish a 3D needle felted animal?
Most small animals take 1 to 3 hours. If you want to make a bigger or more detailed sculpture, you might spend a few days. Take your time and enjoy the process!
Can kids try 3D needle felting?
Yes! Kids can try needle felting with adult supervision. The needles are sharp, so always use finger guards and work slowly. Start with simple shapes like balls or animals.
What should I do if my needle breaks?
Don’t worry! Needle breaks happen. Just remove the broken piece from your project. Use a new needle and poke straight up and down. Try not to bend the needle.
How do I keep my felted sculpture clean?
You can dust your sculpture with a soft brush. If it gets dirty, gently spot clean with a damp cloth. Avoid soaking it in water. Keep your sculpture away from pets.
Can I use my pet’s real fur in a needle felted portrait?
Yes, you can! Some artists, like Pawimprint, offer to add your pet’s real fur for a special touch. This makes your portrait even more personal and meaningful.