
How to Turn Your Pet’s Photo into a Wool Felt Portrait
You can make wool felt pet portraits at home. You do not need to have done it before. Many people enjoy making wool pet portraits. The process is calming and shows your love for your pet. Blending and layering wool fibers helps show your cat’s special look and fur. You do not need to be a great artist. This craft works for any pet. Felines are a favorite for beginners. If you want a custom pet portrait or keepsake, Pawimprint can help. They make lifelike wool felt pet portraits. They also offer other special pet memorials for your cat or any pet you love.
Key Takeaways
Get the right tools and wool colors before you start. Pick a clear photo of your pet with good light. Use this photo to help you while you work. Make the base shape first. Then add wool colors in layers. This helps make the fur look real. Add small details like eyes, nose, and whiskers with care. This will show what makes your pet special. Be patient and stay safe. Enjoy making a special memory of your pet.
Materials for Wool Felt Pet Portraits

Essential Tools and Supplies
Before you start your wool felt pet portrait, you need the right tools. These supplies help you shape, trim, and add details to your pet’s face and fur. Here’s a handy table to guide you:
Tool/Supply |
Description & Use |
|---|---|
Felting Needles |
Different sizes for shaping and adding fine details. |
Wool Batting/Roving |
Main material for building your pet’s shape and fur. |
Felting Pad |
Foam or brush pad to protect your table and your fingers. |
Finger Protectors |
Keep your hands safe from sharp needles. |
Small Scissors |
Trim and shape wool for neat edges. |
Needle Holders |
Make it easier to hold and control your needles. |
Pointed Stick |
Hold your project steady and keep fingers away from needles. |
Doll Making Needles |
Add tiny details like whiskers or small features. |
Wool Locks |
Add texture for curly or fluffy fur. |
Armatures (optional) |
Wire frames for extra support in complex shapes. |
You can find most of these in diy wool pet felting kits. Always use finger guards, especially if you’re new to felting. Safety comes first!
Choosing Wool Colors
Picking the right wool colors makes your pet portrait look real. When working with wool, try to match your pet’s fur as closely as possible. Many artists use several shades—sometimes up to eight—to get the perfect look. If you have a cat with orange and white fur, blend different tones for a natural effect. For a feline with stripes or spots, layer colors to show those patterns. Merino tops work well for soft, fine fur, while carded batts help you build the base. Blending wool from different breeds, like corriedale for the base and merino for the top, gives your pet’s portrait texture and depth. If you want to make a craft that really captures your pet, don’t be afraid to mix and match colors.
Tip: Save small scraps of wool in jars or bags. You can use them for tiny details like a cat’s nose or a pet’s ear tips.
Preparing Your Workspace
A tidy workspace helps you focus on felting and keeps your supplies in good shape. Store your wool in fabric or mesh bags so it stays fluffy and fresh. Use clear containers or jars to organize wool by color. This makes it easy to find the right shade for your pet’s fur. Keep your tools in a basket or box nearby. Always work on a table or tray, not your lap, to avoid accidents. Make sure your felting pad is on a flat surface. Good lighting helps you see details, especially when you’re adding the final touches to your cat’s eyes or a pet’s whiskers. Clean up after each session so you’re ready for your next project.
Note: Keep felting needles in a safe case when you finish. They are sharp and can hurt if left out.
How to Make Wool Pets: Step-by-Step
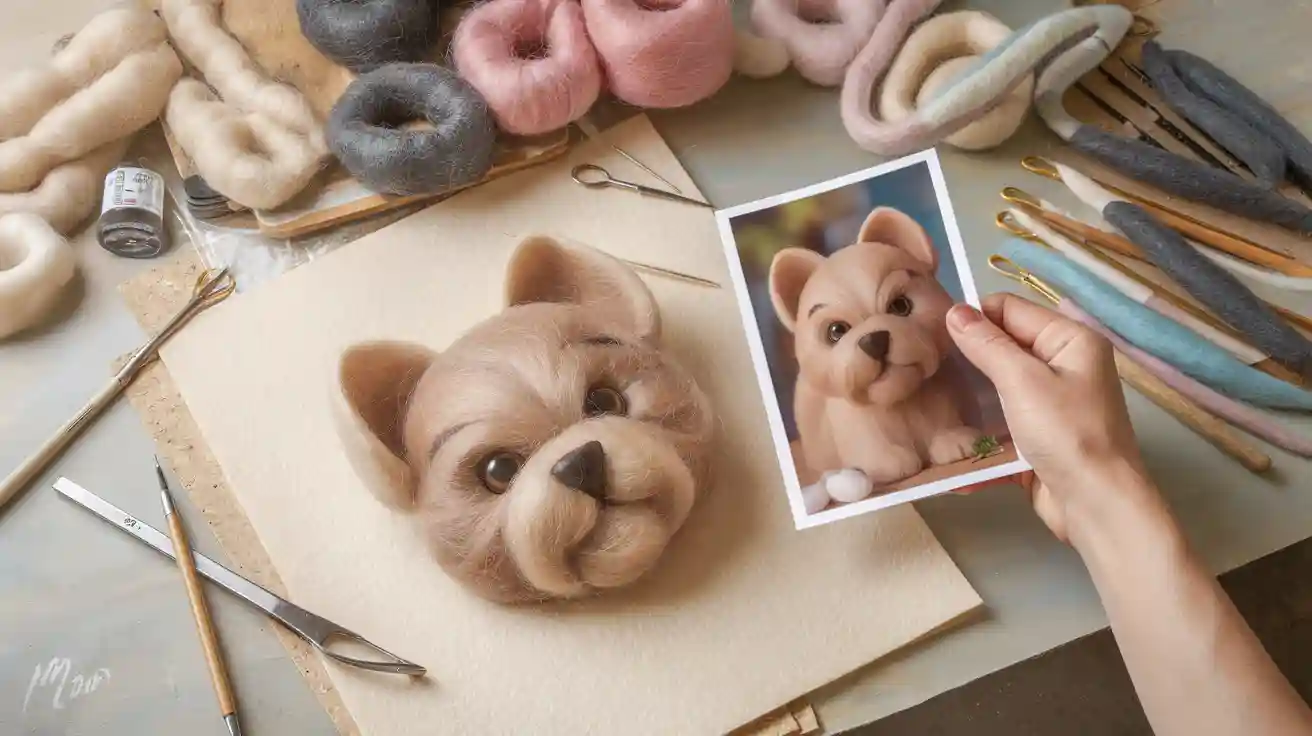
Selecting and Tracing Your Pet’s Photo
Choosing the right photo is the first step in making wool pet portraits. You want your portrait to look just like your pet, so pick a photo that shows your pet’s face clearly. Here are some tips to help you select the best photo:
Use a high-resolution image. Blurry photos make it hard to see important details.
Pick a photo with good lighting. Shadows can hide your pet’s features.
Try to find photos from different angles. This helps you see the shape of your cat’s head or the way your pet’s ears sit.
Look for photos that show your pet’s unique colors, markings, and expressions. These small things capture your pet’s personality.
Once you have your photo, print it out to the size you want for your wool felt pet portrait. Place tracing paper over the photo and use a pencil to trace the outline of your pet’s head, ears, and main features. Don’t forget to trace the eyes, nose, and mouth. These details will help you later.
Tip: Use a lightbox or hold your photo up to a sunny window to make tracing easier. This helps you see every line and curve.
Transferring the Template to Felt
Now you need to get your traced outline onto the felt. There are a few ways to do this, and you can pick the one that feels easiest for you. Here’s a handy table to compare some popular methods:
Method |
Description |
Key Steps / Tips |
|---|---|---|
Freezer Paper Method |
Draw or print design on freezer paper, iron onto felt to temporarily stick, embroider on paper, peel off |
Draw/print on matte side, cut with border, iron on low-medium heat, embroider on paper, peel off gently |
Tracing Paper Method |
Pin tracing paper with design onto felt, embroider on paper, then tear off carefully |
Draw/trace design on tracing paper, pin to felt, embroider on paper, remove pins, tear paper off carefully |
Freehand Tracing |
Draw pattern directly on felt using erasable fabric pen |
Use erasable fabric pen to mark design directly on felt |
Stencil Method |
Pin stencil pattern onto felt and trace around it |
Use sewing pins to secure stencil, then trace or cut accordingly |
Iron-On Transfer Paper |
Print mirror image on transfer paper, iron onto felt to transfer full-color image |
Print mirror image on transfer paper, cut with border, iron on medium heat, optionally decorate with stitches |
Many crafters like to use tracing paper and an iron-on transfer pen. Trace your pet’s image onto tracing paper, then flip it over and trace again with the pen. Place the tracing paper on the felt, pen side down, and iron gently for a few seconds. This transfers the outline to the felt, so you can start felting with confidence.
Note: If you use a fabric marker, make sure it’s erasable or water-soluble. This way, you can remove any extra lines after you finish your wool needle felt pet portrait.
Building the Base Shape
You’re ready to start felting! Begin by building the base shape of your pet’s head and body. This step is important because it gives your wool pet portraits a strong foundation. Here’s how you can do it:
Use an armature (a wire frame) if you want your portrait to hold a special pose. Not every project needs one, but it helps with stability.
Break your pet’s body into simple shapes. For a cat, start with a round head and oval body. Add small shapes for ears and cheeks.
Place your wool on a felting pad or foam mat. This protects your needles and your hands.
Use a coarse felting needle to poke the wool into shape. Short, quick stabs work best. Don’t stab too deep—the barbs are near the tip.
Keep checking your photo and template. Make sure the size and shape match your pet.
Add or remove wool as needed. If you make a mistake, just pull off some wool or add more. Felting is very forgiving!
Take breaks often. Felting takes time, and your hands will thank you.
Layering Wool for Texture
Now comes the fun part—making your pet’s fur look real! Layering wool gives your wool felt pet portraits texture and depth. Here’s what experienced crafters do:
Blend different wool colors to match your pet’s coat. For a cat, you might mix orange, white, and brown for a tabby look.
Pull off small tufts of wool and lay them on your base shape. Use a medium or fine needle to poke them in place.
Add layers of fur and details by working in the direction your pet’s fur grows. This makes your portrait look soft and lifelike.
Keep layering until you see the texture and color you want. Don’t rush—each layer adds more personality to your handmade wool pets.
Tip: Save tiny bits of colored wool for stripes, spots, or special markings. These small touches make your wool pet portraits unique.
Adding Features and Details
The last step is adding the fine features that bring your needle felted pet portrait to life. This is where you use your smallest needles and your sharpest eyes. Here are some techniques to help you:
Use a size 42 felting needle for thin layers of wool. Align the fibers with the direction of your pet’s fur.
For ears, cut felt into rough shapes, fray the edges, and wrap with colored wool. Felt them onto the head and blend with more wool.
Make eyes by shaping the head and snout, then insert glass or plastic eyes. Secure them with thread and cover the knots with wool.
Shape paws with pipe cleaners and wool. Use thread to make toe lines, then felt small bits of wool between the toes.
Add fine details like dark lines around the eyes, a pink nose, or the inside of a cat’s ears. Use your smallest needle and just a pinch of wool.
For whiskers, use fishing line or natural hair. Thread them through the snout and secure with a tiny drop of glue.
Finish by smoothing stray fibers with your needle and trimming loose hairs with sharp scissors.
Remember: Mastering the basic techniques takes practice. Don’t worry if your first wool pet portraits aren’t perfect. Each one gets better!
If you want a portrait that looks just like your pet but don’t have the time or skill, you can always choose custom wool pet portraits from Pawimprint. Their artists use high-quality materials and expert needle felting techniques to capture every detail and expression. Many pet lovers say these portraits look almost exactly like their pets and bring comfort and joy.
Making wool felt pet portraits is a rewarding craft. You get to celebrate your pet’s unique look and personality. With patience and practice, you’ll create a wool needle felt pet portrait that you’ll treasure forever. If you want to try intermediate or advanced designs, keep your favorite cat photos and keep experimenting with new techniques. Enjoy the process and have fun with your craft!
Tips for Realistic Wool Pet Portraits
Capturing Likeness and Expression
You want your wool felt pet portrait to look just like your furry friend. Start by studying your pet’s photo. Notice the shape of the eyes, the tilt of the ears, and the way the mouth curves. These small details help you show your pet’s personality. If you have a cat, pay close attention to the eyes and whiskers. Cats often show their personality through their gaze and ear position.
Try to match your pet’s unique features. Use a fine felting needle to add tiny lines around the eyes or mouth. This helps with capturing personality. If your pet has a playful look or a gentle smile, add those touches. Take your time and check your work against the photo often.
Essential tip: Focus on one feature at a time. Finish the eyes before moving to the nose or mouth. This keeps your portrait looking balanced.
Matching Fur Patterns and Colors
Getting the fur right makes your portrait stand out. Look at your pet’s fur in the photo. Notice the colors, patterns, and any special markings. For a cat, you might see stripes, spots, or patches. Use the right fiber colors to match your pet’s fur tones. Sometimes, you need to blend different fibers to get the perfect shade.
Blend fibers together to copy the soft changes in color and pattern.
Make a color swatch library with both solid and blended fibers. This helps you remember what works best.
Always use clear photos to see the real fur colors and patterns.
Keep a fiber palette page to track your blends and colors.
You can use these steps for both flat and 3D portraits. Blending and layering wool helps you show your pet’s personality and makes your cat’s fur look real.
Smoothing and Finishing Touches
A smooth finish gives your wool felt pet portrait a polished look. Start with a coarse needle and move to finer ones, like a 40G or 42G, to reduce holes. Try felting at an angle instead of straight down. This helps hide needle marks. Use spiral or twisted needles for an even smoother surface.
Layer wool carefully. Overlap the edges a little so you do not see lines or lumps.
Gently rub the surface with your fingers to move fibers and close gaps.
Use a soft brush, like a baby brush, to blend fibers and smooth the surface.
Trim any stray fibers with small scissors for a neat finish.
For flat areas, you can use a mini iron or hair straightener to press down fuzz and make the portrait look clean.
Note: Choose soft wool, like merino, for the final layer. This helps your pet’s portrait look smooth and lifelike.
With these essential tips, you can create a wool felt pet portrait that shows your cat’s personality and keeps your pet’s memory alive.
Creative Wool Pet Portrait Ideas
Needle Felted Cat Designs
You can have a lot of fun with needle felted cat designs. Many crafters love making these because they look so much like a real cat. Some people choose a lifelike portrait of their pet. Others go for a cute, chibi-inspired style. These small, round faces with big eyes are perfect if you like kawaii things. You can even make a 3D cat head that looks just like your own feline friend.
Lifelike cat portraits capture every detail of your pet’s face.
Chibi cat keychains show off a playful and adorable side.
3D brooches let you wear your cat on your jacket or bag.
Cats are one of the most popular pets in the world. That is why so many people want to transform them into lasting keepsakes. You can make your own handmade wool pets or try different artistic styles. Some people like realistic designs, while others enjoy a more creative look. No matter what you choose, you will have a special keepsake to remember your pet.
Tip: Try using different shades of wool to match your cat’s fur. This helps your needle felted cat designs look even more real.
Brooches and Keychains
Brooches and keychains are great ways to carry your pet with you every day. You can make a small cat brooch and pin it to your shirt or backpack. Keychains are also popular. Many people like to attach a tiny cat head to their keys or bag. These items are not just cute. They are also practical and make wonderful gifts for other pet lovers.
Here are some ideas for your next project:
Idea |
Description |
|---|---|
Cat Brooch |
Wear your pet’s face as a stylish accessory |
Cat Head Keychain |
Keep your pet close wherever you go |
3D Portrait Charm |
Add a mini version of your pet to your bag |
If you want a professional touch, Pawimprint offers a range of personalized pet keepsakes. You can order custom wool felt keychains, brooches, or even a full portrait. Each piece is made with care and attention to detail. These keepsakes help you celebrate your pet’s memory in a unique way.
Note: Brooches and keychains make it easy to share your love for your cat with friends and family.
You can make wool felt pet portraits even if you are new. Some beginners have problems like using the wrong wool or breaking needles. You can fix these problems by using good wool and the right tools. Follow simple instructions to help you learn.
Use needle holders so your hands do not get tired.
Buy wool from trusted places for better results.
Making wool pet portraits is a way to remember your pet. It is also a special gift for people who love pets. If you want more ideas, look at Pawimprint’s custom keepsakes. You can find a great way to honor your pet.
FAQ
How long does it take to make a wool felt pet portrait?
It usually takes 3 to 6 hours for a small portrait. If you want more details or a bigger size, you might spend a whole weekend. Take breaks to rest your hands and enjoy the process.
What if I make a mistake while felting?
No worries! You can pull off the wool and try again. Needle felting is very forgiving. If you poke too much, just add more wool and shape it back. Practice helps you get better.
Can I use regular wool or do I need special felting wool?
You should use wool roving or batting made for felting. Regular yarn or craft wool does not felt well. Felting wool sticks together when you poke it with a needle. This makes your portrait strong and smooth.
Is needle felting safe for kids?
Needle felting uses sharp needles. Kids over 12 can try it with adult supervision. Always use finger guards and work on a flat surface. For younger kids, try simple felt crafts that do not need needles.