
Beginner’s Guide to Framing Picture Frame Felt Creations
If you want to frame your needle felted pictures or any picture frame felt art, you can do it easily at home. You just need a few basic tools and a little patience. Framing protects your art from dust and damage. It also helps your piece look its best on display. Pawimprint creates custom felt pet portraits and memorials, so you know you are working with trusted experts. You can feel confident and proud every time you hang your finished creation.
Key Takeaways
Framing felt art keeps it safe from dust and sunlight. It also protects it from water and damage. This helps your art last longer and look bright.
Acid-free mats and backing boards stop yellowing. They keep your felt art safe for a long time.
Put your felt art on strong, acid-free boards. Use pins or stitching to hold it in place. Do not use glue because it can hurt your art.
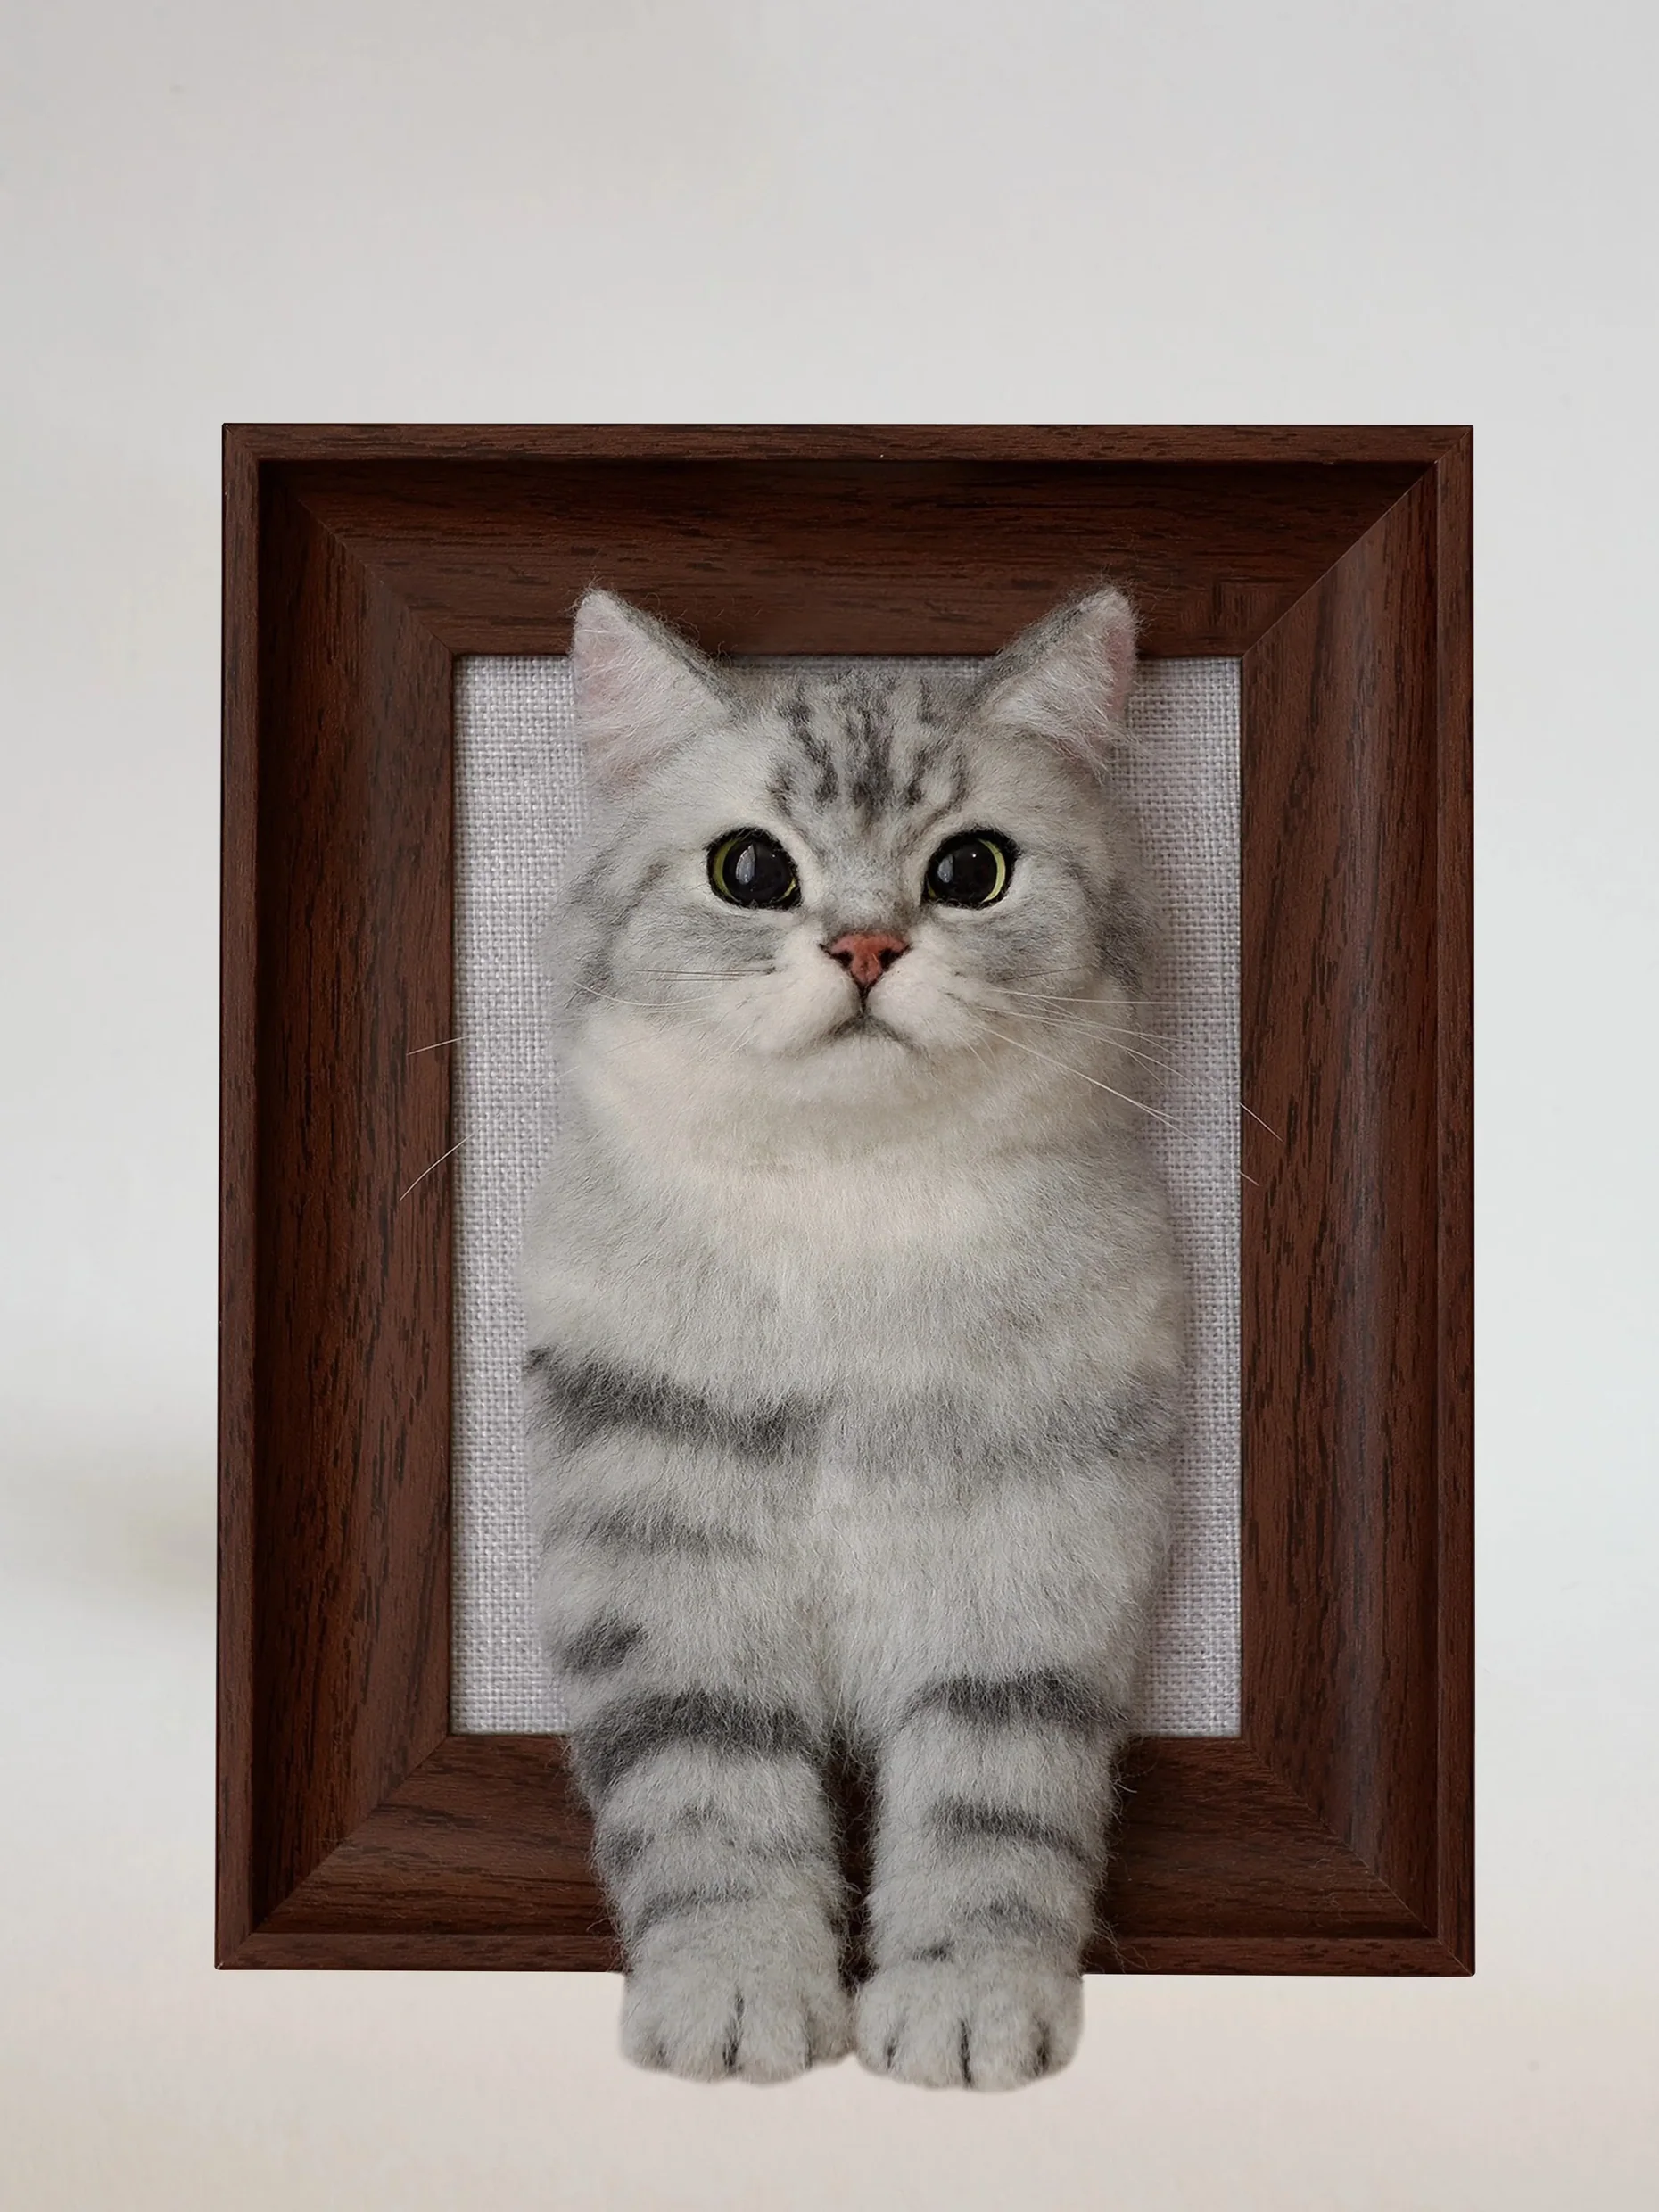
Pick the right frame style for your art. Shadowbox frames are good for 3D pieces. Open frames help show off the texture. The right frame makes your art look better.
Follow easy steps to get your felt art ready. Mount and put your art together with care. If your art sags or looks crooked, fix it by adjusting and stitching.
Why Frame Felt Art
Protection and Preservation
When you create a picture frame felt masterpiece, you want it to last. Framing does more than just make your art look nice. It acts like a shield. Without a frame, your felt art faces many risks. Dust, sunlight, and even the air can damage the fibers and colors. Over time, light can fade your work, and moisture can cause mold or warping. Acid from some materials can make your art yellow or brittle.
Tip: Always use acid-free mats and backing boards to keep your felt art safe for years.
Here are some ways framing protects your art:
Keeps dust, dirt, and pollutants away from the surface.
Blocks harmful UV rays that cause fading.
Stops moisture from getting in and causing stains or mold.
Prevents accidental bumps or scratches.
If you hang or frame your felt art with care, you help it stay bright and beautiful. Many experts say that a good frame is like a mother holding her child, keeping it safe and secure.
Display and Presentation
Framing also helps your picture frame felt creations stand out. A frame gives your art a finished look and draws attention to the details. When you choose the right frame, you add style and value to your piece. People often notice framed art more because it looks complete and important.
Frames create a clear boundary, making your art the center of attention.
The right frame can match your home’s style or the mood of your artwork.
In galleries, shops, or homes, framed felt art looks more professional and inviting.
Research shows that framing changes how people feel about art. When you frame your felt piece, viewers connect with it more deeply. They see it as special and worth protecting. If you want your art to shine and last, always consider the best way to hang or frame it.
Picture Frame Felt Methods
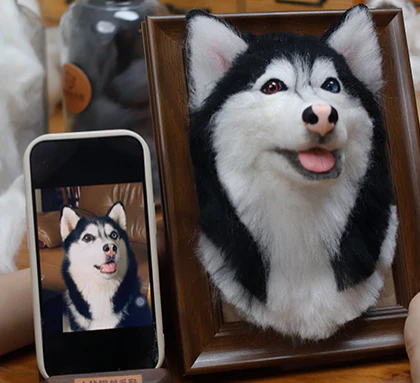
When you finish your picture frame felt creation, you want it to look its best and last for years. Let’s look at some popular ways to display and protect your felt art. These methods work well for both flat and 3D pieces, like the lifelike pet portraits from Pawimprint.
Mounting on Fabric or Board
Mounting your picture frame felt art on a sturdy backing keeps it flat and safe. You can use acid-free foam board or mat board. These materials stop your art from yellowing or getting brittle over time. For extra texture, try quilt wadding or foam core spacers. If your felt art has raised stitches or 3D details, these spacers help keep the texture from getting crushed.
You can attach your felt using stainless steel pins, lacing with strong thread, or gentle hand-stitching. Avoid glue, since it can damage the fibers. Many artists, including those at Pawimprint, use these techniques to make sure their creations stay secure and beautiful. Here’s a quick list of good materials:
Acid-free foam board (1/8" or 3/16" thick)
100% rag or alpha cellulose mat board
Quilt wadding for extra cushion
Using Open Frames Without Glass
Some people like to use open frames for their picture frame felt art. This means you frame your piece without any glass in front. Open frames let you see and touch the soft texture of the felt. They also avoid glare and reflections, so the colors and details really pop. This method works well for large or 3D pieces, like Pawimprint’s custom pet portraits.
However, open frames do not protect your art from dust or dirt. If you plan to hang your art in a busy area, you might want to choose a spot away from direct sunlight or heavy traffic. Many artists prefer open frames because they keep the natural look and feel of textile art.
Matting and Stitching Techniques
Matting and stitching are classic ways to finish your picture frame felt project. Mats made from acid-free materials add a nice border and help keep your art in place. You can use hand-stitching or lacing around the edges to secure your felt to the backing. This keeps the fabric tight and smooth, without using glue.
For 3D or textured pieces, shadowbox frames with double mats or spacers work great. They give your art room to breathe and keep the texture safe. Some creative examples include using magnets or extra support fabrics for fragile or heavy pieces. These techniques help you show off your work while keeping it safe for years.
Tip: Always wash and iron your fabric before mounting. This keeps your picture frame felt art looking crisp and clean.
Step-by-Step Finishing and Framing
Framing your felt art can feel like a big project, but you can do it with a few simple steps. Let’s walk through the process together so your picture frame felt creation looks amazing and stays safe for years.
Materials and Tools
Before you start, gather everything you need. Using the right materials makes a big difference in how your art looks and lasts. Here’s a handy list to get you started:
Acid-free mat board or foam board (for backing)
100% cotton or rag mat (for mounting)
Stainless steel pins or strong thread (for securing)
Sharp scissors or a rotary cutter
Ruler or measuring tape
Needle for hand stitching
Frame (wood or shadowbox style works well)
Quilt wadding or spacers (for extra cushion)
Optional: adhesive-backed felt tape for lining or padding
Professional felters like Helen Russell recommend using quality wool, such as Merino Top or Core Wool, and specialty fibers for the best results. If you want to try more advanced techniques, you can find wet felting kits, armature wire, and even glass eyes for 3D pet portraits. For most beginners, though, the basics above will work great.
Tip: Always choose acid-free materials to keep your felt art from yellowing or getting brittle over time.
Tip: At the same time, be careful to avoid injuring yourself during the process. Safety first.
Preparing the Artwork
Now it’s time to get your felt art ready for finishing and framing. Lay your piece flat and gently smooth out any wrinkles. If you used fabric, make sure it’s clean and pressed. Measure your felt art and decide how much border you want around it. Experts suggest making your felt piece about 4 inches larger than your mat board. This extra space lets you stretch and secure the edges neatly.
Cut your mat board so it’s about 2 inches wider on each side than the area you want to show. This border gives your art a professional look and helps it sit flat in the frame. If you want a more dramatic effect, you can use a 3-inch mat border. Always double-check your measurements before cutting.
Mounting and Securing
Mounting your felt art is one of the most important steps in finishing and framing. You want your piece to stay smooth and tight, without sagging or slipping. Here’s a simple way to do it:
Place your felt art face down on a clean surface.
Center your mat board on the back of the felt.
Fold the edges of the felt over the board, pulling gently to keep it taut.
Use stainless steel pins or hand stitching to secure the felt to the back of the board. Avoid glue if possible, since it can damage the fibers over time.
For a neat finish, use a lacing method. Thread a strong needle and stitch back and forth across the edges, like lacing up a shoe. This keeps the felt tight and smooth.
If your piece is heavy or 3D, add quilt wadding or foam spacers behind the felt for extra support.
Some artists use adhesive-backed felt tape for extra hold, but stitching is the safest long-term method. If you want to hang your art with a rod, sew a felt sleeve to the back before framing.
Note: Avoid stitching through the front of your felt art. Always work from the back or edges to keep the surface looking perfect.
Assembling the Frame
Now you’re ready for the final step in finishing and framing your felt art. Choose a frame that matches your style and the size of your piece. Natural wood frames look great with wool fibers, and shadowbox frames work well for 3D art.
Place your mounted felt art into the frame. Make sure it sits flat and centered.
If you want to use glass, add spacers or an acid-free mat to keep the felt from touching the glass. This prevents condensation and damage.
For most felt art, especially textured or 3D pieces, skip the glass. Open frames let you enjoy the soft look and feel of the wool.
Secure the back of the frame with the provided clips or tabs. Double-check that everything is straight and tight.
Attach hanging hardware, like D rings or wire, to the back of the frame. For larger pieces, use sturdy hardware to keep your art safe on the wall.
Tip: Plan your framing method before you start your felt project. This helps you choose the right size and shape for your art and frame.
With these steps, you can finish and frame your felt art like a pro. Your creation will look beautiful and stay protected, ready to brighten any room.
Troubleshooting Frame Felted Pictures
Avoiding Damage
You want your felt art to stay beautiful for years. The way you frame felted pictures can make a big difference. Here are some smart steps you can follow to keep your artwork safe:
Always use acid-free mat board or ragboard for mounting. This keeps your felt from turning yellow.
Clean any glass or Plexiglas before you use it. Dust and fingerprints can sneak in and spoil the look.
Sandwich your matted felt between clean glazing and a thin polyester film. This helps keep out dust and moisture.
Seal the edges with polyester film tape. Wrap the tape around the package, but keep it inside the frame edges.
Secure the whole package in the frame with brads. Use a brad setter to avoid shaking or damaging your art.
Tip: Plan your framing method before you start your felt project. This helps you pick the right size and shape for your frame.
Fixing Loose or Crooked Art
Sometimes your felt art might slip or look uneven in the frame. Don’t worry! You can fix this with a few easy tricks:
If your felt sags, lace it to the mat board with strong thread. Start from the back and pull gently to keep it tight.
For crooked pieces, open the frame and adjust the felt until it sits straight. Use pins or extra stitches to hold it in place.
For heavy or large pieces, wrap stretcher bars with fabric and add center bars for support. This keeps your art flat and smooth.
If you see your art shifting, check the hanging hardware. Make sure it is strong and even.
Common Mistakes
Everyone makes mistakes when they first frame felted pictures. Here are some things to watch out for:
Using glue on the felt. Glue can damage the fibers and cause stains.
Piercing the front of your felt with pins or needles. Always work from the back or edges.
Forgetting to leave enough border when mounting. You need extra fabric to stretch and secure your art.
Not cleaning the glass or frame before assembly. Dust can get trapped and ruin the look.
Hanging your art in direct sunlight. Sunlight can fade the colors over time.
Remember: Stitch your name or a label on the backing felt, not the front. This keeps your artwork looking neat and professional.
You can make your felt art look great at home. Show your finished piece to your friends and family. Many Pawimprint customers say their portraits look just like their pets. The frames are high quality and the service is friendly. People like how the art fits with their home style.
Want to learn more? Check out beginner guides, free lessons, or workshops like Helen Russell’s class. You can find new ways to get better and have fun with felt art.
FAQ
How do I keep my felt art from sagging in the frame?
You can stretch your felt gently over acid-free board. Use pins or hand stitching to hold it tight. If you need more help, check out felting tutorials for step-by-step tips.
Can I use regular glass to frame my felt art?
You can use glass, but leave space between the felt and glass. This protects the texture. Many tutorials suggest using shadowbox frames or skipping glass for 3D pieces.
Where can I find good felting tutorials for beginners?
You can find many tutorials online. Try video guides or written instructions. Look for online felting workshops if you want to learn with others.
What is the best way to display 3D felt pet portraits?
Shadowbox frames work well for 3D art. They give your piece room to breathe. You can also join online felting workshops to see how others display their creations.
Do I need special tools for framing felt art?
You only need basic tools like scissors, pins, and a frame. Some felting tutorials show extra tools, but you can start simple.