
Differences and Uses of Needle Felting and Wet Felting
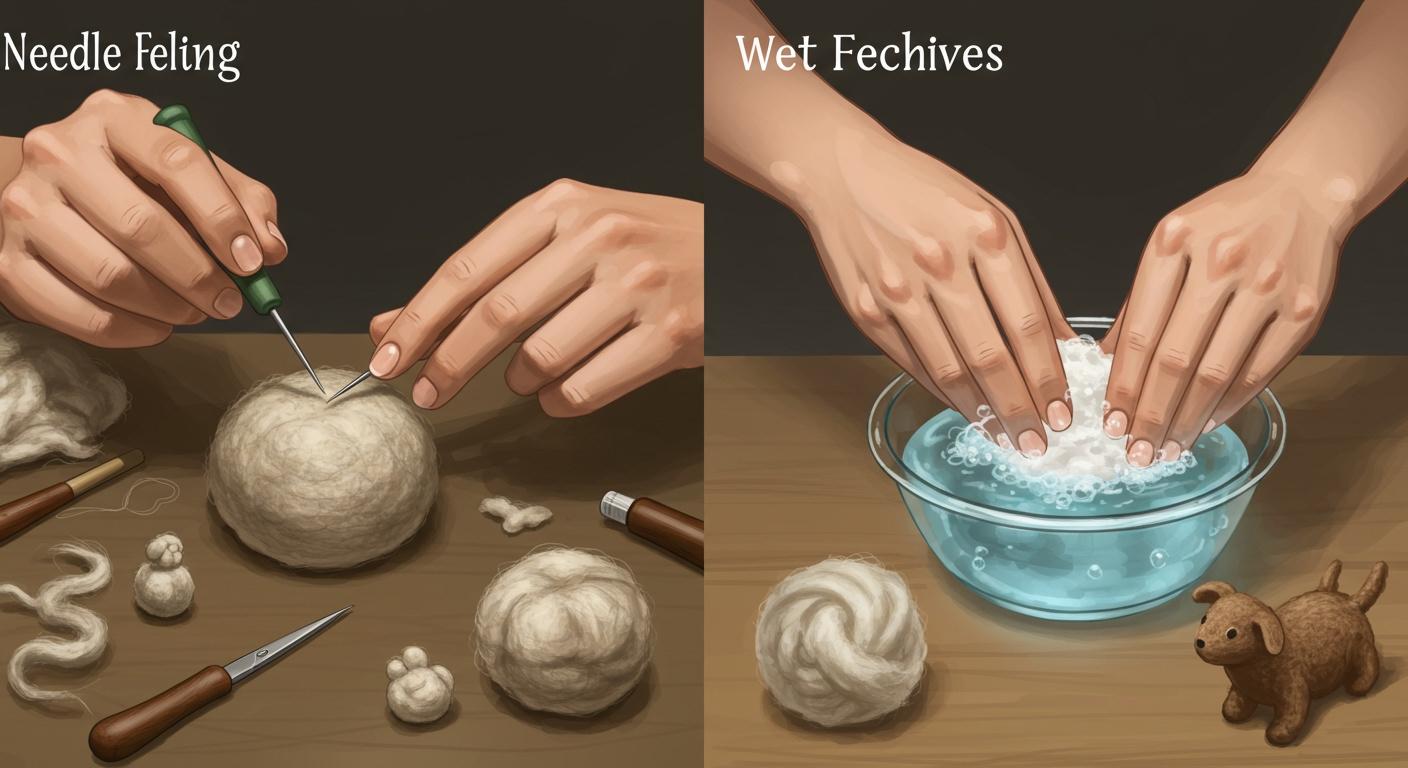
Needle felting and wet felting are not the same. They use different methods to work with wool. Needle felting gives you more control over your art, allowing you to create designs with a lot of detail. Wet felting, on the other hand, produces thick and strong fabric by using water and rubbing. Understanding how needle felting and wet felting differ helps you choose the right technique. This way, you can select the best method for your project.
Think about what you want to make:
Choose needle felting for small or detailed creations.
Use wet felting if you want tough, solid fabric.
Key Takeaways
Needle felting works best for small, detailed projects. You can use it to make tiny designs like animal figures or jewelry.
Wet felting makes fabric that is strong and smooth. Pick this method for bigger things like bags, hats, or rugs.
Each technique needs its own tools. Needle felting uses a felting needle and a pad. Wet felting needs wool, water, and soap.
Begin with easy shapes to learn the basics. Be patient and slowly try harder projects.
You can use both techniques together to improve your work. Wet felting gives a strong base. Needle felting adds small details on top.
What Is Felting?
Felting Basics
Felting is a creative process that transforms loose wool fibers into a solid material. You use different techniques to make felt, and each method gives you unique results. When you work with felting, you can shape wool into fabric, art, or even small sculptures. You do not need to weave or knit the fibers. Instead, you use friction, moisture, or special tools to bond the fibers together.
Here is a quick look at the main types of felting techniques:
Technique |
Description |
|---|---|
Wet Felting |
You layer wool with soap and water, then rub and press to create felt. |
Nuno Felting |
You combine wool and other fibers, like silk, to add texture and design to textiles. |
You use barbed needles to poke wool, locking fibers together for detailed shapes and designs. |
Felting lets you explore many projects. You can make soft toys, sturdy bags, or textured wall art. Each technique works best for certain goals, so you should choose the one that fits your idea.
How Wool Felts
Wool felts because its fibers have tiny overlapping scales. These scales act like hooks, grabbing onto each other when you add friction, moisture, or heat. You can see this effect when you rub wool with warm, soapy water or poke it with a needle. The fibers mesh and lock together, forming a strong fabric.
Tip: Wool works best for felting because its scales interlock better than other fibers.
The science behind felting includes several key actions:
Wool fibers have overlapping scales that catch and hold.
Friction, moisture, and heat help the fibers move and mesh.
Agitation makes the fabric strong and cohesive.
You can see how these actions work in the table below:
Mechanism |
Description |
|---|---|
Fibers move in one direction, causing them to tangle and tighten. |
|
Overlapping Scales |
Scales on wool fibers interlock when you agitate them. |
Mechanical Action |
Actions like rubbing or washing help fibers move and bond together. |
When you understand how wool felts, you can control the process and get the results you want. You can make felt that is soft, firm, or even sculpted. Felting gives you many options for creative projects.
Needle Felting
Process Overview
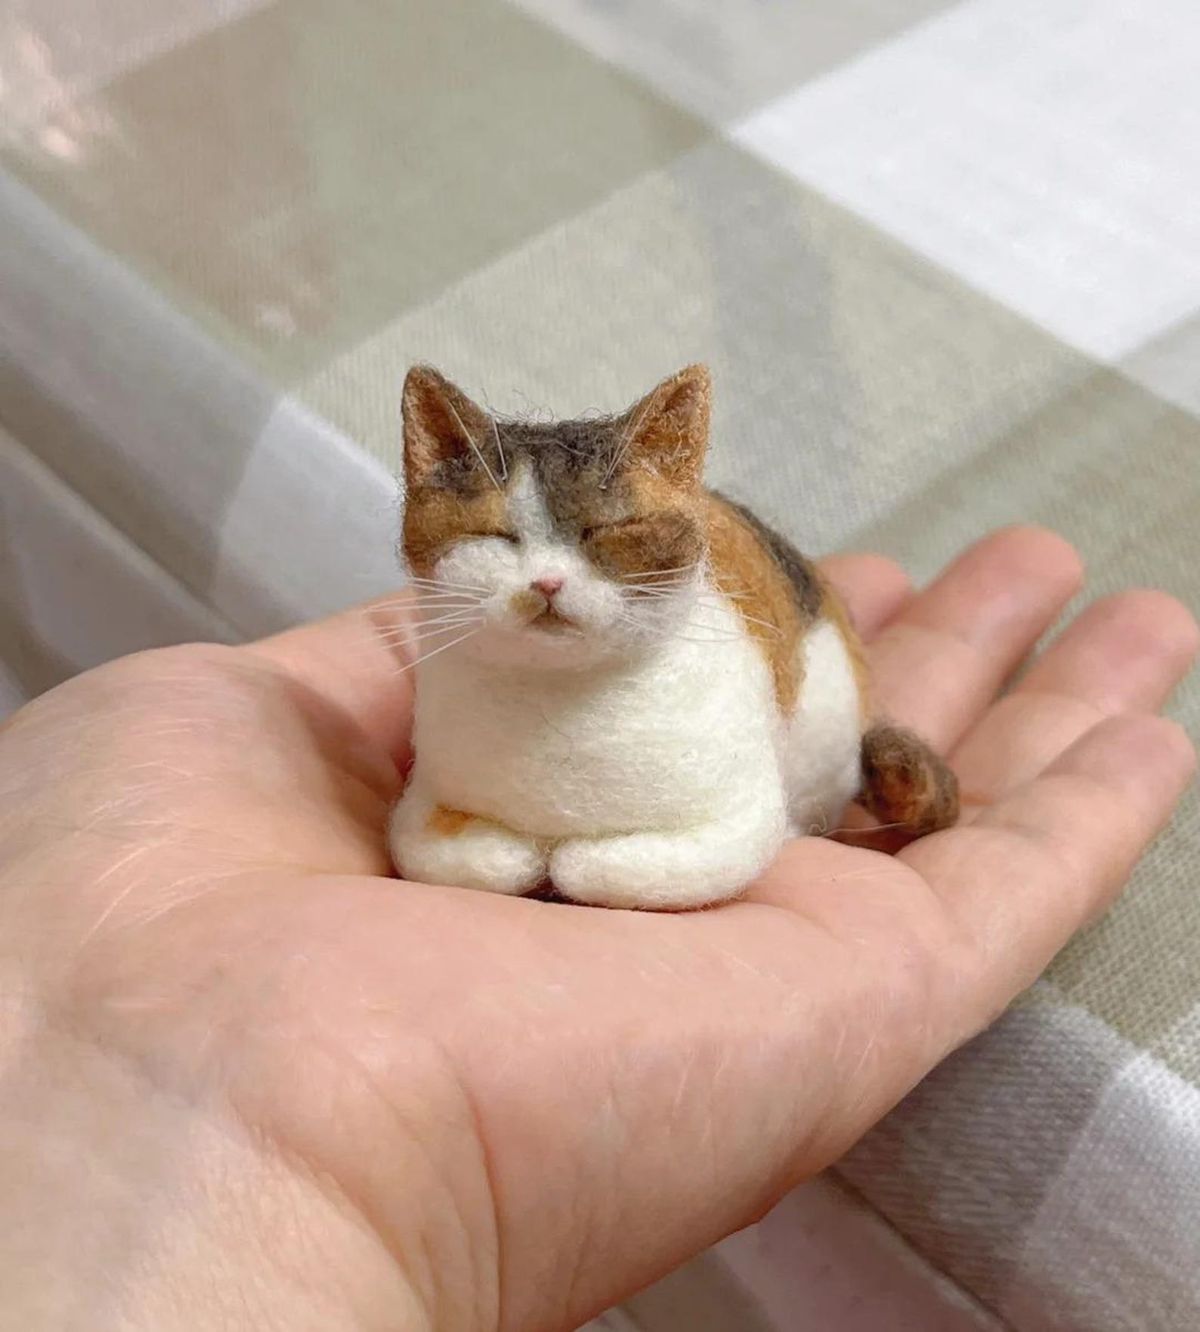
Needle felting gives you a dry, precise, and controlled way to shape wool. You use a special felting needle with tiny barbs to poke the wool. Each poke tangles the fibers and helps them lock together. You can build up shapes and add details step by step. Many crafters start with a simple ball of wool. You add more wool to form parts like a head or body. You use the needle to attach these pieces. When you finish the main shape, you add final touches such as eyes or fur texture.
Here is a simple guide to the needle felting process:
Build onto the shape to form a head, torso, or other parts.
Use a felting needle to attach the separate pieces.
Add final touches for detail.
Needle felting works well for 3D sculptural work and detailed designs. You can create animals, figures, or even tiny objects. You do not need water or soap, so the process stays clean and easy to manage.
Tools and Materials
You need only a few tools for needle felting. The main tool is the felting needle. You can choose from different types and sizes, each suited for a specific job. Triangular needles (size 38-40) help you add fine details like eyes or fur. Round needles work well for shaping and general felting. Flat needles smooth out surfaces and cover large areas. You also need a cushion or pad to protect your workspace.
Here is a table showing common felting needle types:
Needle Type |
Gauge Range |
Description |
|---|---|---|
Coarse Needles |
32-42 |
Catch more fibers, leave larger holes. |
Fine Needles |
38-40 |
Ideal for tiny details, leave smaller holes. |
Spiral Needles |
N/A |
Twist fibers for tight felting. |
Triangular Needles |
38-40 |
Perfect for fine details. |
Round Needles |
N/A |
Great for shaping and general felting. |
Flat Needles |
N/A |
Used for smoothing surfaces and large areas. |
You also need wool. Different types of wool felt in different ways. Some crafters use extras like needle holders, multi-tools, glass eyes, or wire for special effects.
Tip: Needle felting requires only a small workspace and makes less mess than wet felting.
Results and Textures
Needle felting produces a rougher and lighter texture compared to wet felting. You can add wool easily and create intricate details. The finished piece feels soft but holds its shape well. You can make small animals, figures, or decorations with clear features. Needle felting lets you control the felting process and add new wool whenever you want. You get a unique look that stands out from other felting methods.
Wet Felting
Process Overview
Wet felting uses warm, soapy water and movement to turn loose wool into a solid fabric. You start by laying out layers of wool fibers on a flat surface. You sprinkle hot, soapy water over the wool until it is fully wet. The soap helps the fibers slide and tangle. Next, you cover the wool with a piece of netting or mesh. You gently rub olive oil soap on top to keep the fibers in place. Then, you roll up the wool in a bamboo mat, like a sushi roll. You press and roll the mat back and forth. This action makes the fibers lock together. When the wool feels firm, you unroll it, rinse out the soap, and let it dry.
Here are the main steps in wet felting:
Lay out the wool and wet it with hot, soapy water.
Cover with netting and rub in olive oil soap.
Roll the wool in a bamboo mat and apply pressure.
Unroll, rinse, and dry the felted fabric.
Wet felting can get messy, so you may want to cover your workspace and wear an apron.
Tools and Materials
You need a few special items for wet felting. The most important material is wool with long fibers. Long fibers help the fabric become strong and even. You also need hot water, soap, a bamboo mat or rolling tool, and netting or mesh. Some people use bubble wrap or towels to help with rolling and pressing.
Here is a table of wool types that work well for wet felting:
Wool Type |
Characteristics |
Suitability for Wet Felting |
|---|---|---|
Herdwick |
Coarse, thick fleece, changes color from black to grey |
Great choice for felting |
Swaledale |
Fine, resilient, natural grey, can be dyed |
Great for wet felting and needle felting |
Corriedale |
Thick, soft, ideal for 3D projects |
Perfect for wet felting |
Romney |
Heavy, semi-lustrous, high yield |
High quality for wet felting |
Merino |
Fine, soft, light, shiny |
Beautiful material for wet felting |
Blue Faced Leicester |
Soft, strong, fine, dense, good luster |
Another great choice for felting |
Tip: Choose Merino wool if you want a soft and smooth finish for your wet felting project.
Results and Textures
Wet felting creates a thick, sturdy fabric. The finished felt feels dense and holds its shape well. You can use wet felting to make items like bags, hats, slippers, or even art pieces. The texture is usually smooth and even, but you can add patterns or layers for extra interest. Wet felting works best when you have enough space to lay out your materials and roll the mat. The process can be messy, but you get a strong and lasting result.
Wet felting lets you make large pieces of felt or combine colors for unique designs. You can experiment with different types of wool to see which texture you like best. If you want to create solid, durable fabric, wet felting is a great choice.
Needle Felting vs Wet Felting
Process Differences
There are clear differences between needle felting and wet felting. Needle felting is a dry process. You poke wool with special needles to shape it. Wet felting uses warm, soapy water and lots of rubbing. This makes the wool turn into solid fabric. Needle felting does not need water or soap. Wet felting must use water and soap. The table below shows how each process is different:
Aspect |
Needle Felting |
Wet Felting |
|---|---|---|
Technique |
Involves up-and-down motion of felting needles |
Uses warm, soapy water and manual agitation |
Fulling Requirement |
Does not require fulling, soap, heat, or water |
Requires fulling to interlock wool fibers |
Tools Used |
Felting needles and sculpting tools |
Manual agitation tools like a washboard |
Tip: Needle felting is less messy and gives you more control. Wet felting is better for making strong fabric.
Materials and Tools
Each felting method needs different materials. For needle felting, you need felting needles, a pad, and wool. You can use sculpting tools if you want. You do not need water, soap, or heat for needle felting. Wet felting needs wool, warm water, and soap. You also need a rolling mat or bubble wrap to help rub the wool. Here is a quick list of what you need for both techniques:
-
Needle Felting Materials Needed:
Felting needles
Felting pad or cushion
Wool
Sculpting tools (optional)
-
Wet Felting Materials Needed:
Wool
Warm water
Soap
Rolling mat, bubble wrap, or mesh
Needle felting uses fewer materials and is easier to set up. Wet felting needs more space and more materials. Always pick the right materials for your project to get good results.
Note: Using the correct materials helps you avoid mistakes and makes felting easier.
Texture and Finish
The texture and finish depend on the felting technique you use. Needle felting makes a lighter and softer surface. It can look fuzzy and lets you add small details. Wet felting makes a thicker and smoother fabric. This is good for things that need to be strong, like bags or hats. You can use needle felting to add details to a wet-felted base.
Needle felting gives you more control over the look.
Wet felting makes a sturdy and even finish.
Try both techniques to see which texture you like best.
Time and Skill
Each felting method takes a different amount of time. Needle felting is faster and less messy. You can finish small projects quickly. Wet felting takes longer because you need to get materials ready. You use water and soap and spend time rubbing the wool. Wet felting also needs more cleanup.
Needle felting: Fast, less mess, easy to start.
Wet felting: Takes longer, needs more materials, and can be messy.
Think about your skill level too. Needle felting lets you start with simple shapes and learn as you go. Wet felting may need more practice to get smooth results. Both techniques have safety tips. For needle felting, keep fingers away from the needle and use a pad. For wet felting, wear gloves if your skin is sensitive and keep your workspace dry.
Be patient with both techniques. Practice helps you get better and avoid mistakes.
You should also think about the environment when picking materials. Wool is natural and can be better than synthetic fibers. Some dyes can affect water, so try to use eco-friendly products.
Project Ideas and Uses
Needle Felting Projects
Needle felting gives you many creative options. You can use wool fibres to make animal figurines. You shape the wool fibres with a needle to form realistic or cartoon animals. You also create flowers and plants by layering wool fibres and poking them into place. Jewelry projects work well with needle felting because wool fibres are light and easy to shape. You design earrings, pendants, or brooches with colorful wool fibres. Home decor items like wall hangings and pillows use needle felting for texture and detail. Toys and dolls are another popular choice. You sculpt wool fibres into soft figures that children love.
Here are the most popular needle felting projects:
Flowers and plants
Jewelry
Home decor
Toys and dolls
Tip: Start with simple shapes. Add more wool fibres for details as you gain confidence.
Wet Felting Projects
Wet felting uses warm water, soap, and wool fibres to create sturdy items. You make felted beads for jewelry by rolling wool fibres between your hands. Coasters and pot holders use layers of wool fibres pressed together for thickness. Decorative bowls form when you shape wet wool fibres around a mold. Scarves and shawls use thin layers of wool fibres for a soft finish. Floor rugs need many wool fibres to create a strong surface. Hats and flowers also use wet felting for structure and style.
Common wet felting projects include:
Felted beads for jewelry
Coasters and pot holders
Decorative bowls
Scarves and shawls
Floor rugs
Hats and flowers
Note: Wet felting works best with long wool fibres. This helps your project stay strong and last longer.
Combining Techniques
You can combine needle felting and wet felting for advanced projects. Wet felting creates a sturdy base with wool fibres. You use needle felting to add details and textures on top. This combination lets you make items with strong shapes and beautiful designs. You start by wet felting a base, such as a bowl or bag, using many wool fibres. After the base dries, you use needle felting to add patterns, faces, or decorations with more wool fibres. This method improves both the look and strength of your project.
Try combining both techniques. You get a project with a solid base and detailed surface. Wool fibres help you achieve unique results in felting.
Choosing a Method
Project Needs
When you choose between needle felting and wet felting, you should think about your project goals. Each method works best for different results. If you want to make a soft sculpture or add fine details, needle felting is the right choice. If you need a strong, smooth fabric, wet felting will work better.
Needle felting is ideal for intricate designs and adding details to projects, while wet felting is better for creating sturdy items and basic shapes. Wet felting produces a heavier and smoother end product, whereas needle felting results in a lighter and rougher texture. These characteristics influence the choice of technique based on the project's requirements.
You can use this table to help decide which method fits your needs:
Project Type |
Best Method |
Why It Works Well |
|---|---|---|
Small figurines |
Needle felting |
Allows for detail and shaping |
Bags or hats |
Wet felting |
Makes sturdy, smooth fabric |
Adding decorations |
Needle felting |
Easy to attach small features |
Large flat pieces |
Wet felting |
Covers more area, strong finish |
Think about the look and feel you want. Choose the method that matches your vision for the project.
Beginner Tips
Starting with felting can feel challenging, but you can make it easier by following some simple advice. Many beginners face common problems in both needle felting and wet felting:
The process is slow and requires patience.
Wool layer thickness can hinder water penetration and agitation.
Cold water temperature may prevent fibers from felting properly.
Beginners should start with simple shapes like spheres and stars.
The process requires patience and may involve a steep learning curve.
You can avoid frustration by picking easy shapes and practicing often. Here are some expert tips to help you get started:
You only need a felting needle, a cushion, and some wool to start. Try 36 or 38 star needles.
The technique involves poking wool with a notched needle to tangle the fibers.
Romney sheep wool works well for beginners because it felts quickly and gives a smooth finish.
Reverse felting needles help you create fluffy textures, like animal fur.
Practice and patience will help you improve your skills.
Tip: Always use warm water for wet felting. Thin layers of wool help the fibers lock together better.
You will get better with each project. Try both methods to see which one you enjoy most. Felting lets you create many different things, so have fun and keep learning.
You have learned how needle felting and wet felting are different. Needle felting lets you make shapes with lots of detail. Wet felting makes fabric that is strong and smooth. Many people like to use both ways because each has something special:
Needle felting helps you feel calm and pay attention.
Making gifts by hand makes you happy and brings people together.
Wool is good for the planet because it can be used again and again.
Try both ways to see which one makes you feel the most creative.
FAQ
Can you use any type of wool for felting?
You should choose wool with long fibers for wet felting. Needle felting works best with medium or coarse wool. Merino wool is soft and smooth, making it a popular choice for both methods.
Is needle felting safe for kids?
Needle felting uses sharp needles. You should supervise children and teach them to keep fingers away from the needle. Use a felting pad for safety. Wet felting is safer for younger kids.
How do you fix mistakes in felting projects?
You can add more wool and keep felting to cover small errors. If you make a hole, fill it with extra wool and poke it with the needle. Wet felting mistakes can be fixed by re-wetting and reshaping the wool.
What projects are best for beginners?
Start with simple shapes like balls, flat coasters, or basic animals. You can try small wet felted beads or needle felted stars. These projects help you learn the basic techniques and build confidence.