
How to Get Started with Needle Felting at Home
Ready to try needle felting at home? You only need a few basic tools and some wool, so beginners find it easy and affordable to get started. Most starter kits cost about $20, which is much less than other crafts. You don’t need special skills—just patience and creativity. For the best advice for complete beginners, check out these popular beginner projects:
Snowman
Sheep
Pumpkin
Penguin
Chickens
Tip: Beginners often use too much wool or break needles by rushing. The best advice for complete beginners is to start slow and enjoy shaping simple projects.
Key Takeaways
Needle felting is an affordable and creative craft. Beginners can start with basic tools and wool for around $20.
Choose the right needle size for your projects. A 38-gauge star needle is great for most tasks, while a 40-gauge is perfect for fine details.
Safety is key in needle felting. Use finger guards and a proper mat to protect yourself and your workspace.
Needle Felting Kits and Tools
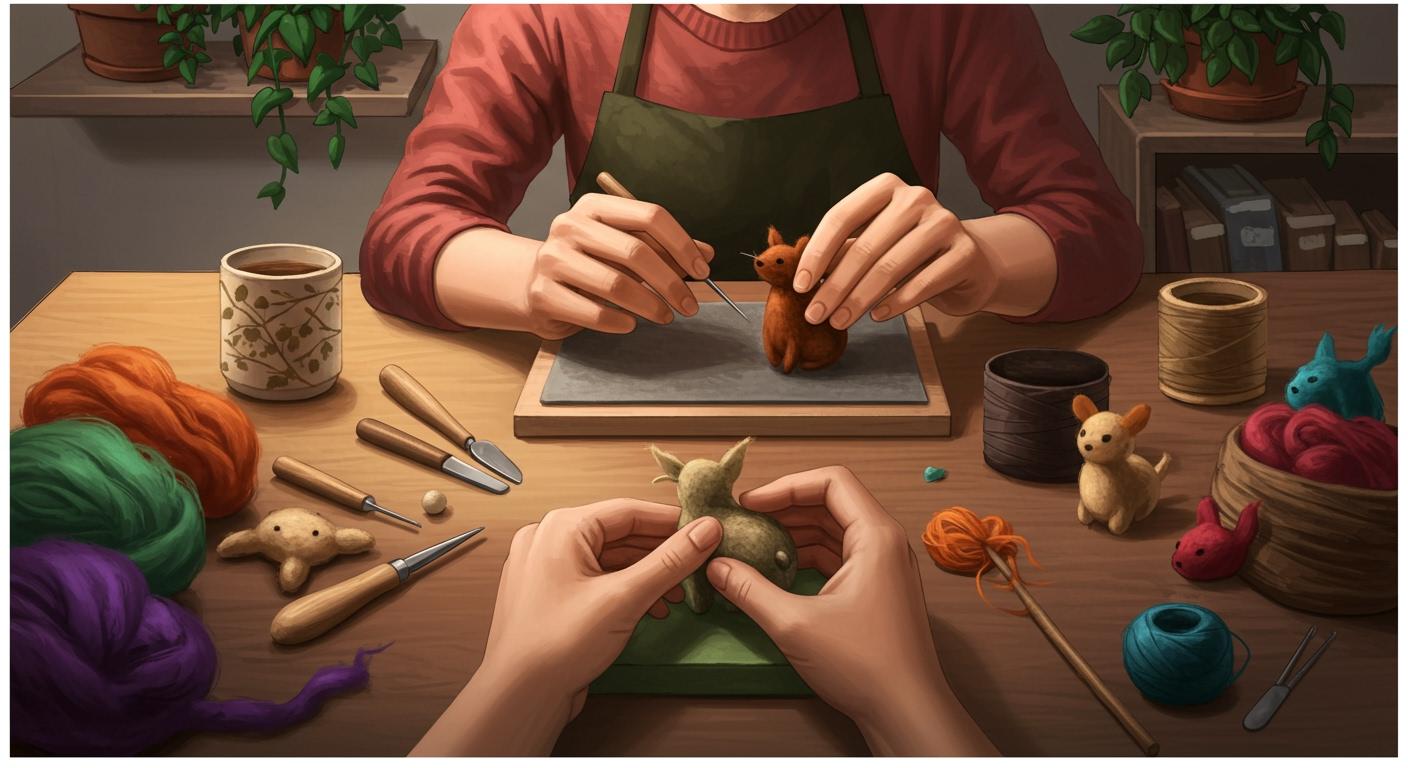
Getting started with needle felting at home is easier when you know what to look for in your supplies. You do not need a lot of fancy equipment. Most beginners start with a few basic needle felting tools and materials. Let’s break down what you need and how to stay safe while you create.
Essential Needles
The most important tool for needle felting is the needle itself. You will see many types, but you do not need to buy every size. For beginners, it is best to start with just a couple of needles. A 38-gauge star needle works well for most projects. You can also try a 36-gauge triangle for shaping and a 40-gauge triangle for adding fine details. These sizes help you work on both the main shape and the finishing touches.
Here’s a quick look at common needle sizes and their uses:
Gauge |
Characteristics |
Recommended Use |
|---|---|---|
36 |
Moves fiber quickly |
Under layers, base shapes |
38 |
Good for details and layering |
All-purpose, finishing work |
40 |
Fine, less aggressive |
Fine details, pictures |
42 |
Very fine, slow |
Delicate work, less distortion |
You might see a multi-needle tool in some needle felting kits. This tool holds several needles at once. It helps you felt larger areas faster, which is great for big projects.
Tip: Don’t rush to collect every needle for needle felting. Start simple and add more as you learn what you like.
Wool and Materials
Wool is the main material you use in needle felting. The type of wool you pick can change how your project turns out. High-quality wool makes your work smoother and easier. It also helps your shapes look more defined and last longer.
Here are some popular types of wool and their special features:
Wool Type |
Unique Properties |
|---|---|
Merino |
Very soft, many colors, best for finishing touches |
Blue Faced Leicester |
Long, fine, soft, gives a detailed finish |
Shetland |
Fine, bulky, easy for beginners, lots of colors |
Corriedale |
Felts quickly, less fine, harder for tiny details |
Manx Loaghtan |
Bulky, felts fast, limited natural colors |
Jacob |
Medium, easy to felt, comes in natural shades |
Herdwick |
Coarse, dense, adds texture |
Alpaca |
Very fine, soft, takes longer to felt, natural colors |
If you want to try a starter kit, most needle felting kits include:
Felting wool
Felting mat or pad
Step-by-step instructions
Starter kits can cost anywhere from $5 to $51, depending on what’s inside. Most beginners find a kit in the $20 range is perfect for learning.
Note: The wool you choose affects how easy your project will be. Merino is soft and great for details, while Corriedale is sturdy and felts quickly.
Work Surface Safety
Needle felting needles are sharp. You need a safe work surface to protect your table and your fingers. Most people use needle felting pads. These pads can be made from foam or layers of wool felt. Foam pads are cheap and easy to find, but they wear out after a few projects. Wool felt pads last longer and are better for the environment.
You can also use upholstery foam or even a pile of kitchen scourers. Just make sure your pad is dense enough so the needle does not poke through to your table.
Here are some options for needle felting pads:
Foam pad (easy to find, wears out faster)
Wool felt pad (long-lasting, eco-friendly)
Upholstery foam (dense, protects your table)
Pile of scourers (works in a pinch, but not as durable)
Protecting your fingers is just as important. Many beginners poke themselves by accident. You can use leather finger cots, ceramic thimbles, or metal thimbles to keep your fingers safe. Some people even use sewing machine finger protectors.
Tool Type |
Description |
|---|---|
Leather Finger Cots |
Soft leather, fits over your fingers, flexible and protective |
Ceramic Thimble |
Smooth, prevents wool from sticking, easy to use |
Metal Thimble |
Strong, protects well, may block your view a little |
Sewing Machine Protector |
Adjustable, keeps fingers away from the needle |
Safety Tip: Always keep your eyes on your needle for needle felting. Use finger guards if you are new to the craft.
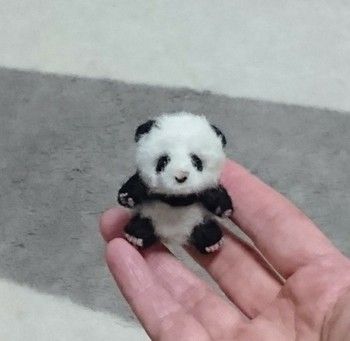
If you want to see what’s possible as you get better, check out the Pet Portrait Custom Frame by Pawimprint. This advanced project uses premium wool and expert needle felting techniques to create a lifelike, three-dimensional portrait of your pet. While beginner projects cost much less, custom portraits like these can range from $160 to $800 or more. They show how far you can go with practice and creativity.
Getting Started Needle Felting Techniques
Workspace Setup
Before you start needle felting, you need a safe and comfortable workspace. You want to keep your tools organized and your fingers protected. Here’s a simple table to help you set up your area:
Step |
Tool/Material |
Description |
|---|---|---|
1 |
Felting Needles |
Use different sizes for shaping and details. Multi-needle tools help with big areas. |
2 |
Felting Mat or Foam Block |
Protects your table and absorbs needle pokes. Wool mats last longer. |
3 |
Wool Roving |
Soft, fluffy wool is best for beginners. Merino wool works well. |
4 |
Finger Guards |
Rubber or leather guards keep your fingers safe from sharp needles. |
5 |
Needle Felting Kits |
Kits give you all the basics and instructions to start your first project. |
Keep your workspace clutter-free. Store your needles in a safe container when you finish. Always keep sharp tools away from pets and kids.
Basic Felting Steps
You can create many shapes with simple needle felting techniques. Let’s walk through the steps for making a basic ball or oval:
Take a long piece of wool and roll it into a tight oval or cylinder. Tuck in the ends as you go.
Hold the wool on your felting mat. Use your needle to poke the wool, turning it as you work. Keep your needle straight up and down.
Keep stabbing the wool until it holds its shape. You will see the fibers tangle and stick together.
Shape and smooth the wool by rolling it gently between your hands. This covers deep needle marks and makes the shape even.
Most beginners finish a basic ball in 10-20 minutes. If you want to cover the surface or make a simple animal, plan for 1-3 hours. Take your time and enjoy the process.
Tip: Start with easy projects like a ball, a pumpkin, or a felted pet. These help you learn the basics before moving to bigger ideas.
Safety Tips
Needle felting needles are sharp and can hurt if you are not careful. Here are some ways to stay safe:
Wear finger guards or thimbles to protect your fingers.
Use a felting mat or foam block. Never felt on your lap or hand.
Keep your free hand away from the needle. Try using a Felting Claw or a leather glove for extra safety.
Hold your needle at a 90-degree angle. This keeps it from breaking and helps you control your work.
Take breaks to rest your hands, neck, and shoulders.
Store your needles in a safe place when you finish.
Always count your needles before and after you work.
Needle Penetration Resistance |
Remarks |
|
|---|---|---|
Life Liner Glove Liner |
High |
Great resistance against needle pokes |
FingGuard Finger Guard |
High |
Good for sharp needles, covers only part of finger |
Other Glove Liners |
Moderate |
Some protection, but not as strong |
Safety Reminder: Always keep your workspace tidy and your tools covered when not in use. This helps prevent accidents.
Common Mistakes
Many beginners make the same mistakes when learning needle felting. Here are some to watch out for:
Not focusing on safety. Always use finger guards and keep your hands away from the needle.
Starting with projects that are too hard. Begin with simple shapes or animals.
Using the wrong needle technique. Don’t stab too deep or at an angle. This can break your needle and ruin your project.
You can avoid these mistakes by practicing simple needle felting techniques and watching a tutorial or video before you start.
Troubleshooting
Sometimes things go wrong, but you can fix most problems with a few easy steps.
If your project has lumps or uneven shapes:
Make short, quick stabs instead of deep ones.
Pick the right needle size for your wool.
Use wool that felts easily, like Romney or Icelandic.
Keep your needle straight to avoid breaking it.
If your needle breaks:
Hold the needle lightly and avoid pressing down hard.
If the needle bends, stop and check your grip.
Use the right needle for the job. Start with a 36 or 38-gauge for shaping, and switch to a 40-gauge for details.
Never use your needle to pull or pry fibers.
If you find holes or thin spots:
Be gentle to avoid making holes.
If you see a thin area, add more wool and felt it in place.
For holes, place the spot over your felting pad, add wool, and poke around the edges until it blends in.
Repeat on both sides if needed.
Note: If you get stuck, watch a needle felting video tutorial or ask for help from experienced felters online.
Learn More with Tutorials and Videos
You can learn a lot from watching a tutorial or video. Many beginners find it easier to follow along with needle felting video tutorials. Here are some great options:
Tutorial Name |
Description |
Link |
|---|---|---|
Free course for learning the basics. |
||
Shows how to shape and shade a realistic apple. |
||
Step-by-step guide to making a cute cactus. |
||
Covers tools and simple techniques for getting started needle felting. |
You can also find many needle felting video tutorials on YouTube. Watching a video helps you see each step and learn at your own pace. Try starting with a simple project, then move to more advanced ideas as you get better.
Experienced felters suggest you begin with easy projects and kits. As you gain confidence, you can try more complex shapes and even create custom pet portraits like the ones from Pawimprint.
Needle felting gives beginners a fun way to relax and express creativity. You can set small goals, try new projects, and learn from mistakes. Many beginners find joy in making pet portraits, which help you feel close to your furry friends. Remember, needle felting helps you feel calm and proud of your progress.
Mistakes help you learn.
Small projects keep things easy.
Pet portraits bring happy memories.
FAQ
How do you choose the best tutorial for needle felting?
You want a tutorial that shows each step clearly. Look for a video with close-up shots. Try a beginner-friendly tutorial before moving to advanced projects.
Can you learn needle felting from a video or do you need in-person help?
You can learn needle felting from a video. Many people start with a tutorial online. You see techniques in action and pause the video anytime.
What should you do if your project does not look like the tutorial or video example?
Don’t worry! Every project looks different. Watch the tutorial again or pause the video to check your steps. Practice helps you improve with each tutorial.
Tip: If you get stuck, try a different tutorial or watch another video. You might find a new trick that works for you!