
Beginner Mistakes to Avoid When Needle Felting Wool Animals
If you are new and want a beginner's guide to needle felting, you might wonder what advice is best for you. Needle felting can seem hard at first, but guides like your quick-read guide can help you. Many beginners pick the wrong wool, forget to plan, or hurry through their projects. Some people have trouble with needle felting dos and don’ts, picking the right tools, or learning how to needle felt. Do not worry if you make mistakes because every beginner does. Your quick-read guide, guides from a wool animal website, and tips from needle felting experts can help you start needle felting more easily. For ideas, look at Pawimprint’s custom needle felted animals and other beginner tips.
Key Takeaways
Pick core wool for the inside. Use softer top wool for the outside. This helps you make strong and smooth wool animals.
Use different needle sizes for shaping. Use them for adding details too. This makes your work easier and more exact.
Begin with simple shapes and projects. This helps you feel confident. Try harder techniques like armatures later.
Be patient and practice often. This will help you get better. You will also enjoy making things more.
See mistakes as ways to learn. Mistakes can make your wool animals special. Be proud of their unique look.
Wool Choice Core vs. Top Wool
Choosing the right wool makes a big difference when you start needle felting wool animals. You will see two main types: core wool and top wool. Each one has its own job in your project.
Here’s a quick table to help you see the differences:
Aspect |
Core Wool (Carded Wool) |
Top Wool (Tops/Roving) |
|---|---|---|
Texture |
Coarser, fibers in many directions |
Softer, finer, fibers run in one direction |
Felting Speed |
Felts more slowly |
|
Suitability |
Great for building firm shapes inside animals |
Best for outer layer, adding color, and smooth fur |
Core wool is the sturdy base of your animal. It holds shape well and felts fast. You use it for the inside of your animal. Top wool, which is softer and finer, goes on the outside. It gives your animal a smooth finish and lets you add color or details. If you use only top wool, your animal may feel too soft or take longer to felt.
Best Wool for Beginners
If you are a beginner, picking the right wool helps you avoid frustration. Some wools are easier to work with than others. Here’s a table to guide you:
Wool Type |
Why It’s Good for Beginners |
How to Use It |
|---|---|---|
Corriedale |
Felts quickly, sturdy, easy to shape |
Use as core wool for base shapes |
Merino |
Very soft, smooth finish, great for details and color |
Use as top wool for outer layers |
Corriedale is a favorite for beginners. It is a bit coarser, so it felts fast and makes a strong base. Merino feels soft and looks beautiful, but it felts slowly. You can use Merino for the final layer to make your animal look real and smooth.
Many beginners make the mistake of using only soft animal fibres like Merino for the whole animal. This can make felting slow and tricky. Start with core wool for the inside, then add a thin layer of top wool for color and detail.
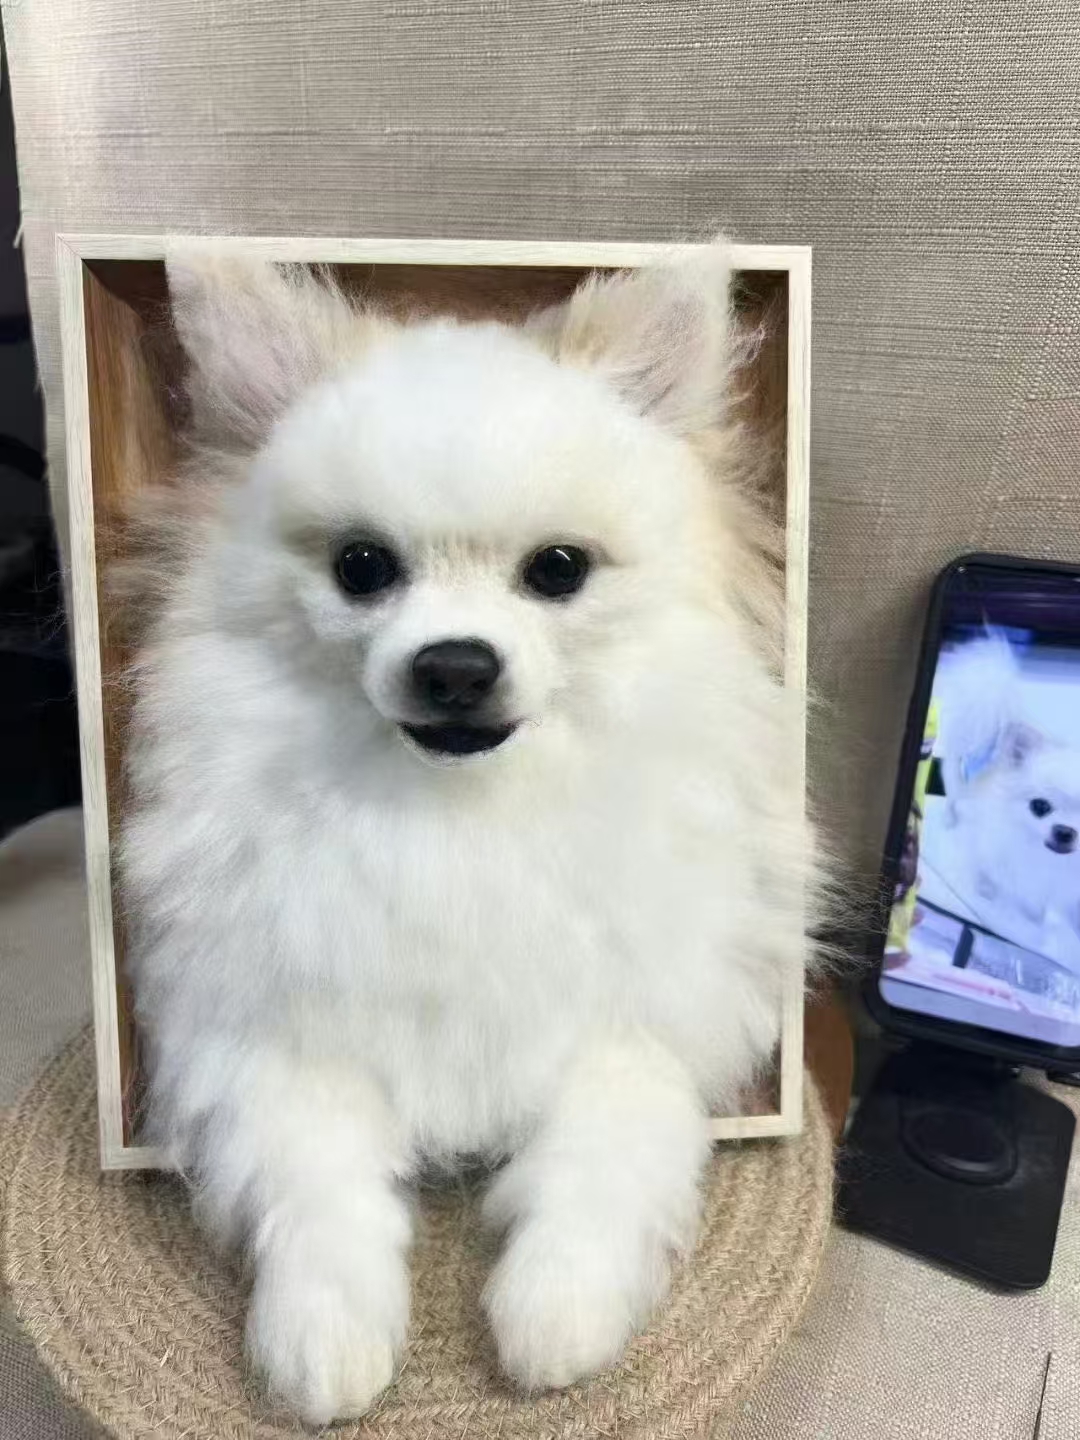
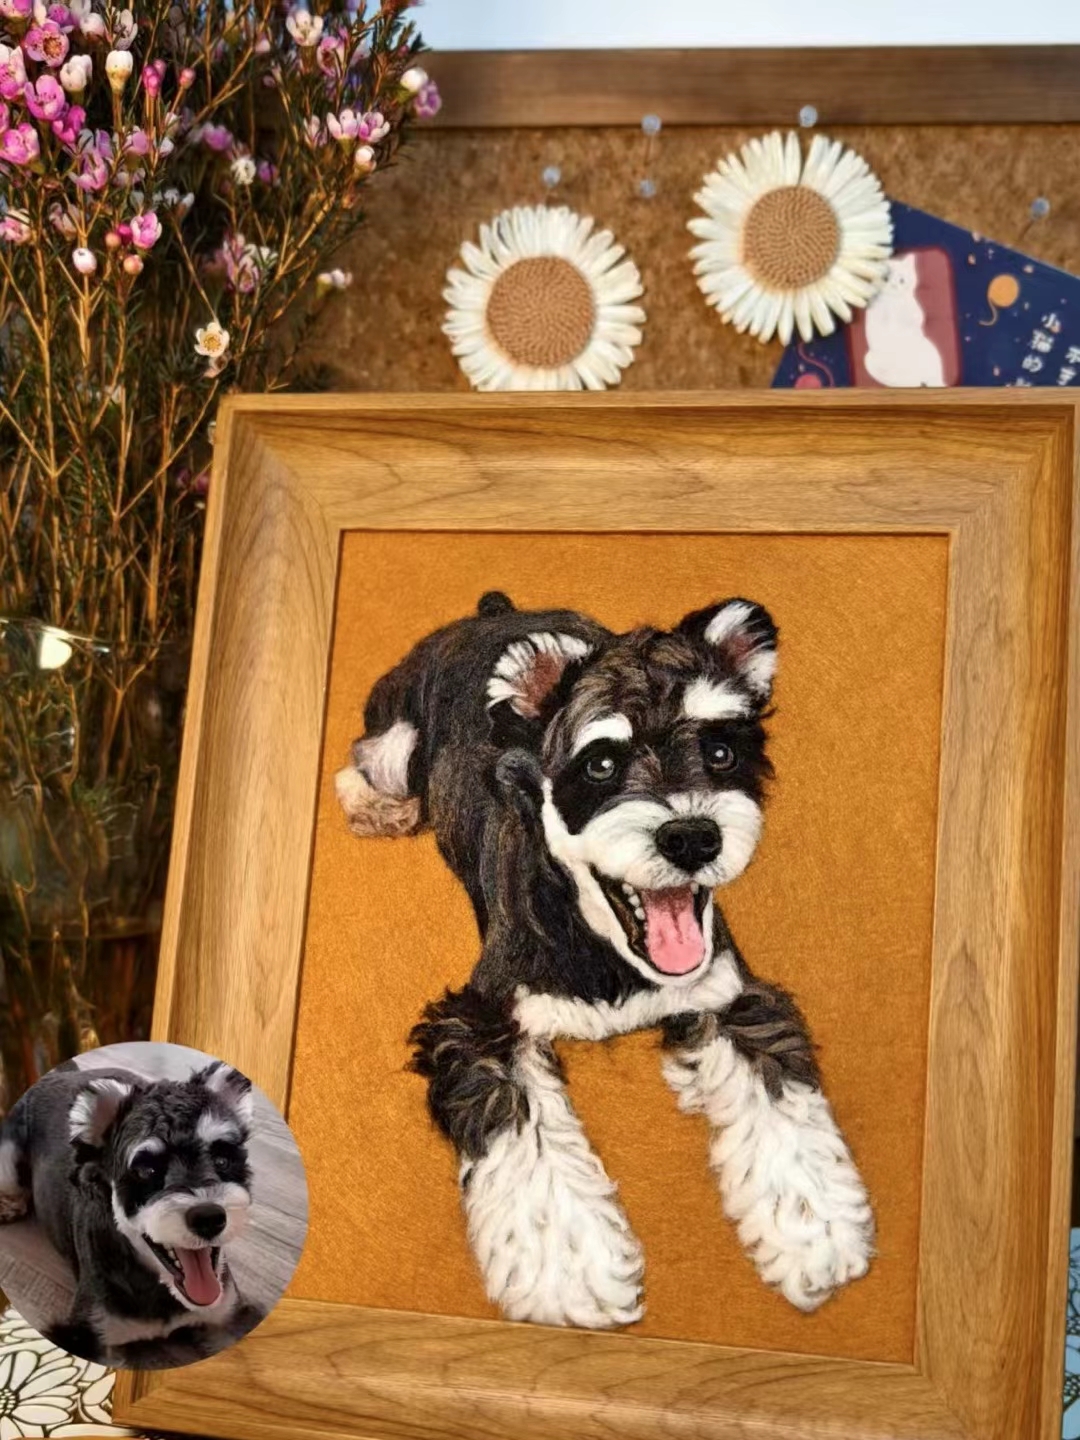
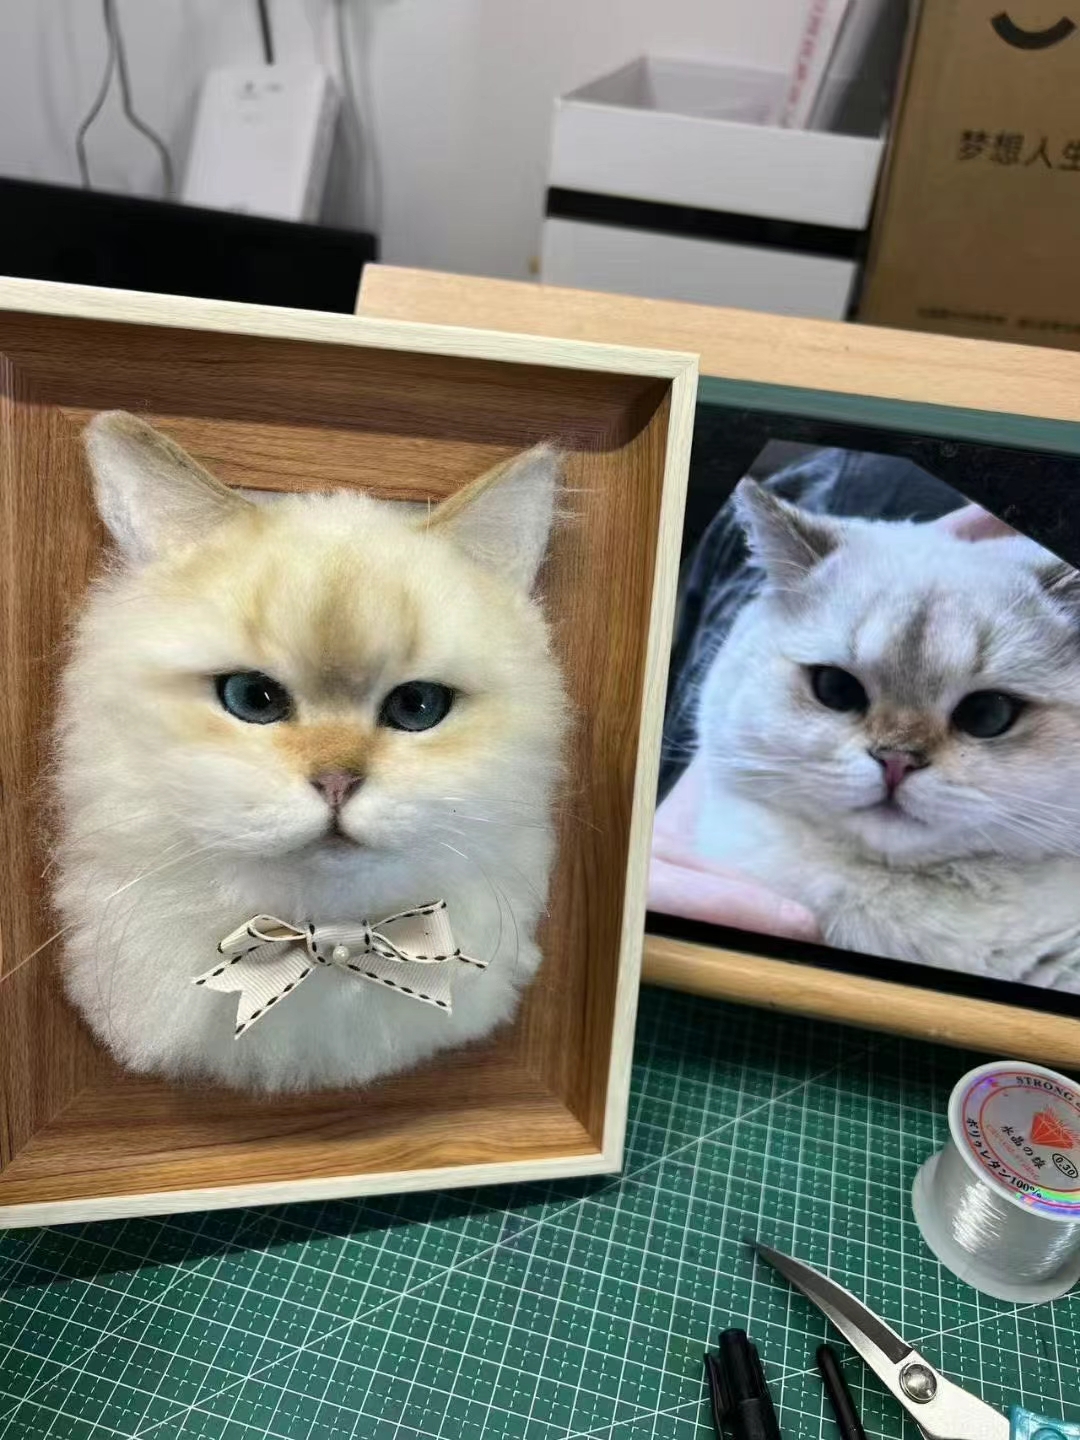
Tip: Look at Pawimprint’s custom wool felt portraits for ideas. Their artists use the right mix of core wool and top wool to create lifelike animals. You can learn a lot by studying their work!
Needle felting wool animals is a beginner friendly craft when you use the right materials. With the right core wool and top wool, your animals will look better and last longer.
Needle Felting Wool Tools
Getting the right needle felting supplies makes your projects easier and safer. Many beginners overlook how much the right tools matter. Let’s break down what you need for a smooth start.
Needle Types
Felting needles come in different shapes and sizes. Each type helps you with a different part of your needle felting project. Here are the most common needle types you’ll find in needle felting supplies:
Triangle Needles: These have three edges. They work well for most basic shaping.
Star Needles: With four edges, these needles felt wool faster. They’re great for speeding up your work.
Spiral Needles: These have a twisted tip. They help you get a smooth finish on your wool animals.
Needle size is measured by gauge. A lower number means a thicker, coarser needle. Use a 36-gauge needle for rough shaping. A 38-gauge needle is good for general work. For fine details, try a 40-gauge or even a 42-gauge needle. Many crafters use a needle holder to keep their hands comfortable, especially during long sessions.
Tip: Start with a medium needle for most of your needle felting. Switch to a finer needle for details like faces or tiny paws.
Safety matters, too. Felting needles are sharp and barbed. Always poke straight up and down. Avoid bending the needle, or it might snap. Store your needles in a safe container when you finish.
Felting Surface
A good felting surface protects your needles and your fingers. Most needle felting supplies kits include a foam pad or a wool mat. These give you a soft, stable place to work. A clutter-free, flat workspace helps you avoid accidents.
Some people use finger guards or thimbles, especially when starting out. These protect your fingers from painful pokes. Keep your workspace tidy and your tools organized. This makes needle felting safer and more fun.
Remember: The right needle felting supplies help you avoid broken needles and sore fingers. Take your time, and you’ll enjoy the process much more.
Needle Felting Wool Basics
How to Needle Felt
Learning how to needle felt can feel overwhelming, but you can break it down into simple steps. If you want to know how to needle felt, start with the basics. Here’s a step-by-step guide for beginners:
Gather your supplies. You need felting needles in different sizes, coarse wool, soft merino wool, a felting mat, pipe cleaners, and scissors.
Make a simple shape. Try a ball or oval first. Place your wool on the mat and poke it with a 36 or 38 needle. This is the first step in how to needle felt.
Shape your animal. If you want to make a dog or cat, use pipe cleaners to build a wire armature. Wrap coarse wool around it and poke with your needle.
Add layers. Use finer needles (like a 40 or 42) and soft merino wool for details. This is where you see how to needle felt realistic fur and faces.
Attach parts. Make ears, tails, and paws by shaping small pieces of wool. Use your needle to connect them to the body.
Finish with details. Add eyes, noses, and color patterns. Trim any loose fibers with scissors.
Tip: Watch needle felting video tutorials if you get stuck. Many tutorials show how to needle felt each step, so you can follow along. You can also find needle felting kits for beginners that include everything you need.
Taming the Wool
When you learn how to needle felt, you might notice the wool looks messy at first. Don’t worry! Taming the wool is part of the process. Use your felting mat every time. The mat protects your hands and helps the needle move smoothly. This makes needle felting easier and safer for beginners.
Try to align the wool fibers with the shape you want. If you want smooth fur, lay the fibers in the same direction. Use a fine needle for the last layer. This is one of the basic techniques that helps your animal look neat.
If you want more help, search for needle felting video tutorials online. Many video guides show how to do needle felting from start to finish. You can pause the video and try each step. Tutorials make learning how to needle felt much easier.
Note: Many beginners find that watching video tutorials helps them understand how to needle felt better than reading instructions alone. Try a few different tutorials to see which style you like best.
You can master how to needle felt with practice, patience, and the right tutorials. Every video you watch will teach you something new about how to do needle felting. Keep trying, and soon you’ll feel confident with all the basic techniques.
How to Needle Felt Animals
Simple Projects
If you want to learn how to needle felt animals, start with easy projects. Simple animals like bears, sheep, or dogs make great first choices. You can use basic shapes, such as balls for bodies and heads. Add small pieces for ears, arms, or legs. This approach helps you practice how to needle felt without feeling overwhelmed.
Many beginner kits focus on these simple projects. They give you step-by-step instructions and all the materials you need. You can find these kits on any good wool animal website. When you work on these needle felting animals, you build confidence and learn the basics. Try making a ball or heart shape first. These shapes are the foundation for many needle felting projects, including animal heads and ornaments.
Tip: Practice making a bear by starting with a ball for the body. Add two smaller balls for ears and two more for arms. This method teaches you how to needle felt animals using simple steps.
Using Armatures
When you feel ready to try more advanced needle felting animals, you can add structure with armatures. Armatures are made from pipe cleaners or thin wire. They help your wool animals stand or hold a pose. To use an armature, shape the wire into a simple skeleton. Wrap wool around the wire and use your needle to felt it in place.
Armatures make your needle felted animals stronger and more lifelike. You can bend the legs or tail to create different poses. Many artists on a wool animal website use armatures for realistic results. If you want inspiration, look at Pawimprint’s wool animal website. You will see how to needle felt animals with both simple shapes and armatures.
Needle felting animals becomes easier when you start with simple projects and basic shapes. As you practice how to needle felt, you will feel more confident. Soon, you will create your own unique needle felting projects and share them with others.
Proportions & Anatomy
Getting the proportions and anatomy right makes your needle felted animals look more lifelike. You want your creations to stand out, not just for their long fur or bright colors, but for their shape and pose. Let’s talk about how you can use reference photos and templates to help you make realistic looking creatures.
Reference Photos
Reference photos are your best friend when you want to needle felt animals that look real. They help you see the right shapes, sizes, and even how long fur falls on different parts of the body. Here’s how you can use them:
1. Find clear photos and anatomy diagrams of the animal you want to make. Look for pictures that show the animal from the side, front, and back. 2. Start by shaping simple forms. Make legs as cylinders or cones, heads as ovals or spheres, and bodies as sausages or teardrops. 3. Compare the size of each part before you attach them. Hold the legs next to the body and check if they match the photo. 4. Attach parts with loose fibers first. This lets you move them around if something looks off. 5. Mark where you want to put eyes, ears, or stripes. Use colored pins or a thin strand of bright wool. 6. Build up the wool slowly. This helps you control the size and keeps the long fur from getting too bulky. 7. Use a fine needle to smooth out the joins. This makes the animal look seamless, even if it has long fur.
Tip: Keep your reference photo nearby. Check it often as you work, especially when you add long fur or details.
Templates
Templates give you a big boost when you want your animals to look just right. Many professional needle felters use printable patterns that show the animal from different angles. These templates help you see where to add long fur, how to shape the body, and where the legs should go. You can lay your wool shapes on top of the template to check the size. Templates also help you build up muscle layers, so your animal can move or pose in a natural way. If you want to make animals with long fur, templates show you where to add extra wool for a fluffy look.
Using reference photos and templates together helps you create animals with the right proportions, smooth joins, and long fur that looks natural. You will find it easier to make realistic looking creatures, whether you are making a tiny mouse or a big, fluffy dog.
Rushing the Process
When you start needle felting, it’s easy to want quick results. You might see amazing animal projects online and wish your work looked just as good right away. But needle felting is a craft that rewards patience and steady practice. If you rush, you may end up with lumpy shapes or loose wool that falls apart. Let’s talk about why slowing down helps you enjoy the process and make better projects.
Patience
Patience is your best friend in needle felting. Each poke of the needle shapes your wool a little more. The slow, repetitive movements help you focus and relax. Many people find that needle felting feels calming, almost like a mental break from busy days. You get to enjoy the soft feel of the wool and the gentle sound of the needle. This focus helps you forget about stress and just enjoy creating.
Tip: Take a deep breath and enjoy each step. Needle felting gives you a chance to slow down and be present.
When you work patiently, you notice small details. You can fix mistakes before they become big problems. You also get to see your animal take shape, which feels rewarding. Many crafters say that patience makes the whole experience more fun and peaceful.
Practice
You don’t need to be perfect on your first try. Every project teaches you something new. The more you practice, the better your animals will look. Here’s how regular practice helps you improve:
You learn new techniques by trying different projects.
Hands-on experience helps you remember what works.
Each project lets you experiment and get creative.
Watching video tutorials gives you ideas and shows you new tricks.
Practicing with video tutorials helps you spot and fix mistakes faster.
Many beginners find that following step-by-step tutorials or video guides makes learning easier. You can pause the video, try a step, and then keep going. Over time, you’ll see your skills grow. Your projects will look neater, and you’ll feel proud of what you make.
Remember: Every project, every video, and every tutorial is a step forward. Enjoy the journey and celebrate your progress!
Embracing Imperfections
Learning from Mistakes
You might feel frustrated when your needle felted animal does not look perfect. Maybe the ears are uneven, or the legs look a little wobbly. That is normal! Every beginner—and even experienced artists—makes mistakes. The best part? You can turn those little errors into something special.
Tip: If you poke the wool too much and it gets a dent, try adding a bit more wool and gently felting again. Sometimes, a mistake leads to a new idea or a fun feature you did not plan.
Think of each project as a chance to learn. When you see a crooked tail or a lopsided nose, ask yourself what you can do differently next time. You might even decide you like the quirky look! Many crafters say their favorite animals are the ones with the most personality, even if they did not turn out exactly as planned.
Here are some ways to learn from your mistakes:
Take a photo of your finished animal. Compare it to your reference picture.
Write down what you found tricky. Try a new technique on your next project.
Ask other crafters for advice. You can find friendly groups online who love to help.
Unique Creations
No two needle felted animals ever look the same. You use your hands, your eyes, and your ideas. That means every animal you make is one-of-a-kind. Even if you follow the same steps as someone else, your animal will have its own charm.
Each creation tells a story. Maybe your dog has a big nose because you ran out of wool, or your cat has extra fluffy cheeks because you liked how it looked.
Pawimprint’s custom wool felt portraits work the same way. Each keepsake captures the spirit of a real pet. Your needle felted animals can do that, too. When you embrace little imperfections, you make something truly special. Your animal might have a silly grin or a playful pose. That is what makes it yours.
So, do not worry about making everything perfect. Celebrate the quirks. Enjoy the process. Your unique touch is what brings your wool animals to life!
You can avoid common beginner mistakes in needle felting by following these tips:
Use different needle sizes for shaping and details.
Work slowly and rotate your project.
Start with core wool and simple projects.
Protect your fingers and use a good felting mat.
Remember, patience and practice help you improve. Every animal you make is special. For more tips and inspiration, check out Pawimprint’s custom wool felt portraits and beginner-friendly guides.
FAQ
How do I fix a mistake in my needle felted animal?
Don’t worry! You can add more wool to cover dents or holes. If you need to remove a part, gently pull it off and felt new wool in place. Mistakes help you learn.
What should I do if my needle keeps breaking?
Try poking straight up and down. Avoid bending the needle. Use a soft felting mat. If you push too hard, use a thicker needle for shaping. Switch to a finer needle for details.
Can I mix different types of wool in one project?
Absolutely! Use core wool for the inside and top wool for the outside. Mixing wools gives your animal strength and a smooth finish. Many artists use this trick for the best results.
How do I make my animal look more realistic?
Use clear reference photos. Check the size and shape of each part. Add small details like eyes and fur patterns. Take your time and look at real animals for inspiration.