
My Process for Making a Realistic Felted Dog Memorial
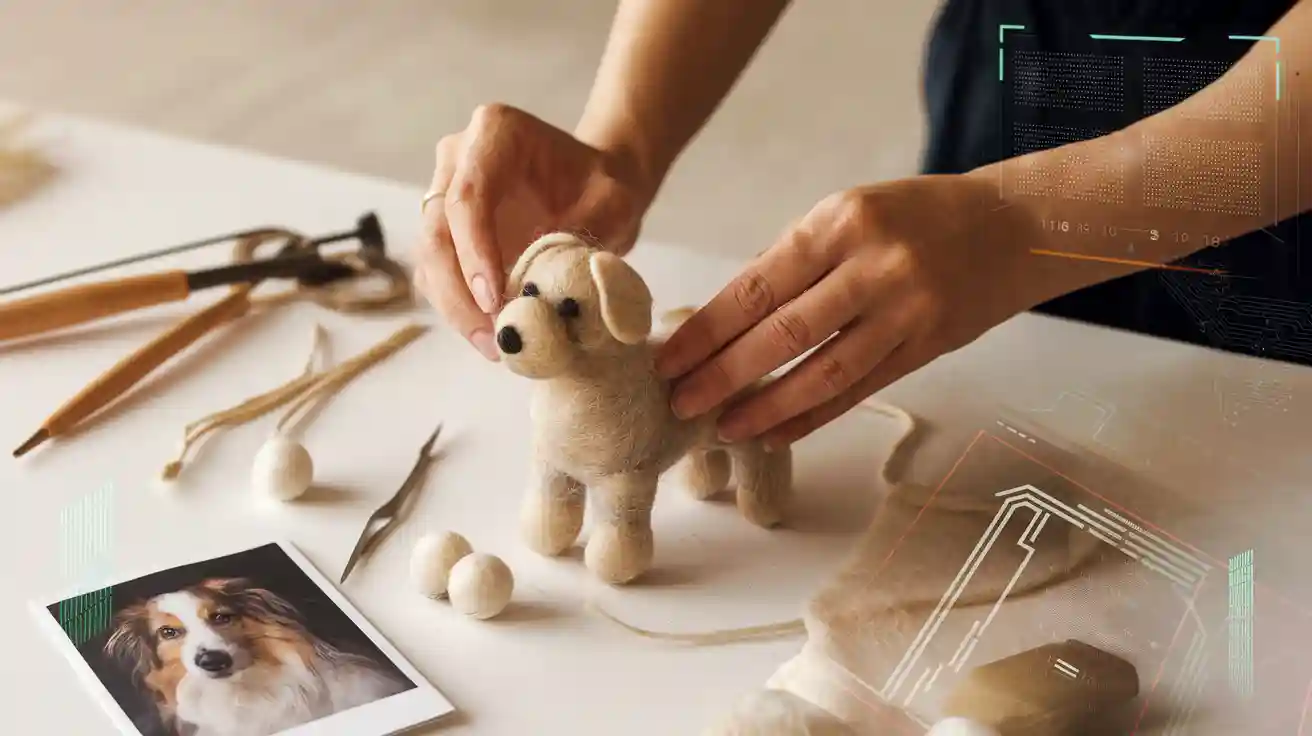
Losing your dog can leave a space in your heart that feels hard to fill. Many people, just like you, find comfort in creating a special memorial. In fact, about 65% of pet owners look for keepsakes after saying goodbye. Pawimprint helps you celebrate those memories with realistic felt pet art that brings your dog’s personality to life. You can follow this tutorial even if you’re new to crafting. If you want to learn more about needle felting, you’re in the right place for a heartfelt start.
Key Takeaways
Pick the best tools and wool to make your felted dog look real. Use the right kind to help shape and add details.
Find clear photos of your dog to help you work. These pictures will help you show what makes your dog special.
Make a strong wire armature to hold up your sculpture. This will help your dog keep its shape.
Add small things like eyes, fur texture, and markings with care. These details help show your pet’s personality.
Keep your finished felted dog safe and show it off the right way. This will help it stay nice for many years.
Materials for Realistic Felt Pet Art

Essential Tools and Wool Types
You need the right tools and wool to start making felt pet art. The table below shows what each tool and wool type does for your project:
Tool or Wool Type |
Description & Use |
Impact on Your Art |
|---|---|---|
Middle gauge, strong, makes medium holes |
Good for shaping without big holes |
|
Size 40 or 42 Triangle Needle |
Thinner, leaves fewer marks |
Makes the surface smooth and detailed |
Reverse Felting Needle |
Pulls fibers up, adds fluffiness |
Makes fur look fluffy and real |
Makes the inside skeleton |
Helps your dog keep its shape |
|
Glass Eyes (4mm for small dogs) |
Adds sparkle to the eyes |
Makes your pet’s eyes look real |
Soft, felts slowly, good for color layers |
Adds softness and color detail |
|
Romney Wool |
Strong, felts dense and firm |
Makes your sculpture feel plush and real |
Shetland, Jacob, Corriedale |
Good for base shapes, felts fast |
Builds structure and bulk |
Beginner kits cost between $7 and $80. Kits often have needles, wool, and extras like glass eyes or wire. You can use your pet’s own fur for a special touch. Collect fur during grooming and mix it with wool to make it personal.
Sourcing and Personalization Tips
Good materials help your felted dog look better. Here are some tips to help you get started:
Shop at trusted online stores like Fabric.com, Joann.com, and Amazon. Check reviews and product details.
Compare prices and shipping. Buying in bulk can save money.
Read what other customers say about the wool and tools.
Check return policies so you can shop safely.
Tip: Pawimprint uses only the best materials for their pet portraits. Their artists focus on every detail, from the glass eyes to the wool, to make your felted animals look just like your pet.
To make your felted dog special, send clear photos of your pet’s favorite pose or face. You can add things like a scarf or a tiny toy to show your dog’s personality. You can also ask the artist to use your pet’s fur for an extra special keepsake.
Tutorial: Creating a Needle Felted Pet Portrait
Ready to start your own needle felted pet portrait? This tutorial will walk you through every step, from choosing the best photos to adding those tiny, lifelike details. You’ll learn how to make a miniature needle-felted dog that truly captures your pet’s spirit. Let’s dive in!
Preparing Reference Photos
The first step in this tutorial is picking the right photos. You want your needle-felted dog to look just like your real dog, so clear, high-quality pictures matter. Here’s how you can get the best results:
Choose high-definition photos. The clearer the image, the easier it is to see your dog’s unique features.
Edit your photos using free apps or software. Brighten up the eyes, adjust shadows, and make sure the fur color looks true to life.
Use a mid-tone background. This helps you see both light and dark fur, making it easier to layer colors later.
Trace the outline of your dog onto your working surface with graphite or carbon paper. This keeps the proportions correct as you work.
If you want to get fancy, try using digital tools like Procreate. You can add layers, use special brushes for fur, and undo mistakes as you go.
Tip: Focus on your dog’s eyes and face. These areas show the most personality in your needle felted pet portrait.
You can also look at different fur types in your photos. Short, long, shiny, or curly—each one needs a different approach when you craft needle felted animals.
Building the Armature
Now it’s time to build the skeleton for your needle-felted dog. This part of the tutorial helps your project stay sturdy and keeps the shape realistic.
Use copper wire for the armature. Copper won’t rust and gives strong support, especially for legs.
Measure and shape the wire to match your dog’s body. You can find easy guides online to help with this step.
Make the limbs separately. Wrap the wire “bones” with wool and secure them with glue if needed.
Attach the limbs to the body. Leave some loose wool at the ends or poke the wire into the body, then cover the joint with more wool.
For the body, use polyester batting or polydown as a base. This saves wool and helps you shape the dog quickly.
Cover the base with undyed carded wool. This wool felts easily and comes in natural colors.
Note: Don’t felt the base too hard at first. You want to leave room for shaping and adding more wool layers later.
If you’re following step-by-step instructions, remember that patience pays off. Take your time with this part of the project.
Shaping the Needle-Felted Dog
This is where your needle-felted dog starts to look real! You’ll use different felting needles and wool types to shape the body and head.
Start with simple shapes. Make spheres for the head and cylinders for the body and legs.
Use coarse felting needles for the first round of shaping. These needles help you move wool quickly.
Switch to finer needles as you add more details. Fine needles make the surface smoother and help you get the right look.
Build the legs separately and attach them later. This makes it easier to shape the joints and mimic the actual dog’s pose.
Use dense wool like Romney for the core. It holds its shape and makes your needle felted animals sturdy.
Layer the wool slowly. Add a little at a time, felting as you go, to keep the proportions right.
If you want to create a replica that really stands out, pay close attention to the head and face. These areas bring your needle felted pet portrait to life.
You can use the same shaping techniques for other needle felted animals, too. The more you practice, the easier it gets to craft needle felted animals that look just like your pets.
Adding Details and Markings
Now for the fun part—making your needle-felted dog look just like your real dog! This part of the tutorial focuses on the tiny touches that make your portrait special.
Use different sizes of felting needles. Small needles help you add fine lines and tiny details.
Layer and blend wool colors. Sometimes you’ll use up to eight shades to match your dog’s fur.
Always lay the wool in the direction the fur grows. This makes your felted dog look soft and real.
Add whiskers with fishing line or natural hair. Secure them with a tiny dab of glue.
Use small scissors to trim stray fibers and shape the fur.
Focus on the eyes, nose, and ears. These spots show your dog’s personality and make your needle felted pet portrait shine.
Try blending different wool types. Use corriedale for the base and merino for the top layer to add depth and texture.
Safety tip: Use finger guards and a felting pad to protect your hands while you work.
If you want your final project representing a little dog to look perfect, take your time with these details. The more you practice, the better your needle felted animals will look.
Here’s a quick table of common mistakes and how to fix them:
Mistake |
Solution |
|---|---|
Using foam cushions |
Use a wool felting cushion for smoother results |
Wrong needle size |
Pick the right needle for your wool and use a needle holder |
Using superwash wool |
Choose Romney or Icelandic wool for best felting |
Overusing armatures |
Only use wire for long legs or special poses |
Rushing the project |
Slow down and felt each layer firmly |
By following these directions and tips, you’ll finish with a needle felted pet portrait that’s full of life and love. This tutorial gives you all the tools you need to craft needle felted animals that honor your pet’s memory. When you finish, you’ll have a felted, lifelike, and heartfelt final project representing a little dog—one that you’ll treasure forever.
Finishing Your Needle Felted Pet Replica
Eyes, Nose, and Fur Texture
You have shaped your needle-felted dog, and now it is time to bring it to life. Start with the eyes. Use glass or plastic eyes for a lifelike sparkle. Place them carefully so your dog’s gaze feels real. For the nose, roll a small ball of black wool or use a tiny plastic nose. Shape it with your fingers, then attach it with a few gentle felting pokes. This step gives your needle-felted dog its unique expression.
To create realistic fur, blend wool batts for the base and layer merino wool tops mixed with natural undyed wool. Keep the fibers going in the same direction. Layer different colors, pull them apart, and blend without fully mixing. Cut the blended wool into narrow strands and small pieces. Add the fur by felting each piece from the back of your dog, layering over previous pieces. Use a barbed needle to felt shallowly along the center and edges. Trim the fur unevenly with small scissors to make it look fluffy and natural. Fluff the strands with your fingers and stab lightly between them to keep the volume.
Tip: Use fine needles for delicate details and medium needles for blending. Always check your reference photos to match the fur’s color and texture.
Final Touches and Personalization
Now you can add the final details that make your needle felted pet replica special. Trim stray fibers and add highlights with a touch of lighter wool. If you want to use your pet’s real fur, brush your dog and collect clean fur. Add the fur by wrapping it around the armature and felting it in place, especially on the tail or chest for extra authenticity.
You can personalize your finished needle felted portrait with a favorite collar, scarf, or tiny toy. These little touches help your needle felted animals stand out. Pawimprint’s artists use these same methods to create felted keepsakes that capture every detail and emotion. When you finish, you will have a needle-felted dog that feels full of life and love.
Displaying and Caring for Your Needle Felted Pet Portrait
Framing and Placement Ideas
You have finished your felted pet portrait, and now you want to show it off. One popular way is to stretch the felted fabric over a canvas frame. Place it in a ready-made frame without glass. This keeps the wool’s texture and makes your portrait stand out. If you want extra protection, use a shadow box or a glass dome. These options help keep dust away and protect your art from curious pets or little hands.
Try placing your portrait in a spot where you see it every day. Many people like to display their felted pet art on a shelf, mantel, or even in a hallway. You can add a small nameplate or your pet’s favorite toy next to the portrait for a personal touch. Pawimprint also offers custom display options, so you can find the perfect way to honor your pet.
Tip: Before framing, tidy up loose strands and press the wool gently. This keeps your portrait neat and secure.
Maintenance Tips
Taking care of your felted portrait helps it last for years. Here are some easy steps you can follow:
Keep your portrait dry. Water makes dust stick to the wool.
Do not brush or comb the fur. Use a large felting needle to gently fix stray fibers.
Wash your hands before touching the portrait. Oils from your skin can attract dirt.
Use a small vacuum with low suction to remove dust. Cover the wand with a sock or thin cloth for safety.
Display your portrait behind glass or in a shadow box to protect it from dust and insects.
Check for signs of insects like carpet beetles. Store extra wool in sealed tubs and use lavender oil to keep bugs away.
Here is a quick table to help you prevent damage:
Cause of Damage |
How to Prevent It |
|---|---|
Insects (like moths or beetles) |
Use lavender oil, store in sealed tubs, check often |
Dust and oils from hands |
Avoid touching, use glass frames, clean gently |
Pawimprint wants you to feel happy with your keepsake. They offer a 30-day return and exchange period, free shipping, and promise to work with you if you have any problems. You can trust that your felted portrait will stay beautiful and safe.
Creating a felted dog memorial is more than just a craft—it’s a healing project that brings comfort and joy. Many people say their project helped them remember happy times and even brought a smile through tears. Studies show that making a memorial can ease grief and help you feel close to your pet. If you want to try this project or order a custom keepsake, you’ll find it’s a special way to honor your furry friend. Share your story or photo in the comments!
FAQ
How long does it take to make a needle felted dog memorial?
You can finish a simple felted dog in a few hours. If you want lots of details, you might spend several days. Take your time and enjoy each step.
Can I use my own dog’s fur in the project?
Yes! You can blend your dog’s clean fur with wool. This adds a personal touch and makes your memorial even more special.
What if I make a mistake while felting?
Don’t worry. You can pull off wool and try again. Use your felting needle to reshape or add more wool until you like how it looks.
Is needle felting safe for kids?
Needle felting uses sharp needles. Kids should always have adult supervision. Use finger guards and work slowly to stay safe.
How do I keep my felted dog looking new?
Keep your felted dog dry and dust-free. Place it in a glass dome or shadow box. Gently fix stray fibers with a felting needle if needed.