
Easy Pet Wool Felt Painting Techniques Anyone Can Try

You can begin pet wool felt painting with confidence. You do not need to be an expert. Many new artists like short-fiber carded batts. These give easy control. 100% wool felt is the easiest base for your portrait. This creative craft is becoming more popular. People use it to celebrate or remember their pets. You can try a project at home. You can also look at professional options like Pawimprint’s Custom Wool Felt Portraits. Keep reading to find helpful tips for success.
Key Takeaways
You can begin pet wool felt painting with wool, a felting needle, and a pet photo. You do not need many supplies to get started. Pick a clear photo of your pet. Make sure the photo has good lighting. This helps you see details and colors better. Use good wool like Corriedale or Merino. These types blend well and give nicer results. Blend colors slowly and add details step by step. This helps your pet look real in the painting. Take your time and have fun while you work. The more you practice, the better you will get at wool felt painting. Practice also helps you feel more confident.
Pet Wool Felt Painting Basics
What Is It?
Pet wool felt painting uses colored wool fibers and a special needle to create lifelike images of pets. You work on a flat piece of wool felt, layering and blending colors to build up the features. This technique feels similar to painting, but you use wool instead of paint. You can start with simple shapes and add details as you gain confidence. Many beginners enjoy pet wool felt painting because it does not require advanced skills or expensive tools. You only need wool, a felting needle, and a photo of your pet.
Custom wool felt pet portraits have become popular among pet lovers. Pawimprint offers handcrafted portraits that capture the unique personality of each animal. These portraits serve as a lasting tribute and make thoughtful gifts. You can create your own pet wool felt painting at home or choose a professional option for a polished result.
Tip: Choose a clear photo of your pet with good lighting. This helps you see the colors and details you want to include in your wool felt painting.
Why Try It?
Pet wool felt painting gives you a creative way to celebrate your pet. You can honor a beloved companion or remember a pet who has passed away. This craft lets you express your feelings and create a keepsake that lasts.
You can choose between two main styles: 2D and 3D wool felt portraits. The table below shows the differences:
Aspect |
2D Wool Felt Pet Portraits |
3D Wool Felt Pet Portraits |
|---|---|---|
Technique |
Needle felt painting on fabric |
Traditional needle felting to create shapes |
Appearance |
Flat images resembling paintings |
Three-dimensional forms with depth |
Color Blending |
Layers and blending colors |
Shaping and building forms |
Final Product |
Portraits or landscapes |
Sculptures or figures |
You can start with 2D pet wool felt painting if you want a simple project. This style lets you focus on color blending and detail work. If you enjoy sculpting, you may try 3D portraits later. Both styles help you develop new skills and create art that celebrates your pet.
Materials and Tools for Needle Felted Pet Portrait
You need the right materials to make a needle felted pet portrait. Good supplies help your project look nice. They also make it safer and more fun.
Wool Types
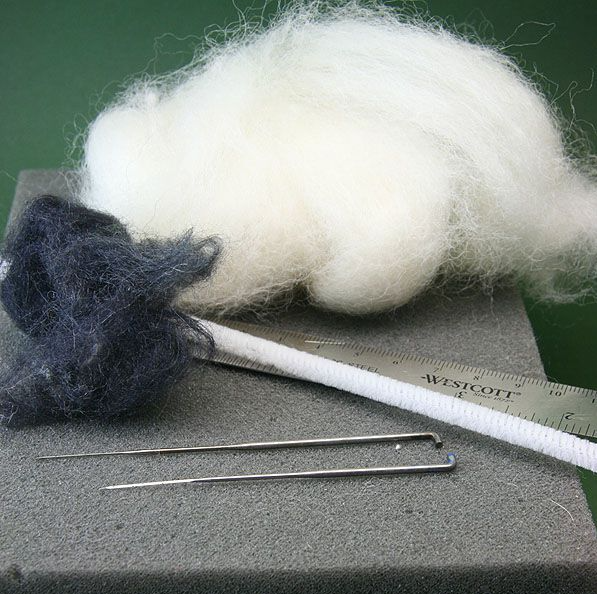
Pick the best wool for your art. Wool from different animals feels different. Some wool is soft. Some wool is thick. Use core wool for the base. It is cheap and strong. Use soft wool like merino for the top. Soft wool helps you add small details.
New Zealand Romney: Thick and tough, good for the base.
Bergschaf: Hard and rough, great for sculpting.
Blue Faced Leicester (BFL): Soft and shiny, good for the top.
Merino with Core: Soft outside, strong inside.
Short-fiber carded batts help you make tiny details. They also help you mix colors. Many artists like Felter’s Palette Wool or MC-1 Fast Felting Batts.
Tip: Use good wool felt or wool blend felt for your base. This is what experts use.
Felting Needles and Safety
Felting needles have small barbs. These barbs mix the wool fibers. You need different needle sizes for different jobs. Use a needle holder or a tool with many needles. This gives you better control. Wear finger guards or leather slips to protect your hands.
Always use a felting pad, not your body.
Keep your other hand away from the needle.
Take breaks so your hands do not get tired.
Change old needles so you do not get hurt.
Safety first: Do not hurry. Felting needles are sharp. You can get hurt if you are not careful.
Other Essentials
You need a few more tools to finish your pet portrait:
Use a felting pad or foam block for a steady surface.
Get roving wool in many colors for real-looking fur.
Use an erasable gel pen or heat transfer pencil to draw your pet.
Silk fibers add shine and texture.
A multi-needle tool helps you work faster.
Good tools make your work easier. They also help your portrait look great. If you buy good supplies, your pet portrait will last a long time.
Step-by-Step Pet Wool Felt Painting Tutorial
Choose a Pet Photo
Start your project by selecting the right photo. The quality of your portrait depends on this first step. Use these guidelines to pick the best image:
Make sure the photo is clear and not blurry. This helps you capture every detail.
Choose a portrait photo that highlights the eyes and facial features. The eyes bring life to your artwork.
Select a well-lit image. Good lighting reveals the true colors and textures of your pet’s fur.
Tip: A close-up shot of your pet’s face works best for a wool felt portrait. This allows you to focus on the unique expressions and markings.
Prepare Your Workspace
A well-organized workspace keeps your process smooth and safe. Gather your supplies and arrange them for easy access. Here is a table to help you set up:
Supplies/Tools |
Description/Use |
|---|---|
Name tag (thick wool felt) |
Keeps your project organized. |
Foam kneeling pad |
Provides comfort during long sessions. |
Wool felt sheets |
Main surface for your portrait. |
Acrylic craft felt |
Useful for extra layers or backgrounds. |
Card stock |
Makes a window mat for better perspective. |
Plastic ruler |
Ensures straight lines and accurate measurements. |
Wooden frame |
For displaying your finished portrait. |
XXL project bag |
Stores and organizes all your supplies. |
Felting needles |
Different sizes for various techniques. |
Card stock mat |
Helps you view your portrait from different angles. |
Mirror |
Lets you check your portrait’s symmetry and proportions. |
Breaks |
Take regular breaks to rest your hands and eyes. |
Set up an Eco Wool Mat for a stable surface. Keep a hard surface nearby if you need to work with wire armatures. Use a variety of barbed needles and store them in a needle holder for safety.
Note: Good lighting and a clutter-free area help you see colors and details clearly.
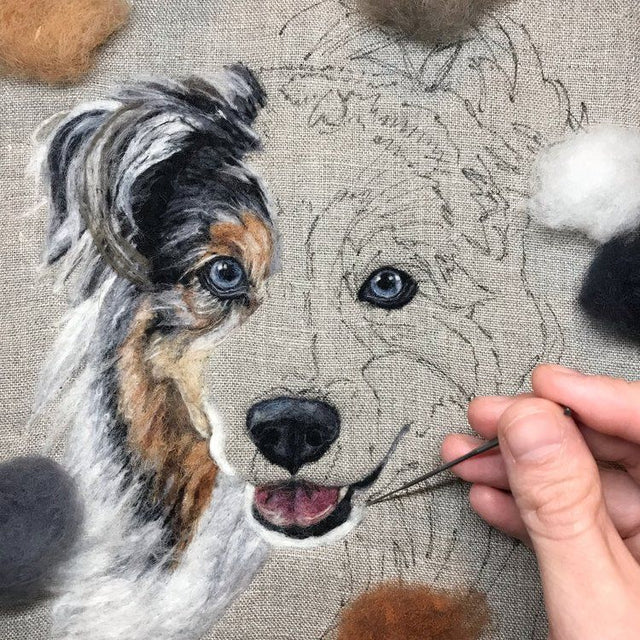
Transfer the Outline
Transferring your pet’s outline onto the wool felt gives you a solid foundation. You have several methods to choose from:
Method |
Description |
|---|---|
Stitching Through Paper |
Trace your pet’s outline on tissue or wax paper. Stitch through the paper onto the felt. No ink marks remain. |
Iron-On Transfer Pen |
Trace a mirror image of your pet’s outline with a special pen. Iron it onto the felt for a clear guide. |
Iron-On Transfer Paper |
Print your pet’s image on transfer paper. Iron it onto the felt for a detailed, colored outline. |
Tip: For beginners, stitching through paper is gentle on the felt and leaves no marks. Always secure your outline before you start felting.
Apply Base Colors
Begin by blocking in the main colors of your portrait. Use small tufts of wool and gently poke them into the felt with your needle. Start with the largest areas, such as the face and neck. Work from light to dark shades to build depth.
Use a multi-needle tool for faster coverage.
Keep your strokes even to avoid lumps.
Refer to your photo often to match the fur’s color patterns.
Professional advice: Mix two or three shades of wool to create a natural look. For example, blend cream and tan for golden fur.
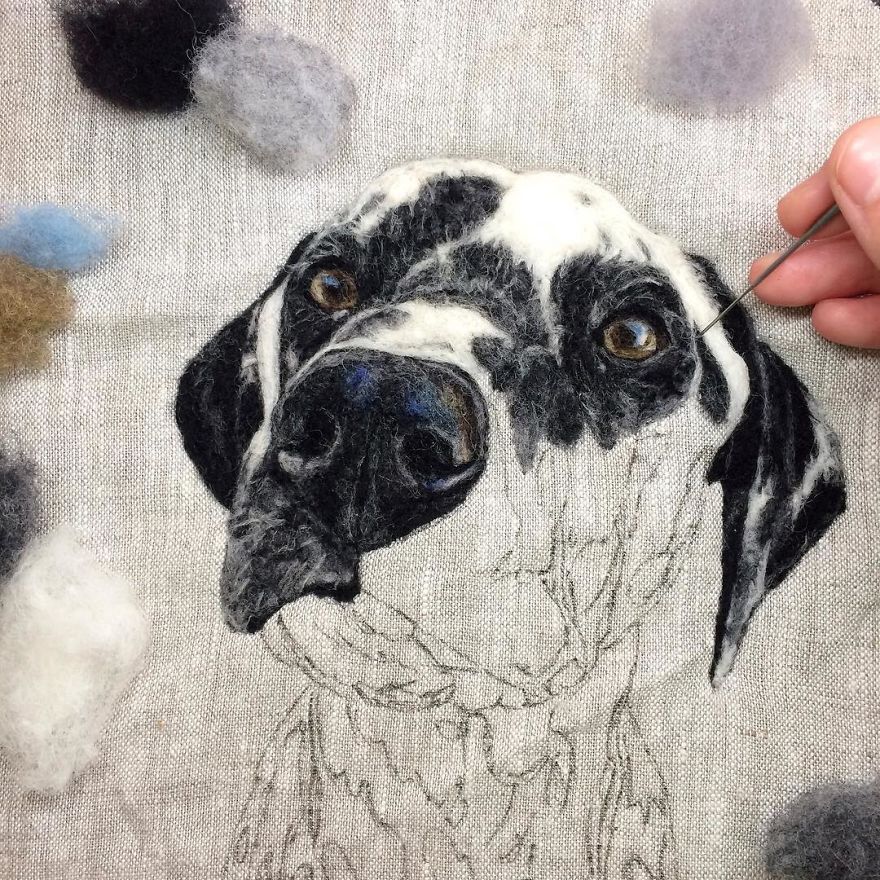
Blend for Realistic Fur
Blending is key to a lifelike portrait. Layer thin wisps of wool in the direction of the fur’s growth. Use your needle to gently feather the edges, creating soft transitions between colors.
For short fur, use short, overlapping strokes.
For long fur, lay longer fibers and blend them with the needle.
Add highlights and shadows to give the portrait dimension.
Pay special attention to the eyes, nose, and ears:
Eyes: Use dark wool for the pupils and lighter shades for reflections. Add a tiny white dot to make the eyes sparkle.
Nose: Shape the nose with a mix of pink, brown, or black wool. Use your needle to define the nostrils.
Ear fur: Use fine, wispy fibers for the edges. Blend several colors for a natural effect.
Tip: Always work slowly and check your progress in a mirror. This helps you spot any uneven areas.
Add Details
Details bring your portrait to life. Focus on the unique features of your pet:
Whiskers: Use fine white or gray wool. Roll tiny strands between your fingers and attach them with the tip of your needle.
Markings: Add spots, stripes, or patches using small amounts of colored wool.
Texture: Use a single needle to sculpt raised areas, such as eyebrows or tufts of fur.
Note: Less is more. Add details gradually and step back often to review your work.
Finish Your Portrait
Once you finish the details, secure all fibers by gently felting the entire surface. Trim any stray fibers with small scissors. Mount your portrait on a card stock mat or place it in a wooden frame for display.
Take a final look in the mirror to check symmetry.
Store your finished portrait in a clean, dry place.
Share your artwork with friends or family.
Safety reminder: Always handle felting needles with care. Take breaks to avoid hand fatigue and keep your workspace tidy.
A finished wool felt portrait captures the spirit of your pet and becomes a cherished keepsake. With patience and practice, you will see your skills improve with every project.
Tips for a Finished Needle Felted Portrait
Color Blending Tricks
You can achieve a lifelike portrait by mastering color blending. Start by layering thin wisps of wool in small sections. Use your needle to gently feather the edges, allowing colors to merge smoothly. For realistic fur, mix two or three shades that match your pet’s natural coat. Always blend in the direction the fur grows. This technique helps you create soft transitions and depth in your portrait. If you want to add highlights or shadows, use lighter or darker wool sparingly. Step back often to check the overall effect.
Tip: Hold your portrait at arm’s length to spot areas that need more blending.
Handling Fine Details
Fine details bring your portrait to life. Focus on the eyes, nose, ear fur, and whiskers. Use a fine felting needle for these areas. For the eyes, layer dark wool for the pupil and add a tiny white dot for a sparkle. Shape the nose with a mix of colors and define the nostrils with careful pokes. For ear fur, use wispy fibers and blend several shades. Roll thin strands of wool between your fingers to create whiskers, then attach them with the needle tip. Work slowly and refine each feature until it matches your reference photo.
Note: Patience and observation are key when adding details to your portrait.
Avoiding Common Mistakes
Beginners often face challenges in needle felted portraits. The table below lists common mistakes and how to avoid them:
Mistake |
Explanation |
|---|---|
Not using a cushion |
Can cause uneven felting and damage the needle. |
Using the wrong needle |
Makes felting harder and slows progress. |
Choosing the wrong wool |
Coarser wool is easier for shaping than soft, fine wool. |
Using too much/little wool |
Leads to size issues or lack of material for shaping. |
Poking too deep |
Creates holes or pitted surfaces. |
Not paying attention to safety |
Increases risk of injury from sharp needles. |
Poking at the wrong angle |
Can break needles and cause frustration. |
Lack of patience |
Rushing leads to mistakes and poor results. |
You can avoid these pitfalls by using a cushion, choosing the right needle and wool, and working with care. Always use finger guards for safety. Take your time and enjoy the process.
Display your finished portrait in a frame or gift it to a loved one. If you want a professional touch, consider Pawimprint’s Custom Wool Felt Portraits for a lasting tribute to your pet.
You should feel proud of your finished needle felted portrait. Show your art to friends, family, or people online. This can inspire others to try it too. As you get better, try new ways like wet felting, nuno felting, or artfelt. The table below shows some advanced ways to improve your skills:
Technique |
Description |
Applications |
|---|---|---|
Wet Felting |
Uses hot water and soap for smooth finishes |
Textile art |
Nuno Felting |
Combines wool with fabric for unique textures |
Fabric-integrated textiles |
Artfelt |
Blends needle and wet felting for easy handling |
Various textile projects |
You can look at Pawimprint for a custom portrait. Each one is made with care, good materials, and a special design. Every time you try, you get better. Have fun as you create.
FAQ
How long does it take to complete a pet wool felt portrait?
You can finish a simple portrait in two to four hours. If you add more details or blend colors, you may need extra time. Take breaks to avoid hand fatigue.
What type of wool works best for beginners?
You should use short-fiber carded batts or Corriedale wool. These types felt easily and allow you to control shapes. High-quality wool helps you achieve smoother results.
Can I fix mistakes if I poke the wool in the wrong spot?
You can gently pull out misplaced fibers with tweezers. Add new wool and felt again. Always work slowly and check your progress often.
Is needle felting safe for kids?
Needle felting uses sharp tools. You should supervise children closely. Use finger guards and teach safety rules before starting.
How do I display my finished portrait?
You can mount your portrait on card stock or place it in a wooden frame. Display it in a dry area away from direct sunlight. This keeps colors bright and fibers intact.