
How to Create Lifelike Wool Felt Pet Faces Step by Step
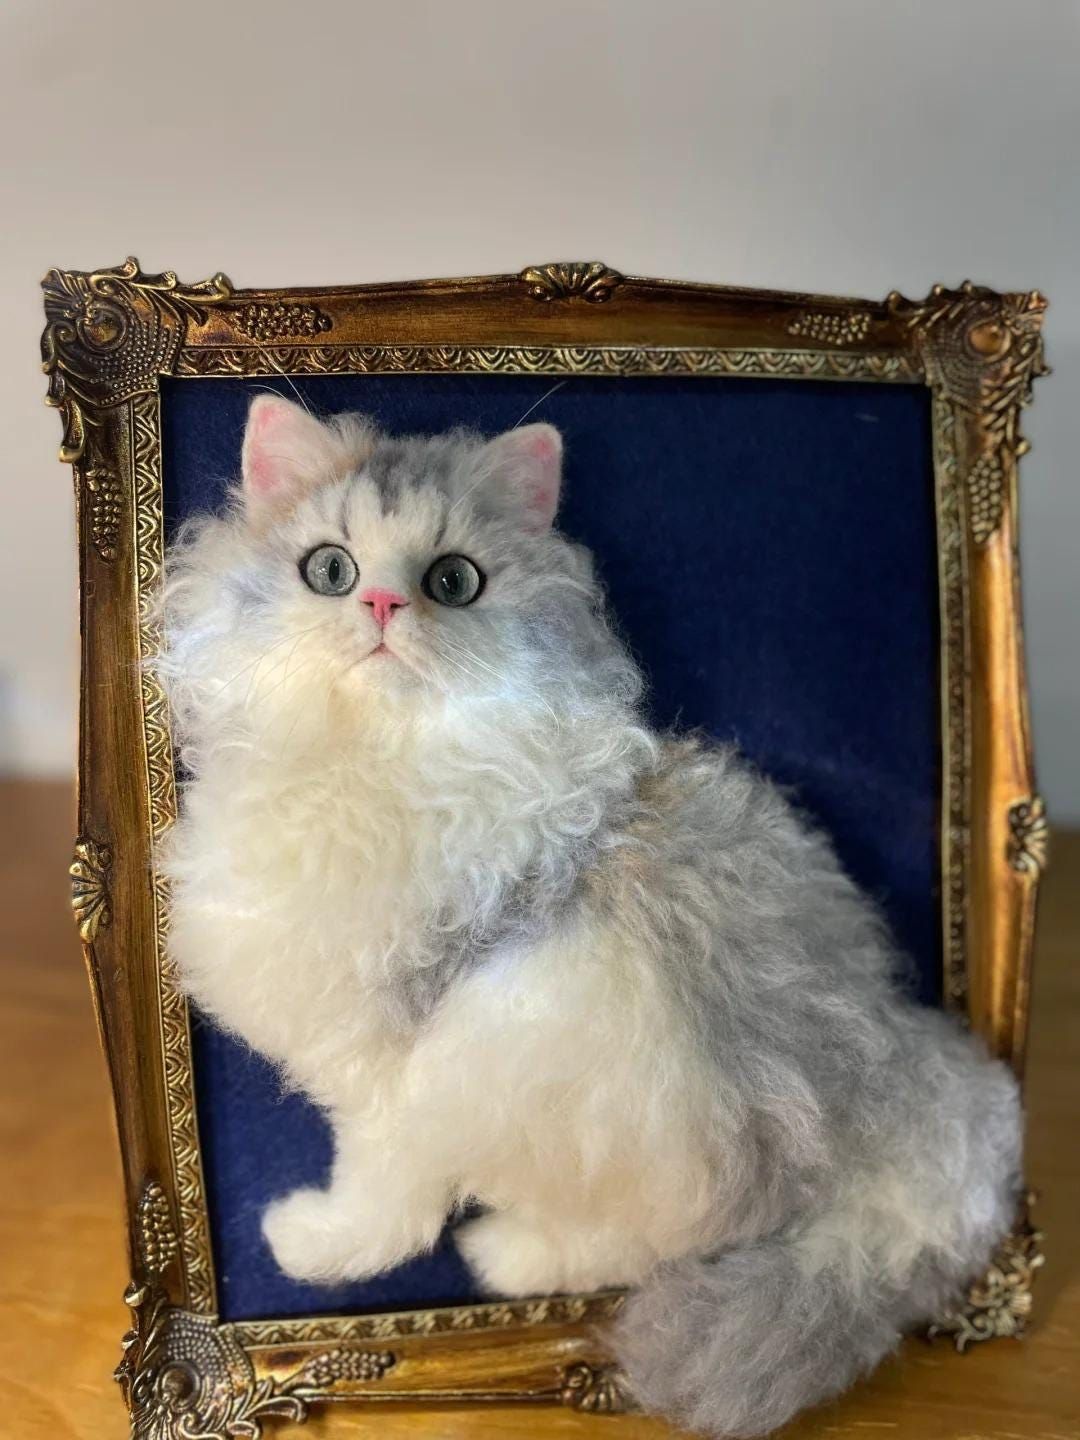
You want your pet’s personality to show in every detail. Begin with clear reference photos. These photos help you get the right size and shape. They also help you choose the best colors. You can blend wool to add depth and feeling. Look at Pawimprint’s Custom Pet Wool Felt Photo Frame. Each piece looks so real. It feels like your pet is right there. This guide helps you make Realistic wool felt pet replicas. You will learn each step with confidence. In this tutorial, you will see how customization makes each portrait unique.
Technique |
Benefit |
|---|---|
Makes sure the size and shape match the photo. |
|
Color Selection |
Helps you see small color changes for lifelike art. |
Blending Techniques |
Adds depth and makes the pet look more real. |
Key Takeaways
Use clear photos of your pet. This helps you see your pet’s real face and special features.
Pick the best wool for your pet. The right wool makes your pet look real. Different pets need different wool.
Pay attention to the eyes. Eyes make your pet’s face look alive. Match the eyes to your pet’s real color and shape.
Add layers of color and texture to the wool. This makes your pet’s fur look deep and real.
Make your portrait special. Add things like markings or a favorite toy. This shows what makes your pet unique.
References and Materials
Pet Photos
You want your wool felt pet face to look just like your furry friend. Start with the best photos you can find. Use clear front-facing shots to capture the true expression. Side views help you see the shape of the head and body. Close-ups show special features, like the sparkle in the eyes or the unique pattern of the fur. These details make your pet’s portrait come alive. If you want a keepsake that feels real, Pawimprint’s Custom Pet Wool Felt Photo Frame uses your photos to create a lifelike three-dimensional portrait. You upload your favorite images, and skilled artists use them as a guide for every detail.
Tip: Pick photos with good lighting. Shadows can hide important features.
Wool and Tools
Choosing the right wool and tools is key for a realistic look. You have many options, and each type of wool works best for different animals. Here’s a quick guide:
Recommended Use |
|
|---|---|
Grand Greys |
Badger, koala, wolf, seal, grey squirrel |
Outstanding Oranges and Yellows |
Red fox, red squirrel, bumble bee, yellow chicks, orangutan |
Gleeful Greens |
Lizard, turtle, snake, frog, parrot |
Corriedale |
Thick, soft wool, great for beginners |
Merino |
Soft, popular wool for various felting projects |
Curly Locks |
For adding texture to manes or curly-haired animals |
Animal Mix |
Variety of soft natural mixed wool tops from 10 breeds |
You can use merino wool for a soft finish. Try combining different sheep breeds for more texture. Hand shred or blend fibers for small areas. Curly locks add a fun touch to manes or curly fur. Pawimprint uses 100% natural wool felt that is hypoallergenic and fade-resistant. The frame is made from high-quality wood, and you can customize the size, color, and even add an engraved message.
Eye Supplies
Eyes bring your pet’s face to life. You can use glass eyes for a shiny, realistic look. Some artists use special types of wool to shape and color the eyes. These supplies help you create depth and emotion. Pawimprint’s artists pay close attention to the eyes, making sure every portrait feels personal. When you order, you choose the style and details you want, and the team follows your guide to make your pet’s eyes sparkle.
Face Structure
Creating a lifelike wool felt pet face starts with understanding the structure. You want your pet’s portrait to look just like them, so focus on the main features that make each animal unique.
Wool Blending
Blending wool is like mixing paint for a portrait. You can combine different colors and textures to match your pet’s fur. Start by gathering reference photos. Look closely at the shades and patterns. Use your fingers to pull wool fibers apart and layer them. This helps you build up the shape and add depth. If your pet has spots or stripes, blend those colors together before felting. You can even mix in a little curly wool for extra texture. Pawimprint artists use this method to capture every detail, making each portrait special.
Importance |
|
|---|---|
Accurate Proportions |
Ensures the sculpture resembles the actual pet in size and shape. |
Unique Features |
Captures the distinct characteristics of the specific pet being replicated. |
Lifelike Details |
Adds realism through elements like glass eyes and textured fur. |
Felting Techniques
Felting is how you shape the wool into a face. You start with a wire armature to get the right proportions. Build up layers of wool to form the cheeks, nose, and forehead. Use a felting needle to poke the wool and make it firm. Begin with the eyes, since realistic pet eyes show emotion and personality. Try using tiny black wool balls for the eyes, then felt around them to make them stand out. Add thin strips of cream or gray wool for eyelids. Place a small black wool ball for the pupil, and add a white dot for light reflection. Make sure both eyes match in size and shape. You can use glass eyes for realistic eyes, or add whiskers for extra detail.
Research and gather reference photos.
Create a wire armature for correct proportions.
Build up layers of wool to form the shape.
Fine-tune the face and body details.
Use glass eyes and polymer clay for additional features.
Fur Texture
You want the fur to look soft and natural. Layer colors and use different lengths of wool. Pull wool apart and lay it in the same direction. Felt in different directions to create depth and texture. This technique helps you make longer fur without gaps. If your pet has curly or wavy fur, use curly locks and felt them gently. You can add more layers for thicker fur. Realistic pet eyes will pop even more when surrounded by lifelike fur. The right texture makes the whole face look real.
Tip: Layering wool in different directions adds movement and realism to your pet’s portrait.
Eyes
Your pet’s eyes are the heart of your wool felt portrait. When you get the eyes right, your pet’s face comes alive. Let’s break down each step so you can create eyes that sparkle with personality.
Cabochons
Cabochons are the clear domes that give pet eyes their shine and depth. You want to pick the best ones for your project. Look for cabochons that are:
Symmetrical in shape
Free of scratches
Clear, with no bubbles inside
High-quality cabochons make a big difference. They help the eyes look real and bright. If you use scratched or cloudy cabochons, the eyes might look dull. Take your time and choose carefully.
Tip: Hold the cabochon up to the light. You can spot any flaws before you start.
Iris Painting
Painting the iris is where you add color and life. You want the iris to match your pet’s real eye color. Use a small piece of watercolor paper or pearlescent photo paper as your base. Acrylic paint works well for this step.
Here’s how you can paint a lifelike iris:
Start with a dark base layer. This gives the eye depth.
Add the main color of your pet’s iris. Use thin layers so the colors blend smoothly.
Blend several colors together. Begin with the darkest shade at the outer edge. Move toward the center with lighter colors. This creates a natural gradient.
Add highlights near the center. Use a tiny bit of white paint or silk fiber. This makes the eye look wet and shiny.
You can use a fine brush for details. Try to copy the patterns you see in your pet’s eyes. Some pets have flecks or rings of color. Layer your paint to build up these effects.
Note: Let each layer dry before you add the next. This keeps the colors crisp and prevents smudging.
Pupil Drawing
The pupil is the dark center of the eye. It gives your pet’s gaze its focus. Use a fine-tipped pen or a tiny brush with black acrylic paint. Draw the pupil in the right shape. Dogs and cats usually have round pupils. Some animals, like goats or snakes, have different shapes.
Make sure both eyes match in size and position.
Add a small white dot on the pupil for a light reflection. This makes the eyes look alive.
If you want extra shine, you can use a tiny bit of white wool or silk fiber. Place it on the pupil before sealing.
Sealing
Sealing protects your painted iris and pupil. It also gives the eye a glossy finish. Use a tempered sealer for this step. Tempered sealers dry faster and have less odor than UV resin. They are easy to use and safe for indoor projects.
Follow these steps for sealing:
Brush a thin layer of sealer over the painted iris and pupil.
Let it dry completely. This can take a few hours.
Check for any bubbles or dust. If you see any, gently remove them before the sealer sets.
Add another thin layer if you want extra shine.
Tip: Always let each layer dry fully before adding the next. This keeps the finish smooth and clear.
When you finish sealing, your pet’s eyes will look bright and full of life. You can now attach the eyes to your wool felt face. Step back and admire your work. You just gave your pet portrait a soul!
Realistic Wool Felt Pet Nose
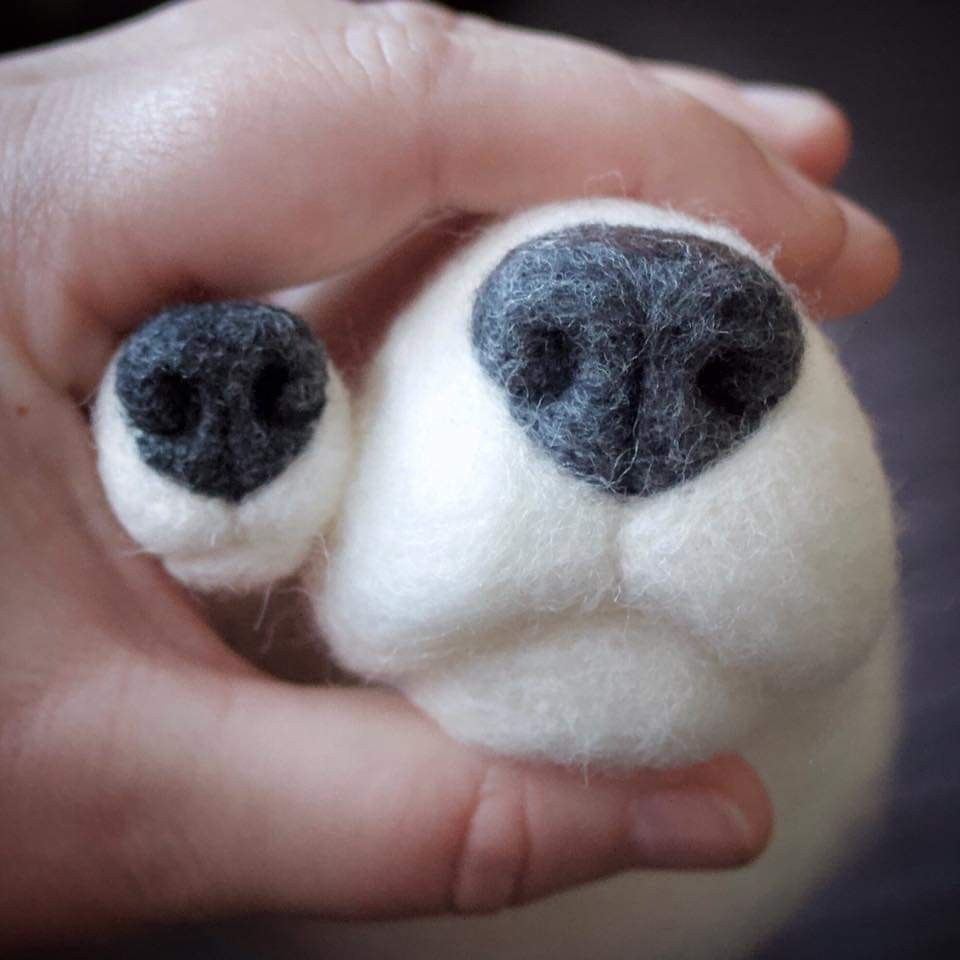
Creating a realistic wool felt pet nose is one of the most rewarding steps in crafting lifelike pet replicas. The nose gives your pet’s face character and charm. You want it to look soft, shiny, and true to life. Let’s break down each part so you can sculpt a lifelike pet nose with confidence.
Wax/Clay Base
Start by choosing a base for your pet’s nose. You can use wax or polymer clay. Wax blends easily with wool. It gives the nose a flexible feel and a shiny finish. Polymer clay makes the nose strong and sturdy. You need to blend it carefully with the wool fibers so it looks natural. Both materials help your wool felt pet nose last longer and keep its shape. If you want your nose to stand out, try sculpting the nose tip with wax for a soft shine or use clay for a bold look.
Tip: Warm the wax in your hands before shaping. It will stick better to the wool.
Wool Gradients
You want the color of the nose to look real. Blending wool gradients is the secret. Here’s how you can do it:
Pick colors that match your pet’s nose.
Decide how much wool you need for each shade.
Layer the wool to add depth.
Mix the wool fibers so the colors blend smoothly.
Layering and mixing help you create a nose that looks just like your pet’s. You can add darker wool around the edges and lighter wool in the center. This makes the nose pop. When you’re sculpting the nose tip, use small bits of wool for highlights and shadows. This technique brings your realistic wool felt pet nose to life.
Nostrils and Seam
Nostrils give your pet’s nose its unique look. Use a felting needle to poke small holes where the nostrils go. Shape them gently so they look natural. You can add a thin line of darker wool for the seam down the middle. This detail makes your wool felt pet replicas look even more realistic. Take your time with this step. The nostrils and seam help your pet’s nose look soft and lifelike.
Step |
What to Do |
|---|---|
Mark nostril spots |
Use a fine needle to poke holes |
Add seam |
Felt a thin line of dark wool |
Check symmetry |
Make sure both sides match |
Detailing
Details make your pet’s nose special. Pawimprint artists use several methods to get every feature just right. You can do the same at home:
Place thin strips of wool over the base for the nose and mouth.
Use your needle to poke and shape the nose and mouth.
Add colored wool for markings and poke them in place.
Trim and blend the edges for a smooth finish.
Stack and pull apart small bits of colored wool, then layer them on the felt.
Mix colors to create shadows or highlights.
These steps help you capture every tiny detail. When you finish, your realistic wool felt pet nose will look just like your pet’s. The attention to detail is what makes crafting lifelike pet replicas so special. Pawimprint’s custom portraits show how much these little touches matter. You can use these techniques to make your own wool felt pet replicas stand out.
Note: Step back and look at your work often. Small changes can make a big difference.
Realistic Wool Felt Pet Replicas Tips
Wool Mixing
Mixing different types of wool can make your pet replica look more lifelike. You want to see the same color changes and textures you see in real fur. Try hand blending several shades together. This gives you control over the final look. When you align the fibers in the same direction, you keep the texture soft and prevent matting. For long-haired pets, let some strands stand out. You will notice that individual colors show up, which adds to the realism.
Mix various wool colors for a natural effect.
Align fibers to keep the fur looking real.
Use hand blending for better control, especially with long fur.
Try using small amounts of different colors. This is one of the best additional tips for realism.
Photo Reference
Always keep your pet’s photos nearby while sculpting. Look at the shape of the ears, the curve of the nose, and the pattern of the fur. Use these photos to guide every step. When you add features like ears or eyes, check the photo to match the size and position. This habit helps you catch small details that make your replica unique.
Here are some steps you can follow for sculpting:
Add ears using colored wool and felting needles.
Attach the ears, making sure they match your pet’s look.
Sculpt the eyes and nose with black wool or glass eyes.
Layer colored wool to copy your pet’s coat pattern.
Add pawprints or markings for extra detail.
Trim extra wool for a neat finish.
Troubleshooting
You might run into problems while sculpting. Don’t worry—every artist does! Here’s a quick table with common issues and how to fix them:
Challenge |
Solution |
|---|---|
Maintaining design integrity |
Avoid carding the underside too much to prevent holes. |
Repairing holes or thin spots |
Use a felting tool or hand carders to blend and fix thin areas. |
Fixing wavy or wonky edges |
Wash and scrub edges or use a dowel rod to straighten them. |
Decorations not staying in place |
Felt gently and use a needle felting tool to secure decorations. |
Sewing skills needed |
Use sewing to fix or improve your project when needed. |
If you get stuck, step back and look at your work. Sometimes a fresh view helps you spot what needs fixing.
Experimentation
Don’t be afraid to try new materials or sculpting techniques. You might discover a style that fits your pet best. Play with different wool types, try new tools, or add fun details. These additional tips for realism can make your replica stand out.
Pawimprint lets you personalize your wool felt pet portrait. You can choose frame size, color, and even add an engraved message. Each piece is tailored to your wishes, making your keepsake truly special.
Customization Aspect |
Description |
|---|---|
Personalization |
Each portrait is made to your exact specifications. |
Remember, sculpting is about capturing your pet’s spirit. Enjoy the process and let your creativity shine!
You’ve learned how to turn wool into a lifelike pet portrait. Every step lets you show your creativity and connect with your pet’s memory. Many pet owners say these keepsakes capture their pet’s spirit and bring comfort. You can add personal touches, like a favorite toy or collar. When you finish, remember to care for your portrait:
Store it in a cool, dry place.
Blot stains gently.
Enjoy the process and make each piece your own. Pawimprint’s custom frames inspire you to create something truly special.
FAQ
How long does it take to make a wool felt pet face?
It usually takes a few hours to a few days, depending on your skill level and the amount of detail you want. Pawimprint’s artists spend 1-3 months on each custom portrait to make sure every detail looks perfect.
Can I customize my wool felt pet portrait?
Absolutely! You can pick frame size, color, and style. You can even add an engraved message. Pawimprint lets you upload your favorite pet photos and choose the look you want.
Tip: Personal touches make your keepsake extra special!
What tools do I need to start needle felting?
You need felting needles, wool in different colors, a foam pad, and reference photos. Glass eyes or cabochons help with realism. You can find starter kits online or at craft stores.
Tool |
Use |
|---|---|
Felting Needle |
Shapes the wool |
Foam Pad |
Protects your table |
Wool |
Builds the face |
How do I care for my wool felt pet portrait?
Keep your portrait away from direct sunlight and moisture. Use a soft brush to remove dust. If you see stains, blot gently with a dry cloth. Your keepsake will stay beautiful for years.
🐾 Remember: Handle with care to keep every detail safe!