
Everything You Need to Know About Needle Felting Animal Sculptures
You can make soft animal sculptures with needle-felting. You shape wool using special barbed needles. Many people enjoy making felted wool animals. The process feels calm and creative. Needle felting lets you make special felted pets or memorials. Even beginners can turn wool felt into real-looking animal art.
Key Takeaways
Needle felting uses special barbed needles to shape wool. You do not need water or soap for this craft. It is calm and creative. Anyone can try needle felting.
Pick the right wool and needles for your project. Use core wool for the base. Use soft wools like Merino for details. Always work carefully. Use the right tools and follow safety rules.
Plan your sculpture with reference photos. Build a strong core first. Add lifelike details slowly. Be patient as you work. Practice and good materials help you make beautiful felted animals.
What Is Needle Felting?
The Basics of Needle Felting
Needle felting is a craft where you use special barbed needles to shape wool into solid forms. You do not need water or soap like in wet felting. Instead, you poke the wool with a needle, and the barbs catch and tangle the fibers. This action makes the wool stick together and lets you sculpt it into animals or other shapes. The rough surface of wool fibers helps them lock in place during the felting process.
The history of felting goes back thousands of years. People first used wet felting to make fabric and clothing. In the 19th century, factories used felting needles to make carpets and padding. Artists started using needle-felting for crafts much later. In 2000, Ayala Talpai wrote a book that made needle felting popular for everyone. Today, you can use needle felting to create detailed animal sculptures and many other projects.
How Needle Felting Works
You need a few tools for the felting process. The main tool is the felting needle, which comes in different types for shaping, sculpting, and finishing. You also need wool, a mat, and sometimes scissors or pins. The felting process uses these tools to turn loose wool into firm shapes.
Aspect |
Details |
|---|---|
Needle Types |
Thick needle: shaping and making hollows |
How to Hold Needle |
Hold needle at 90° angle at the top; holding like a pencil may cause breakage |
How to Use Needle |
Insert and remove needle vertically or diagonally matching the angle; avoid pricking your hand; poke sculpting needle deeply; poke finishing needle lightly |
Tools Required |
Needle, sandwich card, scissors, pins, ruler, mat, mat cover, scales |
Process Overview |
Repeatedly poking wool fibers with needles to interlock and compact fibers into felted shapes |
To start needle-felting, follow these steps:
Choose the right felting needle for your project.
Poke the wool fibers many times to make them stick together.
Add layers of wool to build up the shape.
Blend colors for special effects.
Shape the wool into animals or other objects.
Use different needle angles and depths for details.
Add texture and surface details with special needles.
Work slowly and carefully for the best results.
Tip: Always keep your fingers clear of the needle while you work. Needle felting takes patience, but you will see your sculpture take shape with each poke.
Essential Tools and Materials
Wool Types and Colors
You need the right wool to make your animal sculptures look real. Many artists use core wool for the inside of the sculpture. Core wool holds its shape well and felts quickly. For the outside, you can use soft wools like Merino or Shetland. Merino wool feels smooth and gives a soft finish, while Shetland wool comes in many natural colors. You can also use Gotland wool for shiny gray fur or Bluefaced Leicester for curly textures. Mixing different types of wool helps you create lifelike fur. You can buy wool in many forms, such as carded batts, roving, or curly locks. Color packs like "Beautiful Browns" or "Grand Greys" help you match animal fur. Many needle felting kits include a variety of wool types and colors to get you started.
Felting Needles
A felting needle is the main tool you use for felting. Needles come in different shapes and sizes. Triangle needles work well for most projects. Star needles have more edges and felt wool faster, which helps with large areas. Spiral needles make the surface smoother. Use thick needles (like 36 gauge) for shaping and thin needles (like 40 gauge) for details. Some needles have barbs that pull fibers to the surface, making texture. Needle holders help you grip the needle better and let you use more than one needle at a time. Most kits include several types of felting needle so you can try each one.
Workspace and Extras
Set up your workspace at a table with good light. Always use a felting mat, such as a foam pad or brush mat, to protect your table and your needles. Keep extra felting needles nearby in case one breaks. Finger protectors help keep your hands safe. Scissors help you trim wool for details. You can use wire to make armatures for your animals. Some artists use brushes to blend wool or add extra eyes for more detail. Many kits come with mats, holders, and other extras to make felting easier and safer.
Tip: Keep your workspace tidy and return your felting needle to its case after use. This keeps your tools in good shape and helps you work safely.
Getting Started
Planning Your Sculpture
Before you begin needle-felting, you need a plan for your animal sculpture. Start by choosing a clear photo or drawing of the animal you want to create. Look at the animal’s shape, colors, and special features. Study the body parts, such as the head, legs, and tail. Reference photos help you see the details you need to include.
Gather your supplies before you start. You will need:
Felting needles in different sizes (coarse for shaping, fine for details)
Wool roving in the colors you need
A felting mat or foam block
Finger guards for safety
Optional: glass eyes, wire for support, or a needle felting kit
Tip: Needle felting kits are great for beginners. These kits include wool, needles, a mat, and step-by-step instructions. You can follow the guide to learn how to needle felt simple animal shapes.
Think about the structure of your animal. Some animals need extra support, especially if they have long legs or tails. You can use wire for these parts, but only where you need more stability. Try different types of wool to see which ones work best for your project. Patience is important. Needle-felting takes time, but careful planning helps you get better results.
Shaping the Core
The core is the base of your animal sculpture. You need to make it firm so your animal holds its shape. Some artists use wire armatures for the inside, especially for legs or tails. Wrap wool around the wire to build the basic shape. If you do not use wire, you can still make a strong core by felting wool tightly.
Follow these steps to shape the core:
Choose your wool. Carded wool felts quickly and makes a firm base. Merino wool is softer and smoother but takes longer to felt.
Roll the wool into a rough shape, like a ball or oval, for the body.
Use a coarse felting needle to stab the wool. This bonds the fibers and makes the shape firm.
Keep poking the wool until it feels solid. If you feel resistance, switch to a finer needle to smooth the surface.
Add more wool in thin layers. Overlap the fibers to avoid lumps and harsh edges.
Felt at a slight angle to reduce holes and make the surface smoother.
Use your hands or a brush to help shape the wool and cover any holes.
Trim stray fibers with scissors if needed.
Safety Note: Felting needles are very sharp. Always watch your fingers and use finger guards to protect yourself.
You can also use pressure and heat, like a mini iron, to smooth the surface. Practice felting simple shapes, such as balls or tubes, to get comfortable with the technique.
Building Details
Once you have a firm core, you can start adding details to your animal. Needle-felting lets you create lifelike features by layering and shaping wool. Use different sizes of felting needles for each step. Coarse needles help with shaping, medium needles blend layers, and fine needles add small details.
Here are some ways to build details:
Add wool in small amounts to create features like ears, noses, and tails. Attach these pieces by poking them with a fine needle.
Layer wool to add dimension and texture. Use medium needles to blend the layers smoothly.
Create symmetry by measuring and comparing both sides of the animal. Attach matching parts carefully.
Make eyes by rolling a tiny ball of black wool. Add a small white dot for a realistic look. You can also use glass eyes for more realism.
Add fur texture by teasing out fibers with a barbed needle or layering thin strips of wool.
Use different colors to make patterns or markings. Layer the colors and poke lightly with a fine needle to keep them separate.
Study animal anatomy and use reference photos to get the proportions right.
Note: You can use other materials, such as clay or fabric, for features like noses or ears. This saves time and adds variety to your sculpture.
Keep checking your work as you go. Add finishing touches, such as underbelly color or special markings, to make your animal unique. Needle-felting gives you the freedom to experiment and improve your skills with each project.
Custom Felted Wool Animals
Personalization Options
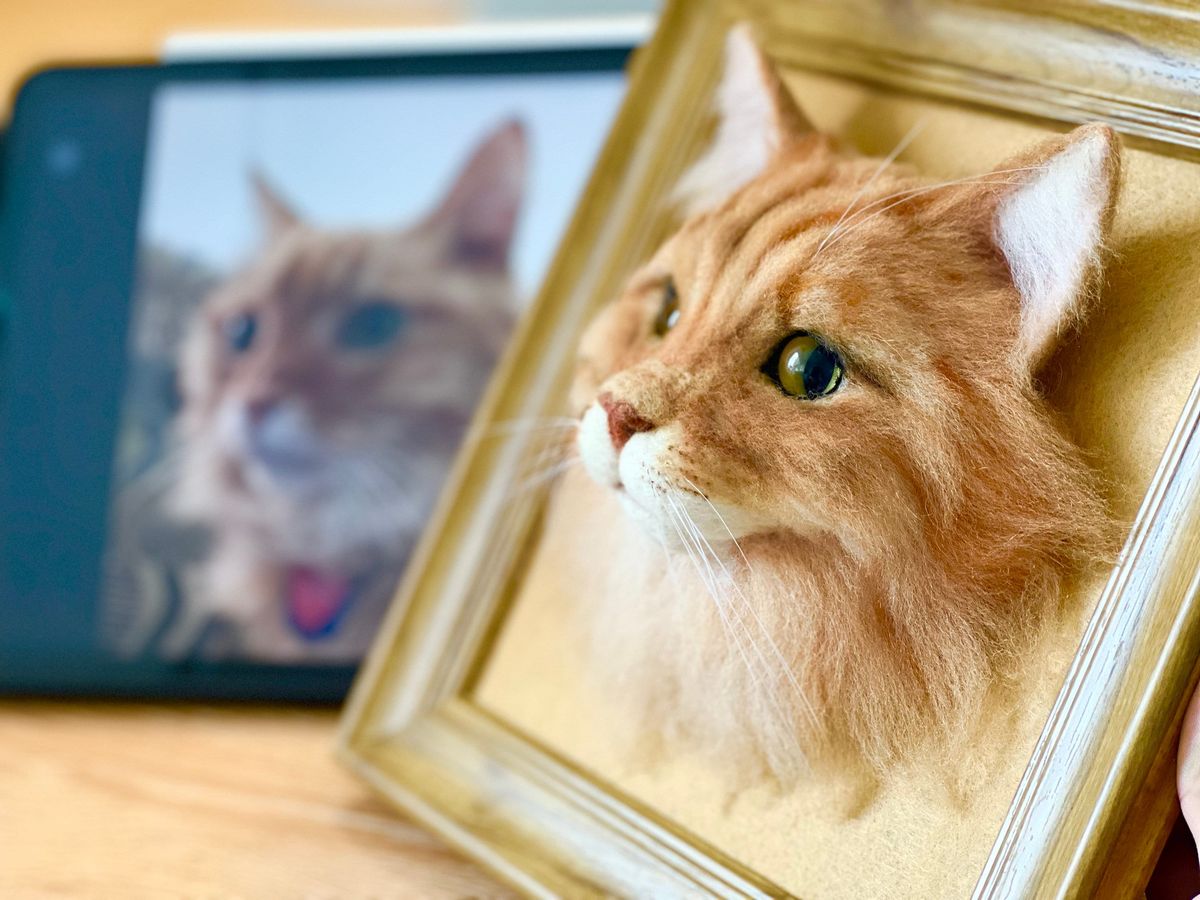
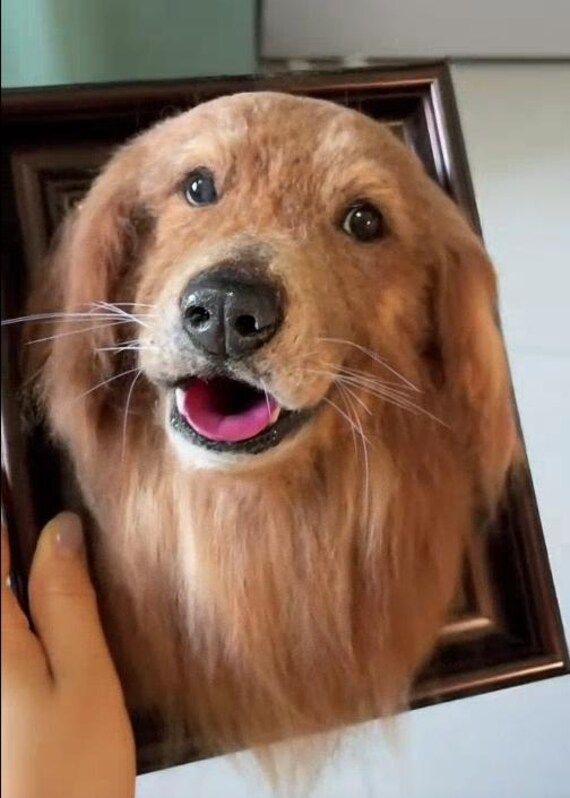
You can make felted wool animals that look just like your pet. Custom projects let you choose from many wool textures, such as core wool for the inside and soft merino wool for the outside. You can blend colors to match your animal’s fur exactly. Pawimprint offers 3D Custom Stuffed Animal Clones with Wooden Frame. You send a photo, and skilled artists use wool, glass eyes, and resin, clay, or wax for features like the nose and paws. This process creates lifelike pet portraits. You can pick the frame size, choose a half-body or head-only design, and even add special touches like favorite poses or accessories. Some people mix real pet fur with wool for a more personal touch. These creations stand out because they use advanced techniques, a wide range of tools, and extra details that standard kits do not offer.
Display and Gifting
You want your felted wool animals to last and look their best. Place them in a wooden frame, shadow box, or display case to protect them from dust and sunlight. Keep them away from moisture and pets. Use a soft brush to clean them gently. When you give felted wool animals as gifts, add the pet’s name or a special date to make them meaningful. These sculptures make thoughtful presents for birthdays, holidays, or as memorials. They bring comfort and joy to anyone who loves animals. For extra care, use acid-free backing boards and avoid adhesives that touch the wool. Protect your creations from insects by placing lavender sachets or cedar blocks nearby.
Custom felted wool animals are more than decorations. They are lasting tributes that keep memories alive.
Advanced Techniques
Using Armatures
You can make your needle-felting animal sculptures stronger and more lifelike by using armatures. Armatures are wire skeletons that support your sculpture from the inside. They help you pose your animals in natural ways and keep long legs or tails from sagging. To build an armature, follow these steps:
Choose a wire type and thickness that matches your animal’s size.
Cut and shape the wire using pliers and wire cutters.
Twist the wire into the basic shape of your animal.
Wrap wool around the wire, using an “X” pattern for extra support.
Felt the wool gently around the wire to avoid breaking your needle.
Armatures let you adjust the pose as you work. They also make your needle felting projects last longer because the wire keeps the shape firm.
Tip: Start with simple shapes and add armatures as your needle-felting skills improve.
Blending Wool for Fur
Blending wool is one of the most important felting techniques for creating realistic fur. You can mix different colors and types of wool to match your animal’s coat. Here is a simple way to blend wool:
Stack small amounts of different colored wool in the same direction.
Hold one end and gently pull the fibers apart.
Lay the pulled wool back on top and repeat until you see a natural blend.
Use only a little at a time to keep the colors clear and lifelike.
You can use fine felting needles to smooth the joins and create seamless fur. Reverse needles help you pull out fibers for a fluffy look. Try layering wool tufts in small patches to copy real fur patterns. Brush the surface gently to soften the finish.
Note: Use natural shades and dyed fibers together for the best results in needle felting.
Realistic Features
Adding realistic features brings your needle-felting animals to life. For eyes, you can use glass or resin eyes, or felt small balls of wool with different colors. Add a tiny white dot to show light reflection. Study real animal eyes to get the right shape and size. For paws, shape the foot with core wool and cover it with soft wool. Use thin black wool to mark toes and add small blobs for paw pads. Whiskers can be made from horsehair, fishing line, or even paintbrush bristles. Attach them by poking a small hole, adding glue, and inserting the whisker.
Layer wool slowly to build up shapes like noses and ears. Use fine felting needles for details and reverse needles for texture. These needle felting techniques help you create animals that look real and unique.
Troubleshooting Tips
Fixing Mistakes
Everyone makes mistakes when learning needle felting. You can fix most problems with a few simple steps. Here is a table of common mistakes and how you can solve them:
Common Mistake |
Explanation & Fixes |
|---|---|
Not Using a Needle Felting Cushion |
Always use a cushion to protect your fingers and your project. |
Stabbing Needle Too Deep |
Use short, quick stabs for better felting and to keep your needle sharp. |
Using Wrong Size Needle |
Start with a Star 36 needle for most felting. Use smaller needles for fine details and softer wool. |
Felting with Wrong Wool |
Choose wool like Romney or Icelandic for best results. Avoid Superwash wool. |
Breaking Felting Needles |
Keep your needle straight. Do not pry fibers. Have extra needles ready in case one breaks. |
Using Too Much or Too Little Wool |
Start with less wool and add more as needed. This helps you control the size and shape. |
Neglecting Safety |
Use finger protectors and always work on a felting mat to avoid injuries. |
Starting with Complex Projects |
Begin with simple shapes. Practice basic felting techniques before moving to advanced animal sculptures. |
Tip: If you make a mistake, gently pull off the wool and try again. Needle felting lets you reshape and add wool until you get the look you want.
Material Choices
Your choice of materials affects how your animal sculpture looks and lasts. Different types of wool give different results. Romney wool makes your sculpture dense and firm, so it will last a long time. Merino wool feels soft and works well for small details, but it stays flexible and may not hold its shape in bigger projects. Corriedale wool gives you a strong base and felts quickly, making it a good choice for most felting projects. Shetland wool is coarser and creates a textured, sturdy finish. Blue-faced Leicester wool is soft and shiny, perfect for adding special touches.
Wool Type |
Characteristics and Impact on Needle Felting Outcome and Durability |
|---|---|
Merino Wool |
Soft, great for details, but less firm for large shapes. |
Corriedale Wool |
Felts quickly, firm and strong, good for most projects. |
Romney Wool |
Dense and durable, best for long-lasting sculptures. |
Shetland Wool |
Coarse, felts fast, adds texture and strength. |
Blue-faced Leicester |
Soft and shiny, best for fine, decorative details. |
You should also use a 100% wool felt base for stability. This helps your sculpture keep its shape and makes felting easier. Always prepare your materials before you start. Good material choices make needle felting more fun and help you create beautiful, lasting animal sculptures.
Caring for Your Sculpture
Cleaning and Maintenance
You want your needle-felted animal sculpture to look its best for years. Start by keeping dust away. Use a soft brush or gently flick the surface to remove loose dirt. For stubborn lint, press a piece of masking tape onto the wool and lift it off. If you see stray fibers, trim them with small scissors.
If your sculpture gets a stain, spot clean it with cold water and a mild soap. Gently rub the stained area and rinse carefully. Do not soak the whole sculpture. Soaking can cause the wool to lose its shape. After cleaning, lay your sculpture flat to dry. Keep it away from direct sunlight to protect the colors.
Tip: You can use a little steam to refresh your sculpture and smooth out wrinkles. Hold the sculpture above the steam, but do not let it get wet.
Handle your sculpture with care. Always support it from the base and avoid squeezing or pulling on delicate parts.
Storage and Display
Proper storage keeps your felted animal safe from damage. Store your sculpture in a dry, dark place. Use acid-free tissue paper to wrap it loosely. Place it in a sealed box or bag to keep out dust and pests. Add a lavender or peppermint sachet to help repel moths and beetles.
Avoid storing your sculpture in humid areas or direct sunlight.
Use undyed cotton fabric for padding and dust covers.
Support round bases with soft, inert foam like polyethylene.
Do not use nylon threads or PVC plastics near your sculpture.
Regularly check your sculpture for signs of pests or damage. Display your felted animal in a glass case or on a shelf away from windows. This helps preserve its color and shape for years to come.
Needle Felting Projects & Resources
Project Ideas
You can begin needle felting with easy animal shapes. Small figures are a good place to start. Beginner kits have wool, needles, and simple instructions. These kits teach you the basics and help you feel confident. As you get better, try harder projects with more materials. Some projects use glass eyes, wire armatures, or special wool. Advanced kits give you new steps and tips to improve your skills.
Here are some advanced needle felting kits you might like: 1. Hippo Kit 2. Chicken Kit 3. Turkey Kit 4. Dragon Kit 5. Mouse Kit 6. Bunny Kit
These kits help you learn new methods and make animals that look real. You can also try wet felting, which uses soap and water. If you keep practicing, you will get better at each project.
Learning Resources
There are many ways to learn more about needle felting. You can use these resources to get better:
A beginner’s guide shows you the tools and steps.
Online courses from Needle Felting Academy teach lessons and give you kits.
Digital lessons let you learn about portraits, animals, and landscapes.
Live classes with artists like Hillary Dow are great for groups.
A Felting Master Class has over 15 lessons on hard techniques and design.
Community blogs, art galleries, and retreats let you share your work and get ideas.
These resources help both new and skilled learners. You can join online groups to ask questions, share pictures, and meet other artists.
You can start needle felting with just a few tools and some wool.
1. Choose a felting needle and cushion.
2. Practice basic shapes and build details.
3. Try Romney wool for dry felting.
4. Use reverse needles for fluffy fur.
5. Stay patient and keep practicing.
Share your finished animals with others.
Connect with fellow crafters for new ideas.
Explore custom keepsakes like pawimprint for special memories.
FAQ
How long does it take to finish a needle-felted animal sculpture?
You can finish a small animal in a few hours. Larger or detailed sculptures may take several days. Practice helps you work faster.
What should you do if your needle breaks?
Always keep extra needles nearby. Replace the broken needle right away. Use a needle holder for better grip and safety.
Can you use pet fur in your needle-felted animal?
Yes, you can blend pet fur with wool. This adds a personal touch to your sculpture. Make sure the fur is clean and dry.