
Felt Cat Ornament Fun for Families and Friends

Ready for some diy fun? Making a felt cat ornament is a great way to spend time with others. You can invite family or friends to join in, since diy crafts like these bring people closer. In fact, nearly one-third of Americans who enjoy arts and crafts do so together with loved ones each year! You do not need special skills to create easy felt ornaments. Just bring your love for pets and a little creativity. With diy, you can turn simple materials into cute ornaments and lasting memories.
Key Takeaways
Making felt cat ornaments is a fun and simple craft. It helps family and friends spend time together. You do not need special skills to make them.
Pick the right felt and use easy tools like scissors, thread, and stuffing. You can make soft and colorful ornaments. They can look like your pet or match your style.
Follow easy steps: cut shapes with templates, sew and stuff the pieces, add fun details, and put on a loop to hang them.
Stay safe while crafting by watching kids, using safe glue, and keeping your workspace neat. This helps stop accidents and keeps things tidy.
Try group activities like ornament swaps and decorating contests. These help you share ideas, make memories, and enjoy the holidays together.
Felt Cat Ornament Materials
Felt Colors and Types
Picking the right felt is important for your project. There are many types of felt. Each type feels and looks different. Here’s a simple guide to help you choose:
Type of Felt |
What It’s Made Of |
What Makes It Special |
Best For |
|---|---|---|---|
Craft Felt |
Synthetic polyester |
Thin, lots of colors, budget-friendly |
Kids’ crafts, simple ornaments |
Eco-Friendly Felt |
Recycled polyester/bamboo |
Stiffer, eco-friendly, fun textures |
Home décor, green projects |
Blended Wool Felt |
Wool and rayon mix |
Soft, rich colors, more durable |
Heirloom ornaments, décor |
100% Wool Felt |
Pure wool |
Thick, soft, biodegradable |
High-quality crafts, décor |
Korean Hard Felt |
Stiffened polyester |
Holds shape, easy to cut |
Charms, brooches, small shapes |
You can use colors that look like your cat’s fur. Or you can pick bright colors for fun. Wool felt is soft and good for the planet. Synthetic felt is cheaper and comes in glittery styles.
Tools and Supplies
You do not need special tools for this craft. Most things are easy to buy and not expensive. Here is a list to help you get started:
Sharp scissors (fabric scissors work best)
Felt sheets in your favorite colors
Embroidery thread or strong sewing thread
Hand sewing needles or yarn needles
Stuffing material (like polyfill or cotton)
Hot glue gun (for no-sew options)
Pins or clips to hold pieces together
Patterns or templates for shapes
Tip: Want to make your ornament fancier? Try pipe cleaners for bendable tails or whiskers!
You can find these supplies at craft stores or online. Craft blogs and DIY kits also give good ideas for what to use.
Stuffing Options
Stuffing makes your ornament look cute and puffy. The most common stuffing is polyester fiber fill, called polyfill, and cotton. Polyfill is light and soft. It is easy to use. Cotton is natural and safe. Wool stuffing is also good for the earth and feels warm inside your ornament.
Polyfill: Soft, affordable, and easy to shape
Cotton: Natural, safe, and gentle
Wool: Biodegradable and sustainable
Do not use pellets or beads. They can make ornaments bumpy or unsafe for little kids. Use just a bit of stuffing so your felt animal ornaments stay cute and keep their shape!
How Do You Make Felt Ornaments
Ready to dive into making felt ornaments? You’ll find that diy crafts like these are simple and fun for everyone. Let’s break down each step so you can create your own felt cat ornament with confidence.
Cut Out Shapes
Start by picking a template for your ornament. You can print a template from the internet, trace around a cookie cutter, or even draw your own design freehand. If you want your diy felt ornaments to look like your own pet, try sketching their shape or markings. Place the template on your felt and use sharp scissors to cut out two matching pieces for the front and back.
Tip: Use a template for each part—body, head, tail, and even tiny ears. This keeps your shapes neat and makes assembly easier.
If you want to try needle felting, fluff out some wool and use a cookie cutter as your template. Fill the cutter with wool, then poke it with a felting needle until the shape holds together. This method works great for diy projects and lets you make ornaments in any shape you like.
Stitch and Stuff
Now it’s time to sew your pieces together. Place the two felt shapes back-to-back. Use a blanket stitch or backstitch along the edge. Blanket stitch looks neat on both sides and works well for diy felt ornaments. Start by hiding your knot between the layers. Sew around most of the edge, but leave a small gap for stuffing.
For stuffing, pull off small pieces of polyfill or wool and push them inside the ornament. Use your fingers or a blunt tool, like a rounded pen, to fill tight spots. Add stuffing little by little so your ornament stays smooth and puffy. Beginners often use too little stuffing, so add a bit more than you think you need for a professional look.
If you’re making felt ornaments with the needle felting method, keep poking the wool with your felting needle until it feels firm and holds its shape. Rotate the piece as you work to keep it even. Add more wool for ears, tails, or other features.
Add Details
This is where your creativity shines! Use embroidery floss, perle cotton, or even metallic threads to add faces, stripes, or spots. Here’s a quick guide to thread choices:
Thread Type |
Best For |
Why Use It? |
|---|---|---|
Embroidery Floss |
Decorative stitching, faces |
Soft, shiny, lots of colors |
Perle Cotton |
Outlines, bold details |
Shiny, strong, easy to handle |
Polyester Thread |
Seams, beads, strong parts |
Durable, many colors, holds up over time |
Metallic/Variegated |
Special effects, sparkle |
Adds shimmer and unique color changes |
Use a template to mark where you want eyes, whiskers, or other features. Stitch them on with small, neat stitches. You can also glue on tiny beads for eyes or use felt scraps for noses and paws. Want to make your ornament extra special? Add a bit of your own pet’s fur inside the stuffing for a personal touch.
If you’re using the needle felting method, add small pieces of colored wool to the surface and poke them in with your felting needle. This lets you create stripes, spots, or even little collars.
Attach Hanging Loop
You want your ornament to hang safely and look great. Cut a piece of ribbon, embroidery floss, or yarn. Thread it through the top of your ornament using a large needle. Tie a knot at the ends to make a loop. Hide the knot inside the felt for a clean finish.
For needle felted ornaments, poke a small hole at the top. Thread your ribbon through with a yarn needle. Pull the ends through the bottom, tie a knot, and tuck it inside the ornament. This keeps the loop secure and out of sight.
Note: Always use a template to mark the spot for your hanging loop. This helps your ornament hang straight on the tree or wall.
Now you know how do you make felt ornaments from start to finish! With a good template, some diy spirit, and a few simple supplies, you can create a felt cat ornament that’s cute, personal, and ready to display.
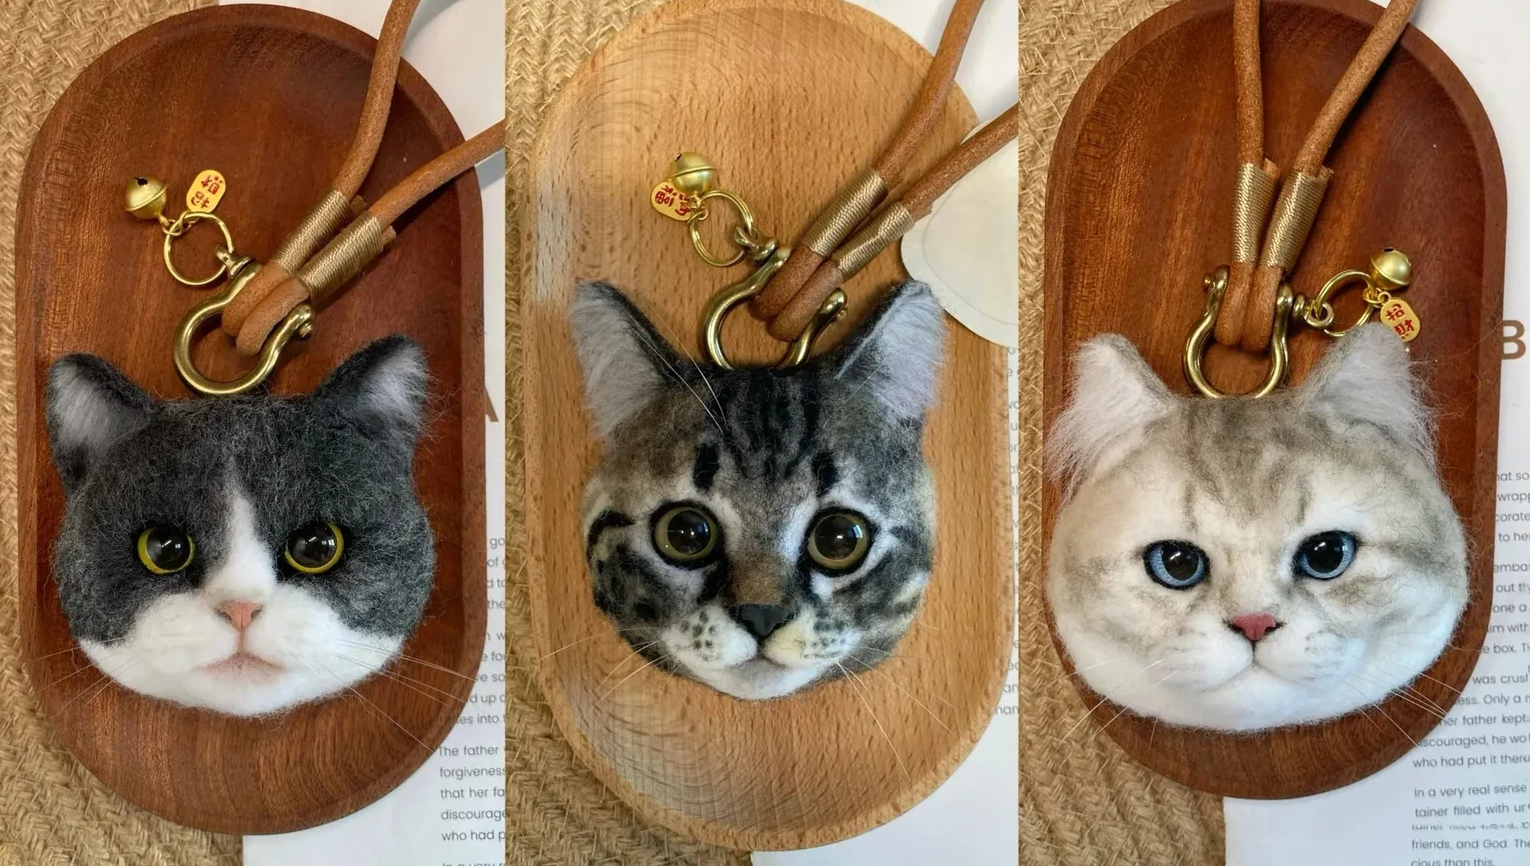
Customize Felt Animal Ornaments
Color and Pattern Choices
You can make your felt animal ornaments look just like your own cat or pick any style you love. Start by looking at your pet’s fur color and markings. Try to match the felt to your cat’s coat, or go wild with bright colors for a playful twist. Many crafters use templates or even cookie cutters to help get the shapes just right. Here are some popular color and pattern ideas for diy felt animal ornaments:
Popular Color/Pattern Style |
Description |
|---|---|
Calico Cat |
Multi-colored spotted pattern resembling calico cats |
Gray Tabby |
Striped gray pattern typical of tabby cats |
Ginger Cat |
Solid orange/ginger color |
Black Cat |
Solid black color |
Tuxedo Cat |
Black and white pattern resembling tuxedo cats |
Siamese Cat |
Cream body with darker points on ears, face, paws, and tail |
All Black Cat |
Entirely black without additional patterning |
You can also use free downloadable templates to help you match your pet’s unique look. This makes diy projects easier and more personal.
Faces and Expressions
The face gives your handmade felt ornaments their personality. You can use embroidery thread, beads, or even a bit of your pet’s real fur for a special touch. Try using an embroidery transfer pen to trace the face onto the felt before you start stitching. Simple shapes work best for eyes, noses, and mouths. The way you place the eyes and mouth can change the whole mood of your ornament.
“Each stitch is a note in a creature’s story, turning simple felt into characters with heart.” The eyes are the windows to your cat’s soul, so take your time with them!
If you want to try needle felting, use thin wisps of wool to draw fine lines for the mouth and nose. Start with a little wool and add more if you need it. You can always remove and redo details until you get the perfect expression.
Accessories and Embellishments
Now it’s time to add some flair! You can sew on tiny beads for eyes, glue on sequins for sparkle, or add layers of felt for extra texture. Try making a mini collar, bow tie, or even a tiny bell. Appliqués and cut-out shapes give your diy felt animal ornaments more personality. Some crafters even tuck a bit of their pet’s fur inside for a keepsake that feels extra special.
Add layers of felt and embroidery for depth.
Use beads and sequins for sparkle.
Try appliqués or cut-out designs for fun details.
If you want a truly lifelike keepsake, Pawimprint creates professional, personalized pet portraits and memorials. Their artists use pure wool and can even include your pet’s real fur, making each piece a heartfelt tribute. You can use their work as inspiration for your own diy creations!
Easy Felt Ornaments Safety Tips
Safe Crafting with Kids
Crafting easy felt ornaments with kids can be a blast, but safety comes first. You want everyone to have fun and stay safe. Always supervise children, especially those under 12, while they work on their ornaments. Avoid using tacks to hang felt trees or ornaments. Tacks can be dangerous for toddlers and young kids. Instead, use ribbon or yarn loops for hanging.
Keep an eye on little ones so they don’t peel off decorations and put them in their mouths. Small pieces can be a choking hazard. Choose larger ornament shapes and skip tiny beads or buttons if you have young crafters. If an ornament breaks, you can glue it back together, but avoid hot glue guns. Hot glue can cause burns. Tacky glue or glue sticks work well and are much safer for kids. Spray glue is messy and needs good ventilation, so it’s best to skip it for family craft time.
Felt ornaments are a safer choice than glass or ceramic decorations. You can reuse them every year, making them a great option for easy felt ornaments that last.
Workspace Organization
A tidy workspace helps you craft safely and keeps the fun going. Start by clearing your table and keeping only what you need within reach. Store sharp scissors and needles in a safe spot when not in use. Use bins or small containers for felt scraps, thread, and tools. Place trash and recycling bins nearby so you can toss scraps right away and avoid clutter.
Good lighting makes a big difference. Try to work near a window or use a desk lamp to see your project clearly. If you use any glue or paint, open a window or use a fan for fresh air. Arrange your tools by how often you use them. Keep the most-used items close by so you don’t have to reach too far.
You can add a little inspiration to your space with wall art or a board for your favorite ideas. A clean, organized area helps you focus and makes crafting easy felt ornaments even more enjoyable.
Group Fun with DIY Ornaments
Making diy felt cat ornaments together can turn a normal day into something special. When friends or family do crafts as a group, everyone gets to relax and have fun. People can talk, laugh, and make cool things at the same time. Studies say that crafting in groups helps people feel less worried and more connected. You can learn new things, share ideas, and even laugh if you make a mistake. Everyone feels proud when they finish their diy ornaments.
Ornament Exchange
A diy ornament exchange is a great way to celebrate. Each person makes a felt cat ornament or another diy craft. Then, everyone swaps ornaments with someone else. This tradition lets you be creative and brings people closer. You get to see lots of different styles and ideas. You also get to take home a special ornament made by a friend. Ornament exchanges are fun at christmas parties, family get-togethers, or even online. You can use diy kits to include friends who live far away. Everyone gets to join in and leaves with a keepsake to remember the day.
Make and trade diy ornaments for a personal gift.
Tell stories about how you made your crafts.
Create memories and build friendships.
Decorating Challenges
Want to make things more exciting? Try a decorating challenge! Give each person a plain felt cat ornament or blank diy ornament. Set a timer and see who can decorate theirs in the coolest way. You can vote for the funniest, brightest, or most real-looking ornament. This friendly contest helps people try new ideas and work together. It also makes your christmas party more fun and lively.
Ask everyone to try new diy tricks.
Cheer for each person’s special style.
Have fun with a little friendly contest.
Display Ideas
After you finish your diy crafts, show them off! Hang your ornaments on the christmas tree or across a window. You can also make a garland or set up a small display on a shelf. Showing your felt cat ornaments helps you remember the fun you had. Your handmade diy ornaments will make your home look bright and remind you of happy times.
Tip: Mix your diy felt cat ornaments with other christmas decorations for a warm, personal look.
Troubleshooting Felt Cat Ornament Issues
Preventing Fraying
Felt usually resists fraying, but you still want your ornament edges to look neat and last a long time. You have a few easy ways to keep those edges crisp:
Try a whip stitch or overcast stitch. These stitches wrap around the edge and hold the felt together. Keep your stitches close—about 1/16 inch apart—so stuffing stays inside.
Use a blanket stitch if you want a decorative look. This stitch not only looks cute but also keeps the edges strong.
For extra help, you can use fusible web stabilizers like HeatnBond Light. Iron it onto the back of your felt before cutting. This makes the edges even sturdier.
Trim close to your stitching lines. This keeps the ornament from looking bulky and helps the edges stay sharp.
Pre-wash and iron your felt if you want to keep its shape and avoid stretching.
Tip: Beginners often find whip or overcast stitches easiest. You’ll get neat, strong edges without much practice!
Fixing Glue or Stitch Problems
Sometimes, glue doesn’t stick or stitches come loose. Don’t worry—you can fix these problems without ruining your ornament. Here’s what you can do:
Gather all the pieces that need fixing.
Pick the right glue. Hot glue works well for felt-to-felt, but don’t use it where you plan to sew.
Lay out the pieces like a puzzle so you know where everything goes.
Apply glue with a small brush. Use just enough to hold the pieces, and smooth out any extra.
Hold the pieces in place gently. You can tape the ornament to your table to keep it steady while it dries.
Let the glue dry for at least 30 minutes.
If you see cracks or gaps, add a little more glue after the first layer dries.
If glue doesn’t work, try stitching the pieces together with a simple running or backstitch. This often works better and keeps your ornament soft.
Note: Always use glue carefully. Too much can make the felt stiff or crusty.
Ensuring Durability
You want your felt cat ornament to last for years. Here are some tips to make sure it stays in great shape:
Choose high-quality wool felt. It’s strong and holds up well over time.
Use tight, even stitches or proper felting techniques. This keeps the fibers locked together and makes your ornament tough.
Handle your ornament gently. Avoid pulling or stretching the felt.
Clean your ornament with mild soap and water if it gets dirty. Keep it out of direct sunlight so the colors don’t fade.
Fix any small tears right away. A quick needle felting repair or a few stitches can stop bigger problems later.
With a little care, your felt cat ornament will bring smiles for many holidays to come! 🐾
You now know how to make felt cat ornaments from start to finish. These ornaments are simple, fun, and perfect for any christmas celebration. Try new designs or swap ornaments with friends at your next christmas party. Share your creations online or display them on your christmas tree. If you want a special keepsake, check out Pawimprint for custom pet ornaments. Gather your family and friends, start crafting, and celebrate your pets together!
FAQ
How long does it take to make a felt cat ornament?
You can finish a simple felt cat ornament in about 30 to 60 minutes. If you add lots of details or try needle felting, you might need more time. Take breaks and enjoy the process!
Can I make these ornaments without sewing?
Yes! You can use fabric glue or a hot glue gun instead of sewing. Just press the felt pieces together and let them dry. This method works well for kids or anyone who wants a quick project.
What if I don’t have a template?
No worries! You can draw your own cat shape on paper and cut it out. Cookie cutters also work as easy templates. Want a tip? Search online for free printable cat ornament patterns.
How do I store my felt ornaments after the holidays?
Place your ornaments in a clean, dry box. Use tissue paper or small bags to keep them safe. Store them away from sunlight and moisture. Your ornaments will look great year after year!