
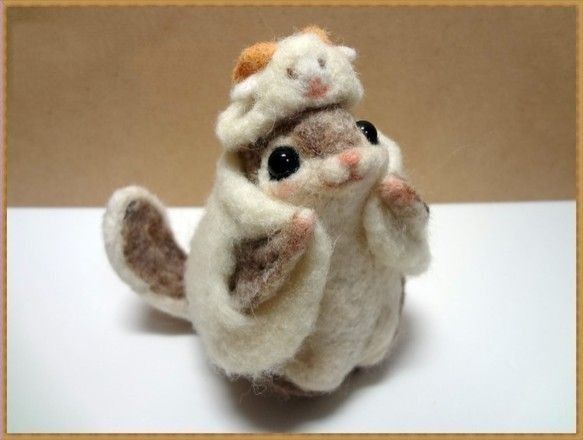
What is Needle Felting and How Are Felted Wool Animals Made

Needle felting lets you turn loose wool into solid shapes using a special barbed needle. You poke the wool again and again, and the fibers lock together to make sturdy forms. Many people use needle felting to create felted wool animals that look soft and lifelike. You can also design custom art pieces with this technique. Wool felt holds its shape well, so you can add small details. With a little practice, you can craft your own felted wool animals at home.
Key Takeaways
Needle felting uses a special needle with barbs. You poke wool many times with it. This makes the wool fibers stick together. You can make firm shapes like animals or art.
Begin with easy shapes like balls or ovals. Then add more layers and details. Use different wool and needle sizes for texture and color.
Pick the right wool and needles for your project. Coarse wool is good for beginners. Fine needles help you add small details.
Always use a felting pad and finger protectors. This keeps your hands safe. It also protects your workspace from sharp needles.
Finished felted wool animals are great gifts or decorations. You can display or change them in many fun ways.
Needle Felting Basics
What Is Needle Felting
Needle felting is a hands-on craft that lets you turn soft wool into solid shapes. You use special notched needles to poke the wool. Each poke tangles and locks the fibers together. This process helps you sculpt the wool into anything you imagine. Many people enjoy needle felting animals because you can create lifelike figures with simple tools. You do not need fancy equipment to start. All you need is wool, felting needles, and a soft pad to protect your work surface.
If you want to learn more, you can find a tutorial online or watch a video tutorial. These resources show you how to get started and explain each step. A good tutorial will also teach you about the different types of wool and needles. You can follow along at your own pace. Many beginners find that a video tutorial makes it easier to see the needle felting process in action.
Tip: Always use a felting pad or foam block under your project. This keeps your needles sharp and your table safe.
How It Works
You start needle felting by rolling wool into a rough shape. For example, if you want to make felted wool animals, you begin with a simple oval or ball. Hold the wool firmly and poke it with your needle. The more you poke, the firmer the shape becomes. You can add more wool to build up the size or change the shape. Use your hands to check if the wool feels springy and holds its form.
Here is a basic step-by-step tutorial for needle felting animals:
Roll wool into a tight oval, tucking in loose ends.
Keep rolling and poking until the shape feels firm.
Add more wool to reach the size you want.
Use a simple template to guide your shape.
Blend colors by adding small pieces of wool and gently poking them in.
Adjust the density for texture—poke more for a firm shape or less for a fluffy look.
Check the back of your project to make sure all fibers are secure.
Trim loose fibers with small scissors for a neat finish.
You can find a video tutorial for each step if you want to see the process up close. Watching a video tutorial helps you understand how to move your hands and needles. Many crafters use a tutorial to learn new techniques or fix mistakes. With practice, you will feel confident making needle felting animals and other creative projects.
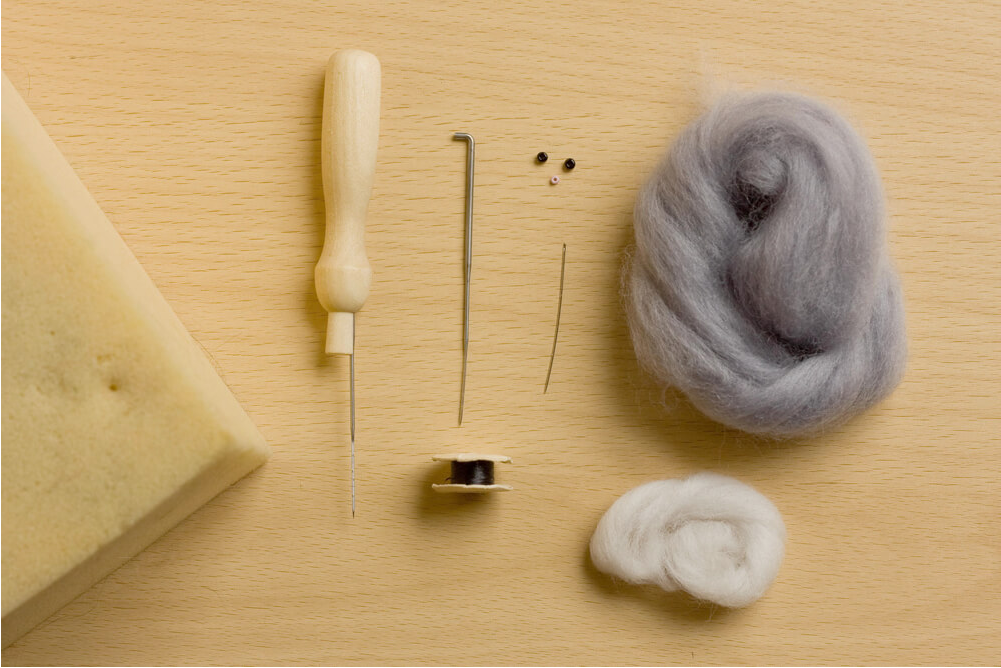
Tools and Materials
Types of Wool
Picking the right wool is important for needle felting. Each kind of wool feels different and works best for certain things. You can look at the table below to see the most common types and what they are good for:
Wool Type |
Unique Properties |
Best Uses in Needle Felting |
|---|---|---|
Merino Wool |
Fine, soft fibers; smooth, refined finish |
Detailed sculptures, toys, ornaments |
Corriedale Wool |
Medium-coarse; felts quickly; firm and strong base |
Robust animals, figures, durable ornaments |
Mountain Sheep Wool |
Coarse, sturdy, holds shape well |
Structural core, underlayer for softer wool |
Alpaca Wool |
Soft, warm, hypoallergenic, natural colors |
Luxurious, soft textures |
Llama Wool |
Coarser than alpaca, warm, durable |
Textured details |
Angora Wool |
Extremely soft, fluffy, lightweight |
Adding delicate, fluffy texture |
Mohair |
Lustrous, durable, takes dye well |
Vibrant colors, enhancing visual appeal |
Finn Wool |
Long-staple, soft yet strong, fluffy finish |
Artistic felting, mixed textures |
Blue-faced Leicester |
Lustrous, soft, longer fibers, silky texture |
Soft draped pieces, detailed ornaments |
Merino and Silk Blend |
Luxurious feel, sheen, strength, softness |
Fine art pieces, wearable felted items |
Merino and Corriedale Blend |
Combines softness and structure, versatile |
Beginners, detailed and durable sculptures |
Wool is natural and breaks down over time. Sheep grow new wool every year. Using wool instead of fake fibers helps the planet.
Felting Needles
You need special needles for needle felting. These needles have tiny barbs that grab and tangle the wool. The size and shape of the needle change how your project turns out. Here are the main kinds you will use:
Coarse needles (lower gauge, like 36) shape wool fast.
Medium needles (like 38-gauge star needles) work for most steps.
Fine needles (higher gauge, like 40 or 42) add small details.
Triangle needles are good for many jobs.
Star needles have more barbs and work faster on big spots.
Spiral needles twist fibers for tiny details.
Reverse needles pull fibers out for texture and blending.
Multiple needles in a holder help with large areas.
Single needles give you control for small parts.
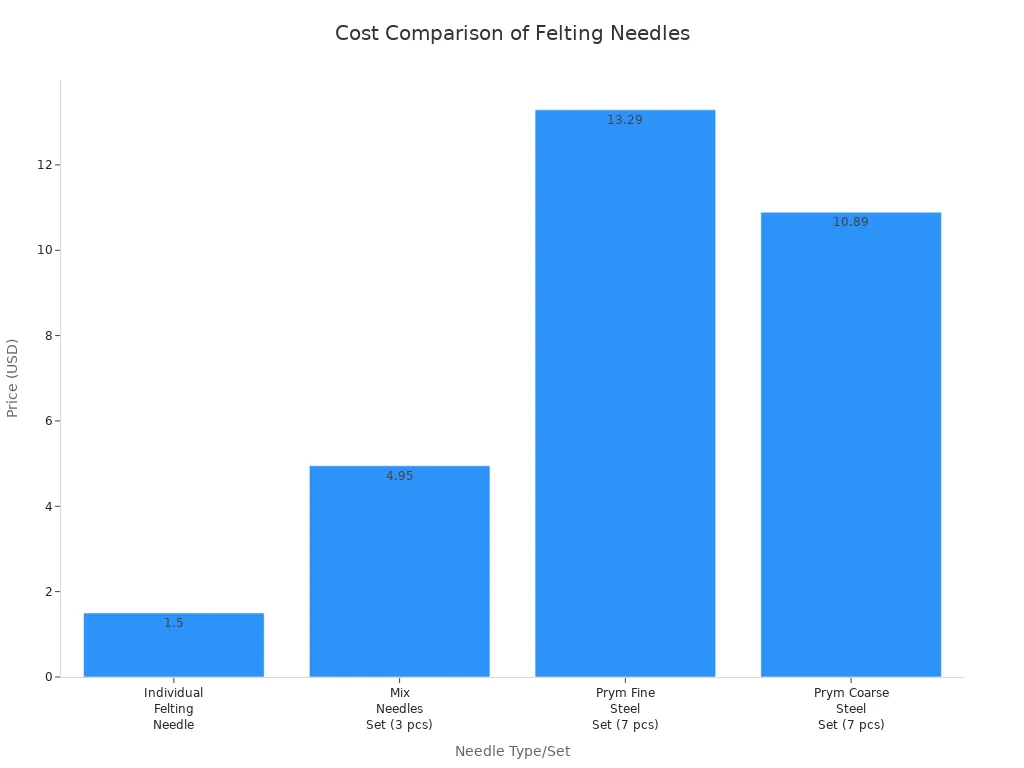
Good needles last longer and break less. Brands like Groz-Beckert cost more but are stronger. You can see a price chart below:
Other Supplies
You need a few more things to start needle felting. These tools help you stay safe and make your work easier:
Felting pad or foam block to protect your table and needles
Needle holders for comfort and faster work
Finger protectors to keep your hands safe
Starter kits with wool, needles, and instructions
Pipe cleaners or pompoms for animal legs or tails
White wool as a base for colorful projects
Prefelt sheets for adding special features
Tip: Always use a felting pad or cushion under your work. This keeps your needles sharp and your workspace safe.
With these tools and materials, you can start needle felting and make your own wool animals or art.
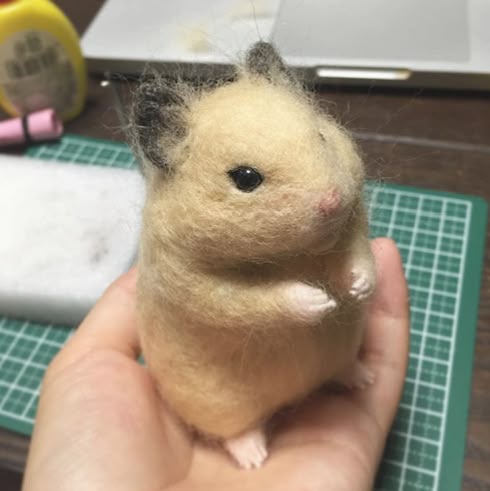
Making Felted Wool Animals
Creating felted wool animals is a rewarding process that lets you turn soft wool into lifelike creatures. You will use needle felting techniques to shape, layer, and add details. Each step builds on the last, helping you create animals that look realistic and unique.
Shaping the Core
You start every project by shaping the core. The core gives your animal its basic form and strength. Before you make complex needle felted animals, you should practice making simple shapes like balls and eggs. These shapes are the building blocks for all needle felting animals. Mastering them helps you feel confident as you move on to more advanced projects.
Here is a step-by-step guide to shaping the core:
Gather your supplies: felting needles, core wool, pipe cleaners, a felting pad, and scissors. You can also use craft eyes if you want.
Make the head and muzzle. Fold the end of a pipe cleaner to make a smooth tip. Wrap wool tightly around the pipe cleaner to form a smooth core.
Create a small wool ball by wrapping wool around your finger. Use your needle to poke and bind the wool. Attach this ball to the pipe cleaner core for the head.
Form the snout by wrapping a smaller piece of wool around the pipe cleaner end. Attach it to the head ball with your needle.
Shape the head and snout. Add details like the nose and mouth by felting small amounts of black wool onto the snout.
Roll a wad of wool to make the body. Use your needle to poke and connect the fibers, smoothing the surface.
Attach the head to the body. Trim the pipe cleaner, fold the end, cut a hole in the torso, insert the pipe cleaner, and secure with more wool and needle felting.
Make legs and tail by cutting pipe cleaners, folding the ends, and wrapping them with wool. Shape the paws with extra wool and needle felting.
Attach the legs and tail to the body. Insert the pipe cleaners into the torso, add wool around the joints, and secure with your needle.
Add finishing touches like paw pads or color accents to make your animal look more real.
Tip: If you see dips or uneven spots, add more wool and felt gently at a 45-degree angle. This helps you get a smooth, firm surface.
Many beginners start with small animals like birds or mice. These projects are popular in online craft communities and are perfect for learning the basics. You can find a tutorial for these animals that shows each step in detail. Most small felted wool animals take about one to three hours to finish, so you can complete a project in an afternoon.
Adding Layers
Once you have a solid core, you can add layers to give your animal texture and color. Hand blending wool fibers of different colors works well for creating realistic fur. Stack lengths of colored wool, then gently pull them apart while keeping the fibers lined up. This method helps you make long fur layers that look natural.
Use different types of wool for varied textures. Core wool gives structure, merino wool makes soft surfaces, and curls or locks add fluffy fur.
Try different needle gauges. Use a coarse needle for shaping, a medium needle for general work, and a fine needle for details.
Layer colors carefully. Place darker shades under lighter ones to create depth and shadows.
Use brushes and mini scissors to refine the fur and add fine details.
Add an armature inside your animal if you want it to stand or pose.
Dry brushing with soft pastels or powdered pigments adds subtle color and shading.
Note: When you follow a tutorial, you will often see artists blending colors and layering wool to create lifelike effects. This step makes your needle felted animals look more realistic.
Detailing Features
The final step is adding detailed features like eyes, noses, and fur patterns. These small touches bring your needle felted animals to life.
You can use fine needles (40-42 gauge) for delicate details. Start with the eyes by felting small black pupils. Add iris colors with tiny bits of wool to show shadows and highlights. For the nose, fill the outline with the main color, then add nostrils for realism. To make fur patterns like stripes or spots, layer contrasting wool and felt it lightly so the colors do not blend too much.
For fur texture, tease out fibers with your needle or layer thin strips of wool. Twirl thin pieces of wool to make whiskers and felt them gently into place. Shape ears as triangles, sometimes adding pink or other colors, and attach them with pins before felting them onto the head. You can also use craft eyes or beads for a shiny look, attaching them with a tiny bit of glue or by inserting them into small holes.
Tip: Many artists find inspiration by studying real animals or watching a tutorial from experienced felters. Try looking at photos or videos to help you capture the right shapes and colors.
When you finish, your felted wool animals will have lifelike faces, soft fur, and unique personalities. Each project helps you learn new skills and express your creativity through needle felting animals.
Tips for Beginners
Safety Tips
Needle felting uses sharp tools, so you need to stay safe while working. Follow these tips to protect your hands and keep your workspace safe:
Use a needle holder or felting tool for better grip and control.
Always keep your needle straight and move it up and down. This helps prevent needle breakage.
Wear leather gloves or finger protectors to shield your fingers from pricks.
Work on a stable, flat surface with a felting mat or foam pad for support.
Keep your workspace tidy and free of clutter to avoid accidents.
Store felting needles in a secure container, away from children and pets.
Take breaks to rest your eyes and stretch your hands.
Tip: If you do not have gloves, use a bamboo skewer or ice pick to hold the wool in place.
Project Ideas
You can start with simple and fun beginner projects to build your skills. These projects help you learn basic shapes and techniques:
Make small felt animals or creatures, like a cactus softie or a yellow chick keychain.
Try finger puppets for a playful and easy project.
Create Christmas ornaments such as reindeer or snowflakes.
Craft felt accessories like hair clips or bows.
Use inexpensive beginner kits to test your interest before moving to bigger projects.
Note: Start with simple shapes like balls or 2D designs. This helps you gain confidence and enjoy the process.
Fixing Mistakes
Everyone makes mistakes when learning needle felting. You can fix most problems with the right technique. Use this table to help you solve common issues:
Problem |
Solution |
|---|---|
Needle breaks or bends |
Use short, quick stabs and avoid sideways pressure. Replace worn needles. |
Wool does not felt well |
Choose coarser wool like Corriedale or Romney. Avoid Superwash wool. |
Project looks uneven |
Add small amounts of wool and felt gently to smooth out bumps. |
Needle pricks or injuries |
Use a felting cushion and finger protectors for safety. |
Project is too big or too small |
Start with less wool and add more as needed. |
Remember: Patience and practice help you improve. Celebrate your progress and enjoy each step.
What to Do with Finished Projects
Displaying Your Work
There are many fun ways to show your felted wool animals. Put them on shelves or mantels to decorate your room. You can also use glass cases to keep them safe from dust. If you want a fancy look, put your 3D felted animal on a canvas frame. Use double-sided tape to stick it in place. Sew it around stretcher bars to make it stand tall and steady. Move the animal’s feet or head until it looks perfect. Many people post their finished animals online or sell them on craft websites. Showing your work at home or in galleries lets others see your art.
Gifting Ideas
Felted wool animals are great gifts for any event. You can make them special by adding names or favorite colors. Here are some fun ways to give them:
Give themed felting kits with supplies and instructions for a hands-on gift.
Have a felting party so friends or family can make animals together.
Make keychains, bag charms, or ornaments for cool keepsakes.
Dress animals in costumes or holiday outfits for Christmas or Halloween.
Pick designs that match the person’s style, like cute or realistic animals.
These gifts are good for birthdays, holidays, or just to show you care.
Custom Pet Portraits
A custom pet portrait made with needle felting is a one-of-a-kind gift. Here is how it works:
Send clear pet photos and share any special ideas.
Talk about the style, size, and extra details you want.
Look at digital drafts and ask for changes if you need them.
The artist makes your portrait by layering wool for every detail.
Check the final photo before the portrait is sent to you.
Pawimprint’s Pet Portrait Custom Frame is a top choice. Talented artists use 100% natural wool to make lifelike, 3D portraits. You can pick the frame, background, and add accessories. People love the careful work and the feelings these portraits bring. Many say they are special gifts and loving memories.
Needle felting projects can be useful too. You can turn them into wearable art, home decorations, or toys. Joining a felting group helps you meet others and share ideas. When you finish a project, remember there are many ways to enjoy and share your art.
Needle felting gives you a creative way to relax and express yourself. You can start with simple kits and learn by doing, just like many beginners. This craft helps you make unique gifts, connect with others, and enjoy the calming motion of shaping wool.
Needle felting supports mindfulness and boosts self-esteem.
You can create special keepsakes, like Pawimprint’s Pet Portrait Custom Frame, that honor your pet and bring lasting joy.
Try needle felting today. You might discover a new passion and make something truly meaningful.
FAQ
How long does it take to finish a needle felting project?
You can finish a small animal in one to three hours. Larger or more detailed projects may take several days. Your speed will improve as you practice.
Can you fix mistakes in needle felting?
Yes, you can fix most mistakes. Add more wool to cover thin spots or remove wool with tweezers. Gently poke the area again to blend the fibers.
What makes a good needle felting artist?
A good needle felting artist pays attention to detail and practices often. You should study real animals and try new techniques. Patience and creativity help you improve your skills.
Is needle felting safe for kids?
Needle felting uses sharp needles. Kids should work with adult supervision. Use finger protectors and a felting pad to stay safe.
What wool works best for beginners?
Corriedale wool works well for beginners. It felts quickly and holds its shape. You can also try blends that combine softness and structure.