
What You Need to Know Before Making Needle Felted Animals
Needle felting animals is a fun way to be creative and a great way to find unique needle felted animals for sale. It is relaxing and involves using your hands a lot. You only need simple tools, some patience, and a desire to learn. Many people enjoy needle felting because it helps them relax and allows them to create one-of-a-kind pieces. The whole process feels rewarding, especially when you see your animal take shape. Whether you want your animals to look real or are searching for needle felted animals for sale, you’ll discover how much joy this craft brings.
Key Takeaways
Get the correct tools and wool before you start. This helps you make better needle felted animals. Take your time and follow each step slowly. Shape your animal and add details with care. Look at photos to help you see how your animal should look. Use wire armatures to keep the shape and size right. Mix colors and put wool in layers for real-looking fur. This makes your animal look more lifelike. Practice often and learn from your mistakes. Join needle felting groups to get better and have fun with others.
Tools and Materials
Before you start needle felting animals, you need to gather a few basic supplies. The right tools and materials make your project easier and help you get better results.
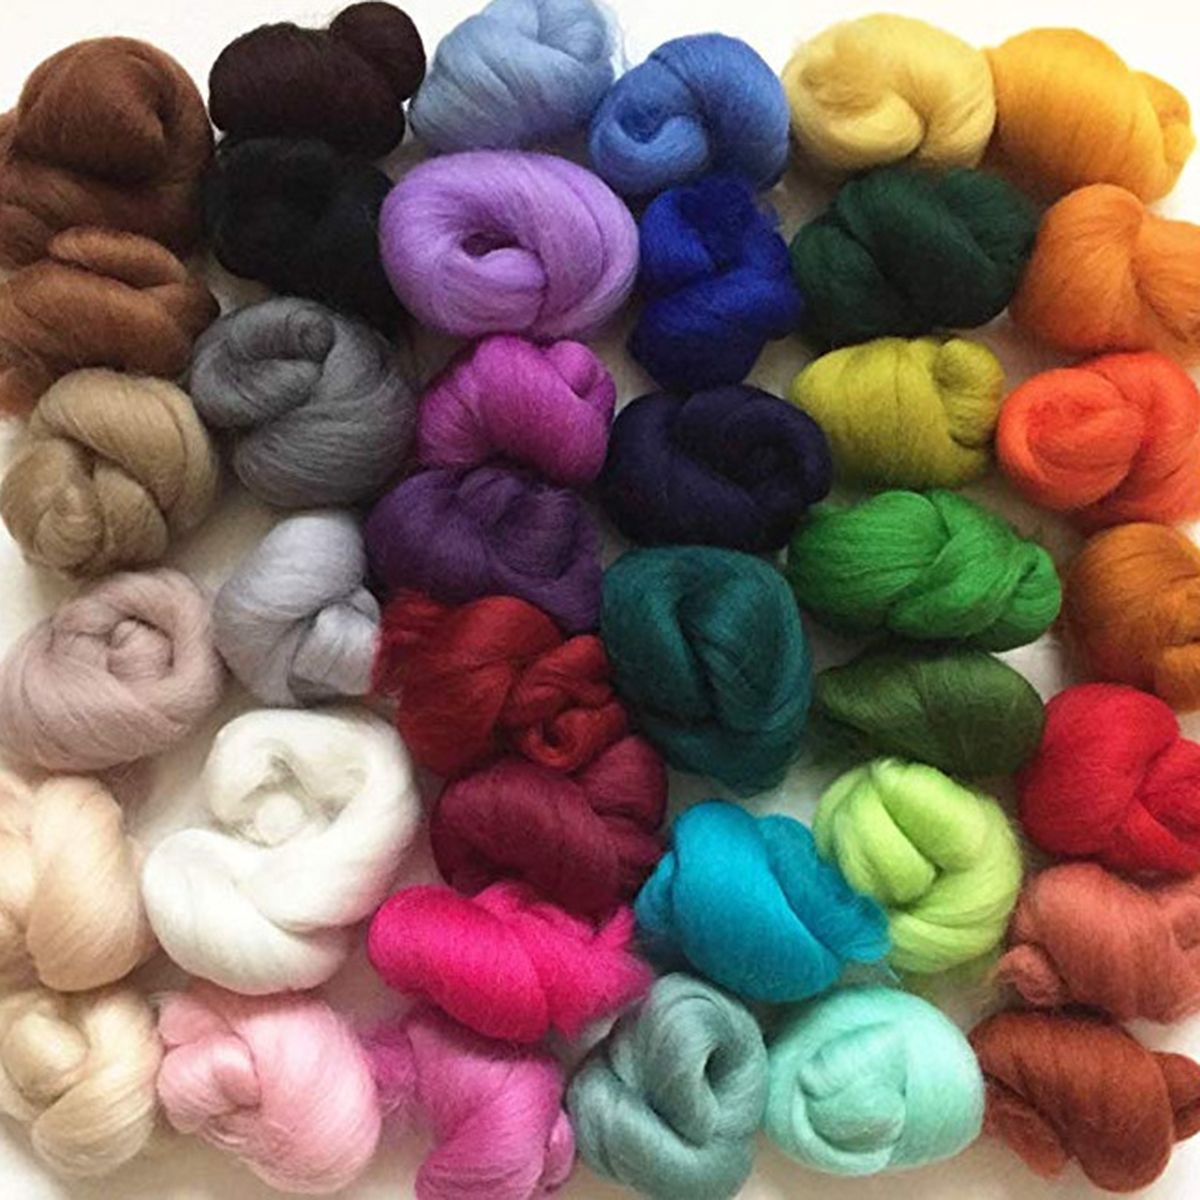
Wool Types
You have many choices when it comes to wool. Here are some popular options:
Carded wool comes in batts (thick sheets) and slivers (long strips). Batts work well for building shapes, while slivers are great for wrapping wire.
Corriedale wool is sturdy and affordable, perfect for the core of your animal.
Merino wool feels soft and smooth. Use it for the outer layer to give your animal a polished look.
Mountain sheep, alpaca, llama, angora, and mohair each bring unique textures and finishes. Try different blends to see what you like best.
Needles
Felting needles come in different shapes and sizes. Each type has a special job:
Gauge |
Best Use |
|
|---|---|---|
Star Point |
38 |
Large areas, fast felting |
Triangle Point |
40 |
Fine details, smoothing surfaces |
Triangle Point |
38 |
General felting, attaching parts |
Triangle Point |
36 |
Rough shaping, coarse wool |
Thicker needles work well for shaping and coarse wool. Finer needles help with details and smoothing. You can use one needle for control or several together to speed up the process.
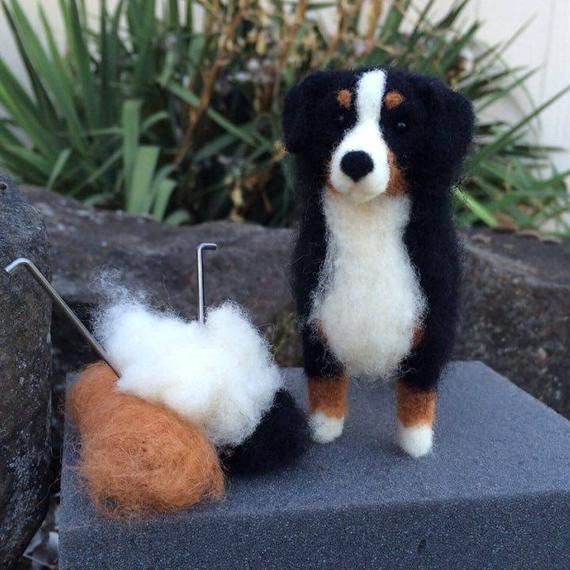
Armature
Some animals need extra support, especially if they have long legs or need to stand. You can use wire, like floral or aluminum wire, to build a simple skeleton inside your animal. This armature keeps your sculpture stable and lets you pose it. Not every project needs armature, but it helps with tricky shapes.
Reference Photos
Always keep reference images nearby. These photos help you see the animal’s shape, color, and details. You can use them to check proportions and make your animal look more realistic.
Optional Details
Want to make your animal stand out? Try these extras:
Add glass eyes for a lifelike look.
Use clay or wood for hooves or claws.
Mix different wools for natural color changes.
Use special needles or brushes to create fluffy or curly fur.
Dye your wool for custom colors.
Make limbs separately and attach them for better anatomy.
Tip: Start with a beginner kit if you’re new to needle felting. Kits usually cost between $7 and $80 and include everything you need.
Needle Felting Basics
Core Steps
When you start needle felting animals, you follow a series of simple steps. These steps help you turn loose wool into a cute animal shape. Here’s how you can do it:
Gather your supplies. You need felting needles, wool, pipe cleaners, craft eyes, and scissors.
Shape the head and muzzle. Wrap wool around a pipe cleaner armature and poke it with your needle until it holds its shape.
Add eyes. Use wool, beads, or craft eyes and secure them in place.
Make ears. Felt small triangles and attach them to the head.
Build the body. Roll and poke wool to form the torso, then connect the head by inserting the pipe cleaner and felting the joint.
Create legs, paws, and tail. Wrap wool around pipe cleaners and shape them with your needle.
Attach the legs and tail. Insert them into the body and felt them securely.
Tip: Take your time with each step. Rushing can make your animal look uneven.
Safety
Needle felting animals is fun, but you need to stay safe. Felting needles are sharp and can hurt you if you’re not careful. Here are some basic tips to keep you safe:
Always watch your hands and keep your eyes on your work.
Use a felting pad or foam block. Never felt on your lap or body.
Wear finger guards, especially for small projects.
Store your needles in a safe place when you finish.
Take breaks to rest your hands and eyes.
Note: Keep your tools away from pets and small children.
Patience
Patience is your best friend when you try needle felting animals. This craft takes time. You need to poke the wool over and over to get the right shape and texture. If you rush, your animal might look lumpy or uneven. Working slowly helps you learn basic techniques and add fine details. You’ll see your skills improve with practice. Enjoy the process and celebrate small wins along the way!
Remember: Every project teaches you something new. Stay patient and have fun!
How to Make Realistic Needle Felted Animals
Creating realistic needle felted animals takes more than just poking wool with a needle. You want your sculptures to look like real, life-like animals, not just soft toys. Let’s break down how to make realistic needle felted animals step by step.
Anatomy and Proportions
If you want your animal to look real, you need to study its body. Start by collecting lots of reference photos. Look at pictures from different angles. Notice the shape of the head, the length of the legs, and the way the tail curves. Some people even use skeleton diagrams or watch animal videos to see how the body moves.
You can use a wire armature as the skeleton for your animal. This helps you keep the right proportions and lets you pose your sculpture. For example, if you’re making a dog, bend the wire to match the shape of its spine and legs. Wrap wool around the wire to build up the body. Always check your work against your reference photos. This helps you spot mistakes early.
Here’s a simple way to keep your proportions right:
Roll a tight core of wool for the main body parts.
Use coarse needles to shape the core.
Rotate your piece often so it stays even.
Compare both sides as you work, especially for legs and arms.
Attach parts carefully and blend the seams.
Pay close attention to special features. Does your animal have big ears, a long snout, or tiny toes? Use thin wire for toes or claws if needed. For paws, roll small pieces of wool and felt them in place. You can even add paw pads with lighter wool. These little touches make your realistic animals stand out.
Tip: Keep your reference photos nearby. They help you capture the unique features that make each animal special.
Layering and Blending
Layering and blending wool is the secret to making realistic needle felted animals. You don’t want your sculpture to look flat or patchy. Start with coarse wool to make the basic shape. Use a coarse needle to felt it firmly. This gives you a strong base.
Next, add thin layers of soft wool, like merino. Lay the fibers in the same direction as the animal’s fur. This makes the surface look smooth and natural. If you want to show muscles or curves, add more wool in those spots and blend it in. Use a medium needle to attach these layers without changing the shape.
Blending colors is important for realistic-looking creatures. Mix different shades of wool to match your animal’s coat. For example, if you’re making a calico cat, blend orange, black, and white wool in thin layers. This helps you create stripes, spots, or other markings. Always finish with a fine needle to smooth out stray fibers and give your sculpture a polished look.
Step |
What to Do |
Why It Matters |
|---|---|---|
1. Base |
Use coarse wool and needle for structure |
Strong, firm foundation |
2. Layering |
Add soft wool in thin layers |
Smooth, realistic surface |
3. Blending |
Mix colors and align fibers with fur |
Natural color transitions |
4. Finishing |
Use fine needle for final smoothing |
Refined, life-like texture |
Note: Layering lets you control the shape and density. Blending colors gives your animal a detailed replication of real fur patterns.
Adding Details
The final step is to add details that bring your animal to life. This is where your sculpture goes from good to amazing. Start by making small parts, like ears, tails, or limbs, separately. Attach them with unfelted wool or wire for extra strength. Use glue if you need to secure wires inside the body.
For eyes, glass eyes on wire look very real. You can also use tiny beads or felt small balls of wool. Use an awl or needle to make holes for the eyes, then insert and secure them. If your animal has hooves, claws, or horns, try using polymer clay or wood. Attach these parts by gluing them onto the wire armature.
You can use different tools to add texture. Try brushing the wool with a soft brush to smooth the surface. Trim any fuzzy fibers with small scissors. For a sleek finish, press the wool gently with a warm iron or hair straightener.
Callout: Don’t rush the details. Take your time to add features like whiskers, paw pads, or tiny markings. These small touches make your realistic animals look alive.
If you want to make realistic needle felted animals, focus on anatomy, layering, and details. Keep practicing, and soon your sculptures will look just like real animals. You’ll impress everyone with your realistic-looking creatures and your skill at detailed replication.
Tips for Realistic Needle Felted Animals
When you want your needle felted animals to look real, you need to focus on a few important details. These practical tips will help you master color blending, fur texture, and realistic eyes. Let’s dive in!
Color Blending
Getting the colors right makes a huge difference in how lifelike your animal looks. Real animals have many shades in their fur, not just one or two. You can use these steps to blend colors like a pro:
Gather several shades of wool that match your animal’s fur. Think of it like preparing a painter’s palette.
Stack small lengths of each color on top of each other. Make sure the fibers all go in the same direction.
Hold one end of the stack and gently pull the wool apart with your thumb and finger. This mixes the colors without losing the texture.
Lay the blended wool in thin layers, keeping the fibers lined up. This helps you control the look and keeps the fur smooth.
Split the wool into smaller pieces if you need to blend more. This works especially well for long-haired animals, where you want each strand to show different colors.
Tip: Practice layering thin wisps of wool. This technique lets you create soft transitions and natural-looking fur patterns.
Blending colors in this way adds depth and makes your animal’s coat look real. You can even mix in a little white or black to highlight certain areas or add shadows.
Fur Texture
If you want your animals to look fluffy and soft, you need to pay attention to fur texture. Creating fluffy surfaces is all about using the right wool and layering it the right way. Here’s how you can do it:
Pick different types of wool, like batts, merino tops, or natural undyed wool. Each type gives you a different feel and look.
Cut the wool into small pieces of different lengths. This helps you copy the way real fur changes across the body.
Pull the center of each piece to make a bow shape. This makes the ends fluffy and helps the fur stand out.
Start felting from the back of your animal and move toward the head. This keeps the layers neat and avoids gaps.
Use a barbed needle to attach the wool. Felt in different directions, but don’t poke too deep. You want the fur to stay fluffy.
Trim the ends at different angles to make the fur look natural and wild.
Run your fingers through the wool and lightly stab with the needle to add volume. This is the secret to making animals fluffy and full of life.
Note: For delicate spots, like around the eyes or nose, use a sewing needle to fluff the wool without flattening it.
Mixing colors within each strand also helps you get realistic textures. Try blending black, cream, or brown shades together. Keep layering and felting until your animal looks just right. You’ll see how creating fluffy surfaces brings your sculpture to life.
Realistic Eyes
Eyes are the soul of your needle felted animal. If you get the eyes right, your animal will look alive and full of character. Here’s a simple way to make realistic eyes:
Start with a small circle of light brown or orange wool. Felt it gently onto the head where the eye should go.
Roll a tiny piece of black wool for the pupil. Place it in the center of the base and felt it down smoothly.
Add a tiny bit of white wool off to the side of the pupil. This makes the eye look shiny and real.
Use thin wisps of black or dark brown wool to outline the eye and add detail.
For extra depth, roll a small seed of wool and felt it above the eye to make a brow.
Keep the top layers loose and gently felted. This lets you adjust the shape if you need to.
Tip: Look at photos of real animals as you work. This helps you place the eyes and highlights in the right spot.
If you want a wet or glassy look, you can use glass or toy eyes instead of wool. This works great for cats or dogs. No matter which method you choose, take your time. The eyes are small, but they make a big impact.
With these tips, you can make your needle felted animals look more lifelike and fluffy. Try different techniques, keep practicing, and soon you’ll see amazing results in your work.
Common Mistakes
When you start needle felting animals, you might run into a few common mistakes. Don’t worry—everyone makes them at first! Let’s look at some of the most frequent issues and how you can avoid them.
Lumpy Shapes
Lumpy shapes can make your animal look uneven or bumpy. This usually happens when the wool isn’t firm enough or you don’t stab it evenly. Sometimes, you might add too much wool in one spot or not enough in another. Here’s how you can keep your shapes smooth:
Stab the wool many times to make it firm.
Use finer needles as the wool gets denser.
Fill in any dips or holes with small bits of wool.
Layer the wool carefully and spread fibers evenly.
Remove any blobs or debris before adding new layers.
Use shallow pokes at an angle to smooth the surface.
Try spiral or twisted needles for a polished finish.
Tip: Take your time and check your work from all sides. Smoothing as you go helps prevent lumps.
Overfelting
Overfelting happens when you poke the wool too much in one area. This can make the surface hard, shiny, or even cause holes. If you overfelt, your animal might lose its soft, natural look. To avoid this, keep these points in mind:
Switch to a finer needle as the wool gets firmer.
Stop felting when the shape feels solid but not rock-hard.
Don’t focus on one spot for too long.
If you see a shiny patch, add a thin layer of wool and felt gently.
Note: Overfelting is easy to fix if you catch it early. Just add more wool and blend it in.
Proportion Errors
Getting the right proportions can be tricky, especially for beginners. You might end up with legs that are too short or a head that’s too big. Here’s how you can keep your animal looking balanced:
Use reference photos and check your work often.
Build each part separately before attaching them.
Compare both sides to make sure they match.
Start with less wool and add more as needed.
Callout: Don’t worry if your first animal looks a little funny. Practice helps you improve your sense of proportion!
By watching out for these common mistakes, you’ll see your needle felted animals look better with every project. Keep practicing, and you’ll get the hang of it in no time!
Practice and Progress
Simple Projects
Starting with easy needle felting projects helps you build confidence and learn the basics. You can try making simple shapes like balls or basic figures. Here are some great beginner ideas:
Wool dryer balls—just roll wool into a ball and felt it.
Snowmen, pumpkins, or penguins—these use simple shapes and let you practice attaching parts.
Sheep or chickens—these animals have easy forms and help you learn how to add details.
Needle felted food—try apples or leaves for a fun twist.
Beginner kits make things even easier. They come with the right wool, needles, and step-by-step instructions. You get everything you need, so you can focus on learning and having fun.
Tip: Always use a felting mat or cushion to protect your hands and keep your workspace safe.
Learning from Mistakes
Everyone makes mistakes when they start. The important thing is to notice what went wrong and try again. For example, if you use the wrong type of wool, your project might not felt well. If you stab the needle too deep, you could break it or waste effort. Using too much wool can make your animal too big, while too little makes it too small.
Try these tips to learn from your mistakes:
Use short, quick stabs with the needle.
Start with less wool and add more as you go.
Keep your needle straight to avoid breaking it.
Note: Patience is key. Every mistake is a chance to develop your skills and get better.
Increasing Complexity
Once you feel comfortable, you can make your needle felting projects more challenging. Start by adding details like glass eyes or using wire armatures for support. Try different types of wool to see how they behave. You can also combine needle felting with wet felting to create new textures.
Here’s how you can level up:
Master basic shapes and techniques first.
Add advanced materials, like glass eyes or wire.
Attach small parts with needle and thread for extra strength.
Try 3D shaping and color blending for realistic animals.
Take online courses or use advanced kits to keep learning.
Callout: Keep practicing and don’t rush. The more you try, the more you’ll grow as an artist.
Needle Felted Animals for Sale
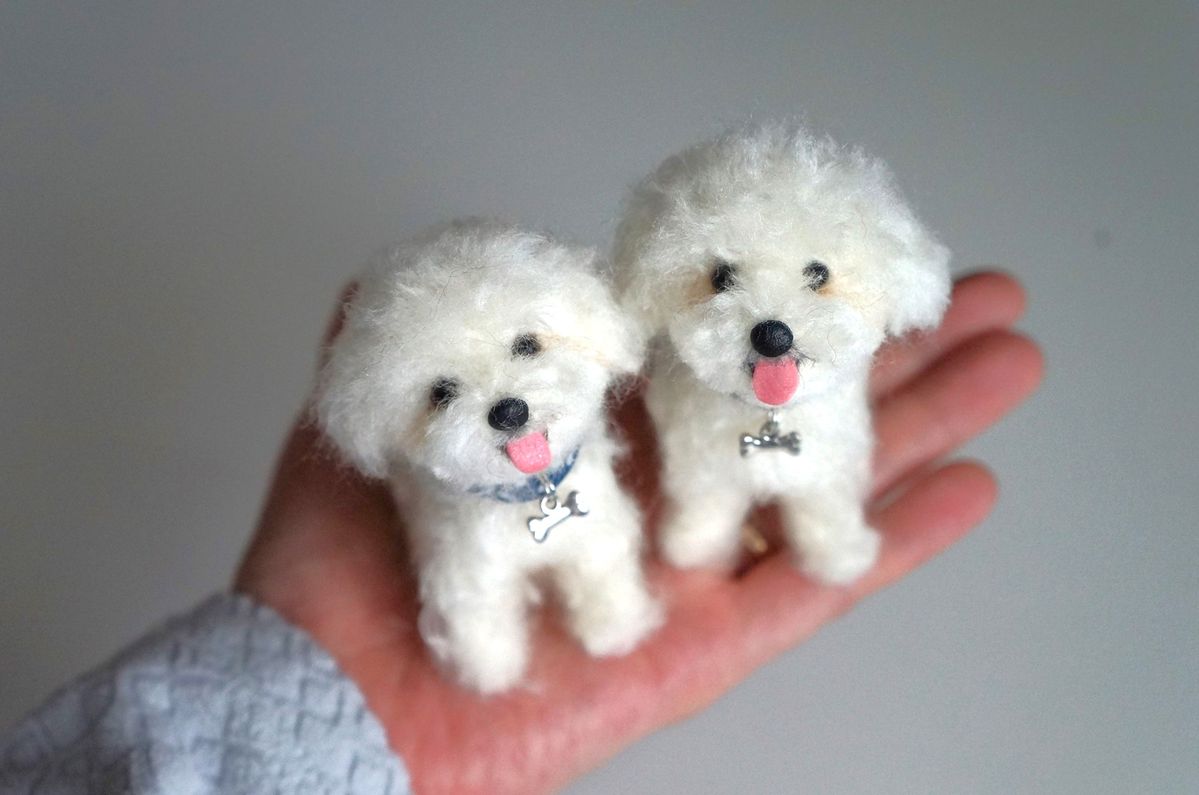
Custom Pet Portraits
Custom pet portraits are a popular choice if you want something unique. Artists use your pet’s photo to make a wool sculpture that looks real. These portraits are soft and strong because they use natural wool. Artists spend a lot of time on each piece. They work hard to show your pet’s personality. You can see photos of the portrait before it is done. You can ask for changes if you want. This makes every portrait special and personal.
Pawimprint’s Custom Pet Wool Felt Photo Frame is a top pick. Talented artists make each frame by hand to match your pet. The finished frame looks real and brings happiness. If you want something smaller, Pawimprint has other choices. You can get mini keychains, 3D pet copies, or pet memorials. These let you keep your pet with you at home or when you go out.
Here is a simple table about needle felted animals for sale:
Product Category |
Price Range |
Features |
|---|---|---|
Needle Felted Dog Portraits |
$192 - $369 |
Custom frames, inscriptions, high realism |
Needle Felted Cat Portraits |
$109 - $179 |
Various sizes, detailed 3D wool felting |
Many people search for needle felted animals for sale every month. Most want pets that look like their own animals.
Where to Buy
You can buy needle felted animals for sale on many websites. Etsy has more than 4,000 items. Prices start at $50 and go over $190. You can find custom pet sculptures and gifts. The best sellers have lots of good reviews. This shows that many people like these products.
Other good places to shop are:
Bear Creek Felting: They sell kits, finished animals, and online classes.
Living Felt: They offer kits, supplies, and free lessons.
The Wool Family: They are known for great wool and felting tools.
If you want a very real-looking piece, try Pawimprint’s custom portraits or memorials. You can order a frame, a small keychain, or a 3D copy of your pet. These make nice gifts or special keepsakes.
Tip: Always read reviews and look at the artist’s work before buying. This helps you pick the best needle felted animals for sale and makes sure you will be happy with your order.
Inspiration and Community
Finding Ideas
You might wonder where to get ideas for your next needle felted animal. Start with animals you love. Maybe you want to make a tiny fox, a fluffy bunny, or even a colorful bird. When you pick a subject that excites you, you’ll feel more motivated to finish your project.
Bear Creek Felting suggests exploring different colors and designs to spark your creativity. Their project galleries show finished animals that can inspire you to try new shapes or patterns. You can also check out their Online Needle Felting Academy. It offers lessons and kits that guide you step by step. If you like reading, their blog articles share tips and stories from other needle felters.
The Midnight Mustard Seed blog is another great place to find ideas. It has beginner-friendly tutorials that walk you through building an armature, layering wool, and adding special details. You can use the same steps to make almost any animal you imagine. This makes it easy to try new projects and add your own twist.
Tip: Follow needle felting artists on social media. You’ll see new projects every day and get inspired by their creativity.
Joining Groups
Needle felting feels even better when you share it with others. Joining a group—online or in your town—helps you meet people who love the craft as much as you do. You can show off your work, ask questions, and learn new tricks from friends.
Many hobbyists say that being part of a needle felting community gives them a sense of belonging. You get to swap tips, celebrate each other’s progress, and even join group challenges. Some groups host workshops or meetups where you can felt together and have fun.
Callout: Don’t be shy! Sharing your creations and ideas can boost your confidence and help you grow as an artist.
You can find groups on Facebook, Instagram, or local craft stores. When you join, you’ll discover that needle felting is not just a hobby—it’s a way to connect and make new friends.
Needle felting animals starts with the right tools, good wool, and a bit of planning. You need patience and practice to see real progress. Try a simple project first or order a custom piece for inspiration.
Gather your supplies
Follow basic steps
Enjoy the process
Remember, you can always join a needle felting group for tips, support, and new ideas. You never have to felt alone!
FAQ
How long does it take to make a needle felted animal?
It depends on the size and detail. A small, simple animal might take you 2–3 hours. A larger or more realistic one could take several days. Take your time and enjoy the process!
Can kids try needle felting?
Yes! Kids can try needle felting with adult supervision. The needles are sharp, so always watch your hands. Start with easy projects and use finger guards for safety.
What if I make a mistake while felting?
Don’t worry! You can pull off wool and try again. Add more wool if you need to fix a shape. Every mistake helps you learn and get better.
Do I need special tools to start?
You only need a felting needle, some wool, and a foam pad. Beginner kits include everything you need. You can add more tools as you learn.
How do I keep my felted animals looking nice?
Keep them away from water and pets. Dust them gently with a soft brush. Store them in a dry place. Your creations will last a long time with a little care!