
Needle Felting or Sewing Which Method Makes Better Stuffed Animals
I always find that the best way to make stuffed animals depends on what you want and how you like to craft. Some people love felting stuffed animals for their soft, fuzzy look. Others prefer sewing for neat lines and shapes. I’ve seen brands like Pawimprint create amazing custom keepsakes, which inspires me to try new things.
Key Takeaways
Needle felting makes soft and fuzzy stuffed animals. These animals have special shapes and textures. They are great for detailed art and creative sculpting.
Sewing makes strong and neat stuffed animals. The lines look sharp and clean. This is good for toys that need to last a long time. Sewing is also good for beginners who want fast and easy projects.
Picking the best method depends on your skill, your project, and who will use the stuffed animal. Both ways let you have fun and make special keepsakes.
Methods Overview
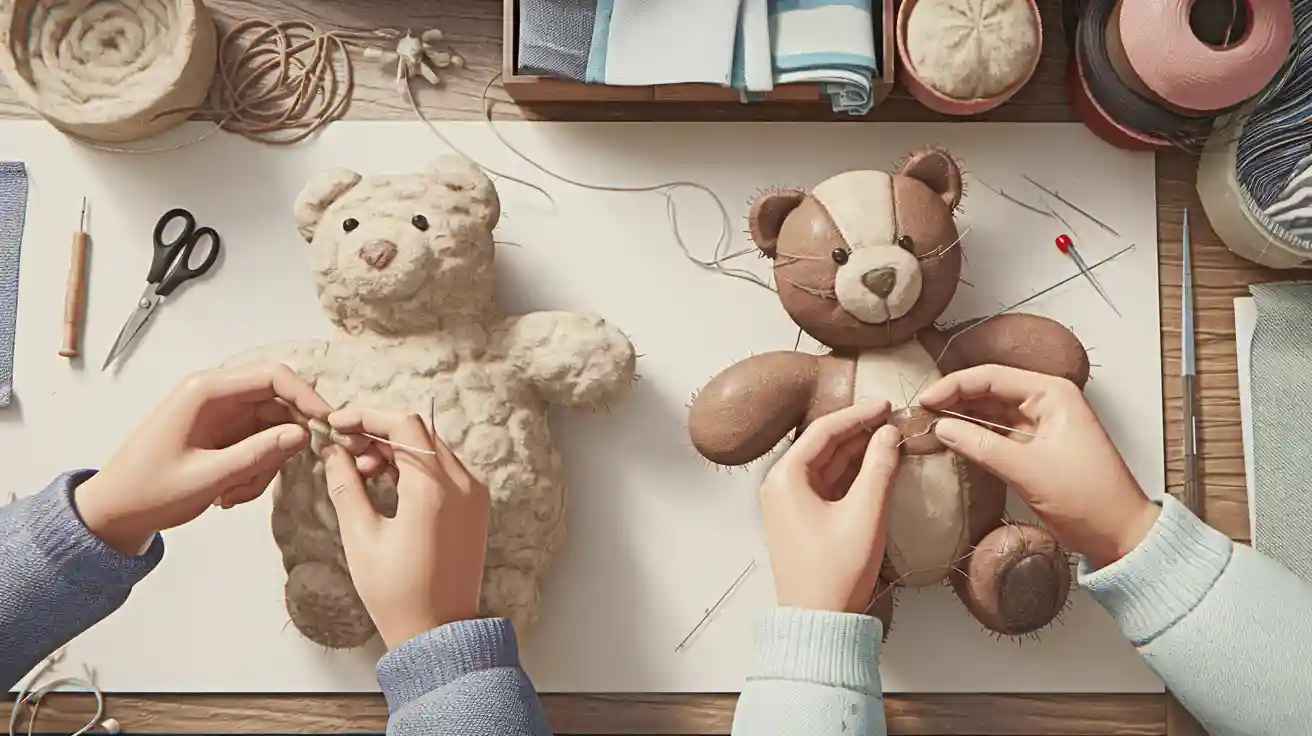
Needle Felting
When I first tried felting stuffed animals, I loved how hands-on the process felt. I start by gathering my supplies: felting needles, wool, a felting pad, and sometimes pipe cleaners for structure. Here’s how I usually make a simple animal:
I roll a chunk of wool into the shape I want and lightly poke it with the needle to hold it together.
I add the base color by layering more wool and felting it onto the body.
For ears, I shape small triangles and attach them with the needle.
I use thin wool threads to make eyes and a mouth, poking them in place.
If I want stripes or spots, I wrap tiny pieces of wool and felt them on.
I make legs by rolling wool into sausage shapes and felting them onto the body.
I always save the final facial details for last, since they really bring the animal to life.
Felting stuffed animals lets me create soft, fuzzy textures and unique shapes. I can even stuff felt ornaments using this method, which makes great gifts.
Sewing
Sewing stuffed animals feels a bit more like following a recipe. I start by picking my fabric and ironing it so it’s smooth. Here’s my usual process:
I cut out all the pattern pieces, making sure to add seam allowances.
If I need extra strength, I fuse interfacing to the fabric.
I sew smaller parts together first, like the chest or legs, and clip the curves so everything lies flat.
I attach the head to the body, using notches to line things up.
For wings or ears, I sew them inside out, trim the seams, and turn them right side out.
I add face details by sewing on felt shapes or embroidering eyes.
I sew the front and back together, leaving a small opening.
I turn the animal right side out, stuff it with polyfill, and close the opening with a ladder stitch.
Sewing gives me crisp lines and lets me use lots of different fabrics. It’s a great way to make sturdy stuffed animals that hold up to play.
Felting Stuffed Animals vs Sewing
Appearance
When I look at felting stuffed animals, I notice they have a soft, fuzzy surface that feels warm and inviting. The wool fibers blend together, so there are no seams or sharp lines. This makes each animal look unique and sometimes even lifelike. For example, I once saw a tutorial where someone made a needle felted bunny using pipe cleaners for the body, glass eyes, and even horsehair whiskers. The artist layered different shades of wool and used special felting techniques to create fluffy fur and tiny paws. The result looked just like a real bunny!
Some artists, like Miki Ichiyama from Japan, create amazing needle felted animals with realistic colors and facial expressions. I’ve also seen brands like Pawimprint use needle felting to make custom wool felt portraits of pets. These portraits capture the unique look and personality of each animal, making them perfect keepsakes.
Sewn stuffed animals look a bit different. Sewing gives me crisp lines and smooth shapes. I can use high-quality fabrics like minky, fleece, or cotton to get different textures. When I sew, I cut out fabric pieces and stitch them together, so the seams show where the pieces meet. If I want a plushie with a neat, classic look, sewing is my go-to method. I usually stuff the animal with polyfill, which makes it soft and squeezable. Sometimes, I use wool felt for details like ears or noses, especially when I want to stuff felt ornaments or add special touches.
Durability
I always think about durability when I make stuffed animals, especially if they’re for kids or will get a lot of hugs. Felted stuffed animals are pretty strong, especially when I use wool felt. The fibers lock together tightly, so the surface resists tearing and holds its shape well. Wool felt is known for being tough and long-lasting, but it doesn’t like water much. If I wash a felted animal, it might shrink or lose its shape.
Sewn stuffed animals can be just as durable, especially if I use sturdy fabrics and strong stitches. I pay extra attention to stress points like the neck and arms. If I use a ladder stitch to close up the opening after stuffing plushies, the seam almost disappears and holds tight. Over time, sewn animals might show wear at the seams or fabric edges, especially if they get dirty or are left in the sun. I’ve learned that using fabric patches and gentle stitching helps repair worn spots without making things worse.
Learning Curve
When I first tried felting stuffed animals, I found it easy to start. I only needed a felting needle, some wool, and a pad. I poked the wool until it held together, and I could see results right away. Simple shapes like balls or hearts took me about 10–20 minutes. As I got better, I tried more complex animals, which took longer and needed more skill. I watched online classes and joined a virtual workshop to learn new techniques.
Sewing stuffed animals felt a bit more complicated at first. I had to learn how to read patterns, cut fabric, and use a sewing machine or needle and thread. There are lots of classes for sewing, both in-person and online. Some are expensive, but many offer all the materials I need. I found that practice makes a big difference, and starting with simple patterns helped me build confidence.
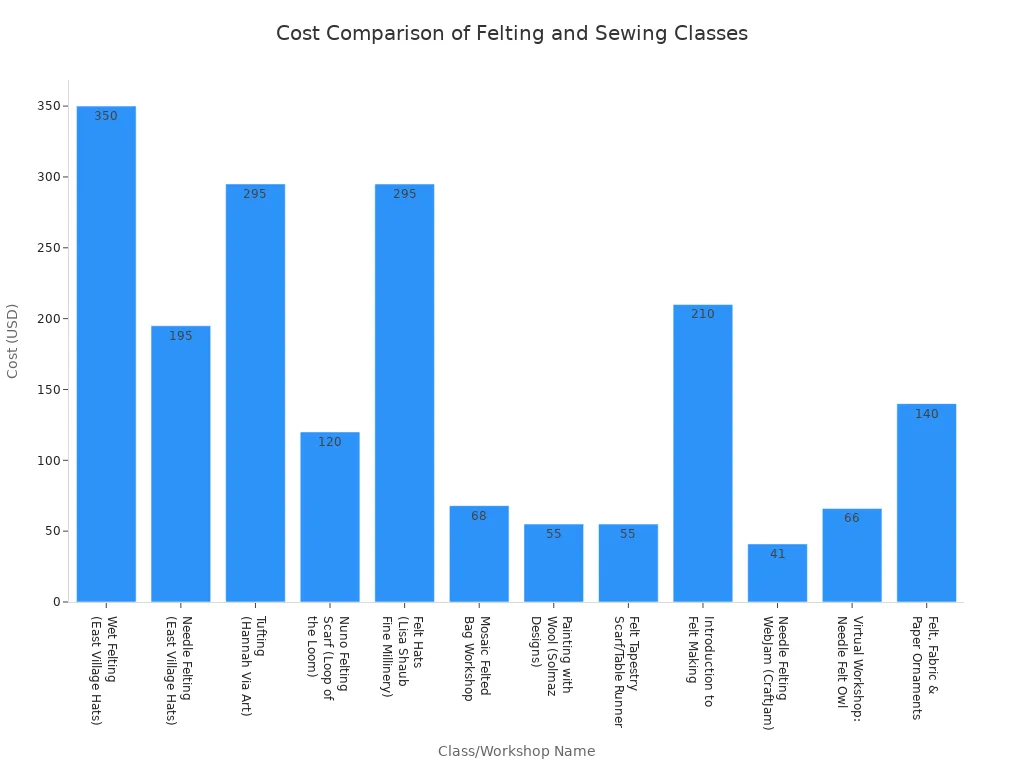
Here’s a quick look at some class options and costs:
Location |
Class/Workshop Name |
Format |
Cost |
Materials Provided/Notes |
|---|---|---|---|---|
New York City |
Needle Felting (East Village Hats) |
In-person |
$195 |
Materials supplied, beginner-friendly |
Online |
Needle Felting WebJam (CraftJam) |
Virtual live |
$41 |
Starter kit included |
Los Angeles |
Painting with Wool (Solmaz Designs) |
In-person |
$55 |
- |
Boston |
Introduction to Felt Making |
In-person |
$210 |
Eight-session course |
Online |
Felt, Fabric & Paper Ornaments |
Virtual live |
$140 |
Requires internet and device |
Tools and Materials
For felting stuffed animals, I keep my toolkit simple. I use barbed needles, a felting pad, and wool fibers. Sometimes, I add a needle handle or finger protectors for safety. If I want to work faster, I use a multi-needle tool. I buy wool in different colors and types, like Corriedale or Merino. I also like to use prefelt for details. Needle felting kits are great for beginners because they include everything I need to start.
When I sew, I need a few more supplies. I use fabric scissors, pins, a sewing machine or needle and thread, and embroidery floss for details. I also use high-quality fabrics for the body and polyfill for stuffing. For felt crafts, I like Aleene’s tacky glue or a hot glue gun to attach small pieces. I always keep extra needles and some glue handy for repairs or adding decorations.
If you’re wondering how to stuff felt or how to stuff felt ornaments, I usually use small bits of wool or polyfill. I push the stuffing into the shape with a chopstick or pencil, making sure it fills all the corners. This helps the animal keep its shape and feel soft.
Time Investment
The time I spend on felting stuffed animals depends on the project. Simple shapes, like a felt ball or a tiny animal, take me about 10–20 minutes. When I work on a detailed pet portrait or a realistic animal, I might spend several days or even up to twelve days. I like to start with easy projects and move on to more complex ones as I get better.
Sewing stuffed animals can also take a while, but I find that once I get the hang of it, I can finish a basic plushie in a few hours. Cutting out the pattern, sewing the pieces, and stuffing plushies all take time. If I add embroidery or special details, it takes longer. I always remind myself to be patient and enjoy the process.
Customization
I love how both methods let me get creative, but felting stuffed animals gives me more freedom to sculpt and shape. With needle felting, I can build up wool in layers, add tiny details, and even use pipe cleaners or wire to make bendable parts. I can attach eyes, paw pads, or other features by poking in small bits of wool or embroidering right onto the felt. This lets me make animals with lots of personality and unique shapes. If you want to know how to stuff felt or stuff felt ornaments with special shapes, needle felting is perfect for that.
Sewing is great for making plushies with clean lines and classic shapes. I can choose from lots of fabrics and patterns. I can add details with embroidery, felt pieces, or fabric paint. While sewing doesn’t let me sculpt the body as much as felting, I can still make each animal special by picking fun fabrics and adding personal touches.
Brands like Pawimprint show just how creative needle felting can be. Their custom wool felt portraits and keepsakes capture the spirit of each pet, turning memories into art. I find this kind of customization inspiring, and it makes me want to try new ideas with my own projects.
Best Fabric for Plushies
Wool Felt
When I make plushies, I always want the best fabric. Wool felt is my favorite. It is made from real wool fibers. This makes it feel warm and thick. Wool felt keeps its shape and stays soft for a long time. It is also good for the planet because it breaks down naturally. I feel proud using it for crafts. I have made finger puppets and peg dolls with Holland wool felt. They still look nice after lots of play.
Here’s a table that shows how wool felt and acrylic felt are different:
Feature |
Wool Felt |
Acrylic Felt |
|---|---|---|
Origin |
Natural wool fiber |
Synthetic acrylic fibers |
Comfort |
Dense, warm, pleasant texture |
Soft but can feel slippery |
Durability |
Durable, flexible, withstands rough use |
Less durable, prone to tearing |
Skin Sensitivity |
Usually safe, but can irritate some skin |
Non-allergic, better for sensitive skin |
Cost |
More expensive |
Cheaper |
Eco-Friendly |
Yes, biodegradable |
No, not biodegradable |
Wool felt is easy to cut and sew. It holds stitches well for detailed designs. If you want to know how to stuff felt, I use small bits of wool or polyfill. This keeps the plushie soft and cuddly. Wool felt is the best fabric for plushies if you want something special and long-lasting.
Tip: Wool felt is great for soft and strong plushies. It is perfect if you want a natural and classic look.
Other Fabrics
Sometimes I want a different look or feel. I try other high-quality fabrics. There are many choices to pick from! Here is a table I use to compare popular fabrics:
Fabric |
Softness |
Durability |
Pros |
Cons |
|---|---|---|---|---|
Faux Rabbit Fur |
Plush, soft, mimics real fur |
More durable than real fur |
Animal-friendly, easy care, colorful |
Slight hair loss, hand wash only |
PV Fleece |
Soft, fluffy, fine texture |
Durable, resists shrinking |
Non-allergenic, lightweight, colorful |
Less soft than natural fibers |
Crystal Super Soft |
Very soft, short-haired |
Durable, hypoallergenic |
Easy care, machine washable |
Less breathable |
Cotton |
Comfortable, breathable |
Moderate durability |
Hypoallergenic, easy care, affordable |
May shrink or wrinkle |
Velvet |
Very soft, luxurious |
Delicate |
Elegant, warm |
Hard to clean, expensive |
I like PV fleece or crystal super soft for extra snuggly plushies. Synthetic fabrics are easy to clean and come in many colors. But they can get fuzzy or pill over time. Cotton is soft and lets air through, but it might shrink or lose shape after washing.
When I pick the best fabric for plushies, I think about who will use it. For kids with sensitive skin, I choose non-allergenic or natural fabrics. For art pieces, I use high-quality fabrics that show details. I always want my plushies to be soft and strong so they last a long time.
Choosing the Right Method
For Beginners
When I started making stuffed animals, I wanted something easy and fun. Sewing felt plushies felt less scary because I only needed to learn the running stitch. Felt does not fray, so I did not have to worry about fancy edges. My first plushies looked cute, even with simple stitches. Needle felting felt different. I had to learn how to use special barbed needles and poke wool until it held its shape. It took practice to avoid breaking needles or poking my fingers. If you want to see the differences, here is a quick table:
Method |
What You Learn First |
Tools Needed |
Beginner-Friendly? |
|---|---|---|---|
Sewing |
Running stitch |
Needle, thread, scissors |
Yes |
Needle Felting |
Stabbing wool with needle |
Felting needle, wool, pad |
Yes, with care |
Tip: Sewing felt plushies is a great way to start if you want quick results and simple tools.
For Kids
I always think about safety when kids want to craft. Sewing works well for older kids because felt is easy to sew and does not stretch. I use strong thread and avoid small parts like buttons. For younger kids, I pick simple shapes and embroider faces instead of using plastic eyes. Needle felting uses sharp needles, so I only let older kids try it with supervision. Here are some safety tips I follow:
Use strong thread to keep stuffing inside.
Avoid small parts that could be choking hazards.
Stick to simple shapes for younger children.
Always supervise needle felting.
For Art Pieces
When I want to make something special for display, I reach for needle felting. This method lets me sculpt wool into detailed shapes and add tiny features. I can create lifelike animal portraits or unique art pieces. Wool felt works best because it holds its shape and does not fray. I have seen amazing pet replicas made with needle felting that sewing just cannot match. If I want a flat art piece, I use wool felt as a base and build up the design with colored wool.
For Play
If I make toys for play, I choose sewing most of the time. Sewn plushies with firm stuffing and non-stretch fabric hold up to hugs and rough play. I use wool felt or sturdy fleece for extra strength. Needle felted animals look cute, but they can lose shape if squeezed too much. For toys that need to last, sewing gives me the best results.
Note: Firm stuffing and strong seams help plushies survive lots of playtime!
Pros and Cons
Needle Felting
When I work with needle felting, I love how creative I can get with shapes and textures. Wool is my favorite fiber because it felts easily and comes in so many colors. Specialty fibers like alpaca or mohair add cool textures, but they cost more and can be tricky for beginners. Here’s a quick look at the pros and cons of different fibers I’ve tried:
Fiber Type |
Advantages |
Disadvantages |
|---|---|---|
Wool (Merino, Corriedale) |
Felts easily, lots of colors, warm, versatile |
Sometimes has a sheep smell, pricier |
Specialty Animal Fibers |
Unique textures, adds personality |
Expensive, harder to felt |
Synthetic Fibers |
Cheap, bright colors, moth-resistant |
Stiff, not eco-friendly, hard to felt |
Plant Fibers |
Eco-friendly, special properties, affordable |
Weak felting, fewer color choices |
Wool works best for most of my projects. It’s easy to shape and holds together well. Specialty fibers look amazing in art pieces, but I save them for when I want something extra special. Sometimes, synthetic or plant fibers just don’t felt as well, so I stick with wool when I want a smooth experience.
Tip: If you’re just starting out, try wool first. It’s forgiving and makes learning needle felting much easier!
Sewing
Sewing stuffed animals gives me lots of control over the final look and feel. I can pick different fabrics, use strong stitches, and stuff my plushies just right. Here’s what I’ve learned about the pros and cons of sewing:
Sewing lets me make strong seams, which keeps my plushies safe and long-lasting.
Using a backstitch makes the seam super strong, but it takes more time.
Overlock stitches stop fabric from fraying, but they aren’t always strong enough for heavy use.
Blind stitches hide the seam, which looks nice, but I don’t use them for parts that get squeezed a lot.
If I sew the head and body together in one piece, it’s easier, but sometimes the neck gets floppy.
When I sew the head and body separately, my plushies look more realistic and hold their shape better.
Stuffing is important! I add stuffing slowly and use strong thread so my animals keep their shape and don’t get lumpy.
Sewing gives me lots of options, but I need to pay attention to my stitches and how I put the pieces together. With practice, I can make plushies that look great and last a long time.
Note: The right stitch and stuffing make all the difference for a sturdy, huggable plushie!
I think the best way to make stuffed animals depends on what you want. Beginners might like sewing for simple plushies. Needle felting works great for detailed art. Kids love soft, sturdy toys. I get inspired by brands like Pawimprint, who use creative packaging and custom touches:
Fun “Sleeping Bag” or “Candy” wraps add personality.
Personalized labels and decorations make gifts special.
Balloon or vacuum wrapping turns unboxing into an adventure.
Try both methods or pick the one that excites you most!
FAQ
How do I fix a mistake in needle felting?
I pull off the wool gently and add new fibers. I poke the area again with my needle until it looks right.
What is the best stuffing for plushies?
I like using polyfill for soft plushies. Wool roving works well for firmer shapes. Both keep my stuffed animals cuddly and full.
Can I combine sewing and needle felting in one project?
Absolutely! I sew the main body, then add felted details like ears or noses. This mix gives my plushies extra personality and texture.
Tip: Mixing both methods lets me get creative with textures and shapes!