
How to Start Needle Felting for Beginners in 2025

You can start needle felting with just a few simple supplies, even if you are an absolute beginner. If you wonder how to needle felt for beginners, try this easy process:
Tear off a piece of wool roving and roll it into a ball.
Use a barbed felting needle to poke the wool, shaping as you go.
Work on a felting surface to protect your fingers.
Keep turning your shape and use short stabbing motions.
Take your time and enjoy learning this relaxing craft.
Needle felting is a fun way for beginners to create cute projects. If you want the best advice for complete beginners, try a getting started needle felting course or a getting started video tutorial. You will find so many video tutorials and courses to help you learn how to needle felt.
Key Takeaways
You can start needle felting with a few simple things. You need wool roving, felting needles, and a foam pad. The foam pad keeps your fingers and table safe.
Use short, straight pokes with the barbed needle. This helps shape the wool into animals or other shapes. Turn your project as you work. This makes the felting even.
Always be careful and use finger protectors. Work on something soft and keep your area clean. This helps you not get hurt.
Start with easy projects like small animals. Follow step-by-step guides or watch videos. This will help you learn and feel more sure of yourself.
Join online groups to get help and ideas. Use patterns you can download and watch video lessons. This helps you learn new things and get inspired.
Needle Felting Basics
What is Needle Felting?
Needle felting is a craft where you use special needles to shape wool. You start with soft wool called wool roving or batting. You poke the wool many times with a felting needle. This makes the fibers tangle and stick together. The wool gets firmer as you keep poking it. You can make almost any shape you want.
Some important things about needle felting are:
You use barbed needles to lock the wool fibers together.
Wool is the main thing you use, and different kinds feel different.
Felting needles come in different sizes for shaping and details.
A foam pad or cushion keeps your table and needles safe.
You can add things like eyes, fur, or patterns with extra tools.
The steps are easy, but you need time and practice.
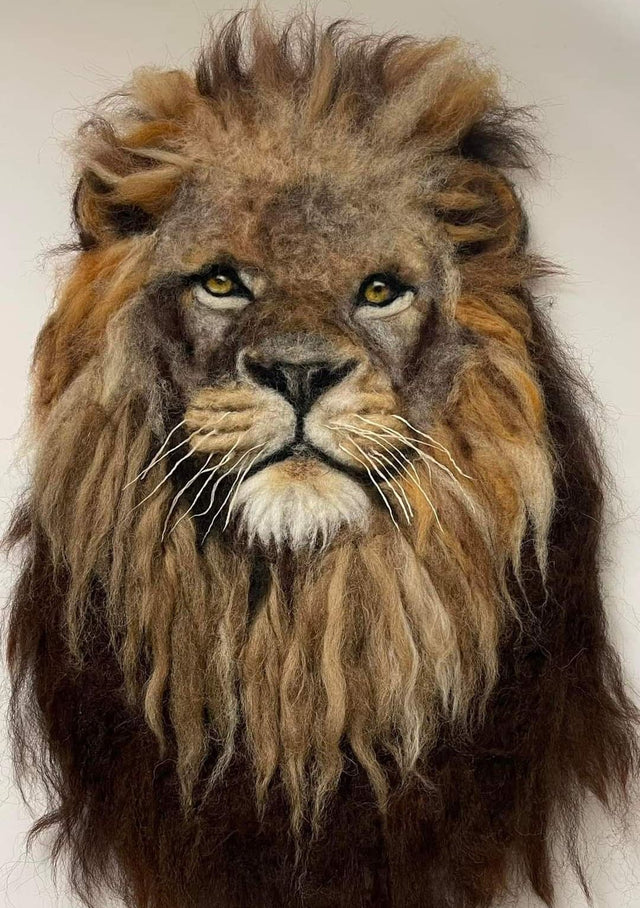
You can make many things with needle felting. Many people like to make small animals. Tiny dogs, cats, and wild animals are favorites. If you want ideas, look at Pawimprint’s custom wool felt portraits. These show how real and detailed your work can look with practice and good technique.
Why Try Needle Felting?
Needle felting is great for beginners because you only need a few things. Starter kits are cheap and have everything you need. You do not have to buy lots of supplies. It is easy to learn, and you can start with simple shapes or small animals.
Many people think needle felting is relaxing. The poking motion helps you feel calm after a busy day. You can watch a basic instruction video or join a class to learn more. There are many online groups where you can share your work and ask questions.
Needle felted animals are very popular now. Artists and social media have made them a big trend. People love to make and collect these cute animals. You can even take a class to learn how to make your favorite animal. Each project teaches you something new and shows how fun this craft is. If you want to make a special gift, Pawimprint’s custom wool felt portraits are a great example of what you can do when you learn the basics.
Tip: Try making a simple animal, like a cat or bear. Follow a step-by-step class. You will be surprised by what you can make with some practice!
Tools and Materials
Essential Supplies
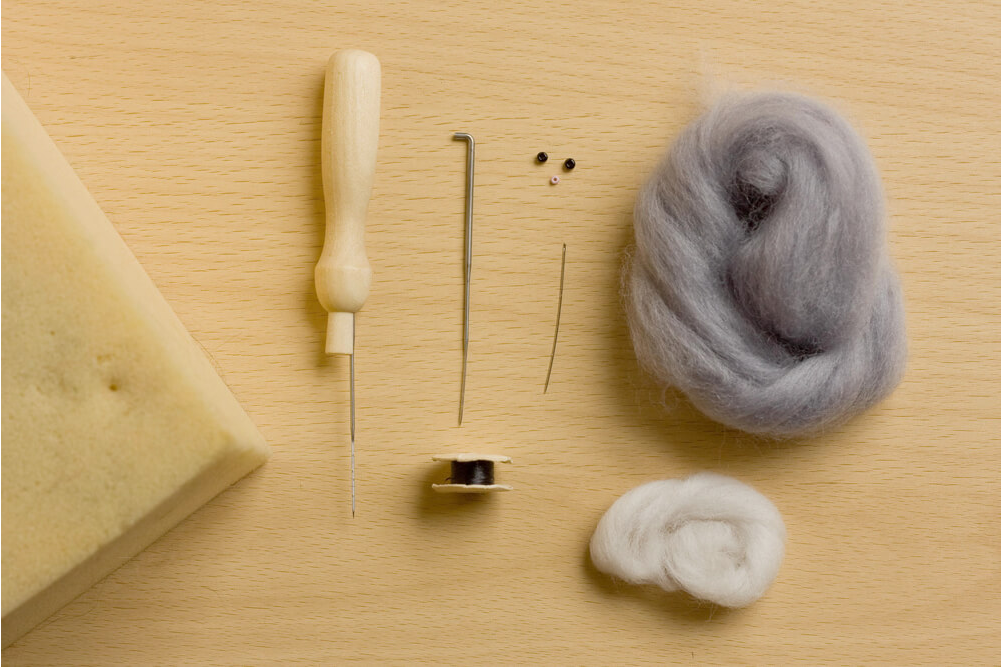
You do not need a lot of fancy tools to start needle felting. Most beginners can get started with just a few basic materials. Here is what you need:
Felting needles in different sizes, like 36, 38, and 40 gauge. Each size helps you shape and add details to your wool.
Wool roving or batting. Corriedale and Romney wool are great choices because they are easy to felt and come in many colors.
A felting mat or foam pad. This protects your table and keeps your felting needle from breaking.
Finger protectors. These help keep your fingers safe from sharp needles.
Scissors and a needle holder. These make your work easier and more comfortable.
Most of these materials are easy to find online or at craft stores. You can organize your supplies in small containers to keep everything neat. The average cost for a starter kit with these items is about $25 to $30. If you want to know how to needle felt safely, always poke your felting needle straight up and down.
Tip: Always use a soft surface like a foam pad to protect your workspace and your needles.
Choosing Beginner Kits
If you want to skip the guesswork, try a beginner needle felting kit. These kits include all the supplies and steps you need to start your first projects. Look for kits that have:
Several felting needles, including different gauges
A foam pad or felting mat
Step-by-step instructions or a beginner’s guide
Finger guards for safety
Basic shapes or molds to help you make animals
Storage containers for your materials
Fun extras like glass eyes or wire armatures
Some of the most popular kits for beginners in 2025 are the Woolbuddy Beginner Needle Felting Kit, Felted Sky Starter Kit, Maydear Felting Kit for Beginners, and The Woolery Needle Felting Starter Kit. These kits get great reviews for their clear instructions and cute animal projects. The Woolery kit even comes with a booklet full of photos and tips, making it a top pick for anyone learning how to needle felt.
When you choose a kit, think about what animals or projects you want to make. Some kits focus on needle felted animals, while others let you try landscapes or pet portraits. If you want inspiration for future projects, check out Pawimprint’s custom wool felt portraits. These show how creative you can get once you learn the basics of this beginner-friendly craft.
How to Needle Felt Safely
Safety Tips
Needle felting is fun, but you need to stay safe. Felting needles are very sharp, so you should always pay attention to your hands and workspace. Here are some simple safety tips to follow every time you practice how to needle felt:
Wear finger protectors or thimbles to keep your fingers safe from needle pricks.
Hold your project with a gentle grip. This helps you avoid hand strain and keeps your joints comfortable.
Use a good needle holder for better control. This makes it easier to poke the wool without slipping.
Always poke the needle straight up and down. Keep it at a 90-degree angle to the surface to prevent breaking.
Take breaks often. Stretch your hands and rest your eyes to avoid cramps and fatigue.
Never needle felt while distracted. Listening to music or a podcast is fine, but watching TV can make you lose focus.
Store your needles in a safe container when you finish. This keeps them sharp and prevents accidents.
Keep your workspace tidy. Put away sharp tools and small parts, especially if you have kids or pets nearby.
Tip: The best advice for complete beginners is to practice good habits from the start. Pay attention to how you hold the needle and where your fingers are at all times.
Some common injuries include finger pricks and hand strain. You can prevent these by using ergonomic tools, taking breaks, and doing gentle hand exercises before you start. If you ever feel discomfort, stop and stretch your hands.
Workspace Setup
A safe and cozy workspace makes learning how to needle felt much easier. You do not need a big room, but you should have a flat, stable surface and good lighting. Here are some ways to set up your space:
Use a felting mat or foam pad to protect your table and your hands.
Organize your wool and tools in bins or boxes. This keeps everything easy to find and safe from pets.
Store your needles in a needle case to prevent them from breaking or getting lost.
Choose a comfortable chair and make sure you sit with good posture.
Keep your area clutter-free. A tidy space helps you focus and prevents accidents.
Hang your finished projects on the wall for inspiration.
Add a small lamp if your room is dark. Good light helps you see details and avoid mistakes.
Note: One of the most important needle felting dos and don’ts is to never felt on your lap or body. Always use a proper mat or pad.
When you know how to needle felt safely, you can enjoy your projects without worry. A good setup and safe habits help you create beautiful things and have fun at the same time.
How to Make Needle Felted Animals

Beginner Project Steps
Ready to try your first animal? Let’s walk through how to make needle felted animals using a simple step by step tutorial. You can start with a basic animal like a sheep, penguin, or even a tiny bear. These animals are perfect for beginners and help you learn how to needle felt a simple shape.
Here’s how to make needle felted animals, step by step:
Gather your supplies. You’ll need a felting pad, felting needles (start with a 36 or 38 gauge), wool roving (try Corriedale or Romney), pipe cleaners, scissors, and craft eyes or beads.
Shape the core. Roll a piece of wool into a ball or oval for the animal’s body. Use your needle to poke the wool, turning it as you go. This helps you learn how to needle felt a simple shape.
Make the head and snout. Wrap wool around a pipe cleaner or shape it by hand. Use your needle to sculpt the head and snout. Attach the head to the body by poking the wool where they meet.
Add limbs and tail. For legs and tails, wrap wool around pipe cleaners. Felt them until they are firm, then attach them to the body with your needle.
Create ears and paws. Shape small pieces of wool for ears and paws. Attach them by felting them onto the head and body.
Add eyes and details. Use beads, craft eyes, or small bits of black wool for the eyes. Felt them in place. Add a nose, mouth, and any markings with colored wool.
Finish and smooth. Go over your animal with a fine needle to smooth out the surface. Trim any loose fibers for a neat look.
Tip: Start with easy animals like a snowman, sheep, or penguin. These projects help you practice how to needle felt for beginners and build your confidence.
If you want more guidance, look for a course or a video that shows each step. Many tutorials break down the process so you can follow along at your own pace.
Tips for Success
You might wonder how to make needle felted animals that look cute and finished. Here are some tips and techniques to help you succeed with your projects:
Use the right wool. Choose coarser wool like Corriedale or Romney for the core. Save softer, colored wool for the outer layer.
Pick the right needle. Start with a coarse needle for shaping. Switch to a fine needle for details and smoothing.
Work on a cushion. Always use a felting mat or foam pad. This protects your fingers and helps you shape your animals safely.
Build shapes slowly. Add small amounts of wool at a time. It’s easier to add more than to take it away.
Layer colors. To add depth, layer different shades of wool. This makes your animals look more realistic.
Use reference photos. Look at pictures of real animals to get the shapes and colors right.
Try wire armatures. For animals that stand or pose, wrap wool around pipe cleaners or craft wire.
Add details last. Save small features like eyes, noses, and markings for the end. Use a fine needle for these parts.
Take breaks. Needle felting takes time. Rest your hands and eyes so you don’t get tired or make mistakes.
Here’s a table of common mistakes and how to avoid them:
Common Mistake |
How to Avoid It |
|---|---|
Not using a felting cushion |
Always work on a mat or pad to protect your hands and project. |
Stabbing the needle too deep |
Use short, quick pokes. The barbs are near the tip of the needle. |
Using the wrong size needle |
Start with a 36 or 38 gauge for shaping, then use a finer needle for details. |
Felting with the wrong wool |
Use Corriedale, Romney, or Shetland wool for best results. |
Breaking needles |
Keep your needle straight and avoid sideways pressure. |
Using too much or too little wool |
Start with less wool and add more as needed. |
Being impatient |
Take your time. Needle felting is a slow, relaxing craft. |
Note: If you want to improve fast, try a course or follow a step by step tutorial. Many artists share free tutorials and video guides online. These resources show you how to needle felt, shape animals, and add details.
Downloadable patterns and video tutorials make learning much easier. You can pause, rewind, and watch techniques as many times as you need. Many beginners find that following a course or a video helps them avoid mistakes and finish their projects with confidence.
If you want to see what’s possible as you get better, check out Pawimprint’s custom pet keepsakes. Their artists use advanced techniques to craft needle felted animals that look just like real pets. These keepsakes show how far you can go with practice and creativity.
Remember: Every animal you make teaches you something new. Enjoy the process, try new projects, and don’t worry about making mistakes. That’s how you learn how to needle felt and create animals you’ll love.
Needle Felting Video Tutorials & Resources
Best Video Tutorials
There are lots of needle felting video tutorials online. These videos help you learn, even if you are new. You can find beginner tutorials on YouTube and in online courses. Felting and Fiber Studio has online classes with small groups. You get step-by-step videos, PDFs, and help from tutors. This lets you learn slowly and feel part of a group.
Many beginners like channels such as Hawthorn Handmade, LivingFelt, and Sarafina Fiber Art. These channels have easy mini tutorials and beginner projects. You can watch how to make shapes, animals, and more. The Funky Felter blog also likes these channels for their clear lessons and friendly teachers. Teresa Perleberg’s Needle Felting Academy is a good place to start. She teaches basic skills and helps you pick the right tools.
Downloadable Patterns
Downloadable patterns make needle felting much easier. You can print templates that show the shapes and sizes you need. This helps your animal look just right. Bear Creek Felting has good patterns and kits for beginners. Each kit has step-by-step instructions and clear photos. You get the right wool and needles, so you do not have to guess.
Printable templates save time and help you avoid mistakes. Many craft blogs and sites share free patterns. These resources let you learn new skills and try different animals. Tutorials with templates guide you through each step. You can work at your own speed and read tips from other crafters.
Some brands, like Pawimprint, do even more. They let you help design pet keepsakes and share progress videos with you. Watching these videos gives you ideas and shows what you can do as you get better.
Note: Joining online groups or forums helps you meet other beginners. You can share your work, ask questions, and get advice from people who love needle felting.
You can try your first project today and learn how to needle felt. Everyone starts as a beginner and gets better with practice. Many artists say they made mistakes at first. Their first projects did not look perfect. Over time, their skills improved a lot. Making things by hand helps you feel calm and proud. Try easy projects and watch tutorials to help you learn. You can also look at keepsakes from Pawimprint for ideas. Be patient and have fun as you create. Let your creativity show in every project!
FAQ
How long does it take to finish a needle felting project?
You can finish a small animal in about 1 to 2 hours. Bigger projects might take a few days. Take your time and enjoy each step. You will get faster as you practice.
What should I do if I break a felting needle?
Don’t worry! Broken needles happen to everyone. Just grab a new needle and keep going. Always poke straight up and down to help prevent breaks. Store extra needles in a safe spot.
Can kids try needle felting?
Yes, kids can try needle felting with adult supervision. The needles are sharp, so safety comes first. Use finger guards and work slowly. Many kits are made for beginners and younger crafters.
How do I fix mistakes in my project?
If you add too much wool, pull some off and felt again. If your shape looks wrong, add more wool or poke it into place. Mistakes help you learn. Every project gets better with practice!
Where can I find more ideas for needle felting?
You can find ideas on YouTube, Pinterest, and craft blogs. Many artists share free patterns and video tutorials. For inspiration, check out Pawimprint’s custom wool felt portraits and keepsakes. These show what you can create as you learn new skills.